Now you can test your Mobile Web Apps with WebDriver

Mobile testing has come a long way since the days when testing mobile web applications was mostly manual and took days to complete. Selenium WebDriver is a browser automation tool that provides an elegant way of testing web applications. WebDriver makes it easy to write automated tests that ensure your site works correctly when viewed from an Android or iOS browser.

For those of you new to WebDriver, here are a few basics about how it helps you test your web application. WebDriver tests are end-to-end tests that exercise a web application just like a real user would. There is a comprehensive user guide on the Selenium site that covers the core APIs.

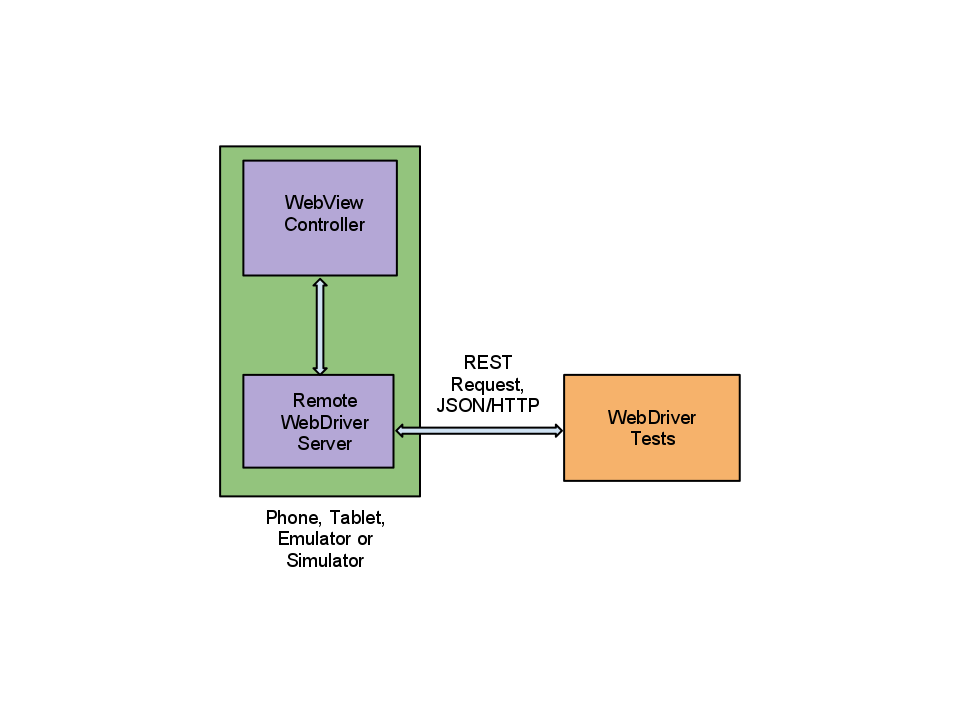
Now let’s talk about mobile! WebDriver provides a touch API that allows the test to interact with the web page through finger taps, flicks, finger scrolls, and long presses. It can rotate the display and provides a friendly API to interact with HTML5 features such as local storage, session storage and application cache. Mobile WebDrivers use the remote WebDriver server, following a client/server architecture. The client piece consists of the test code, while the server piece is the application that is installed on the device.

Get Started


WebDriver for Android and iPhone can be installed following these instructions. Once you’ve done that, you will be ready to write tests. Let’s start with a basic example using www.google.com to give you a taste of what’s possible.

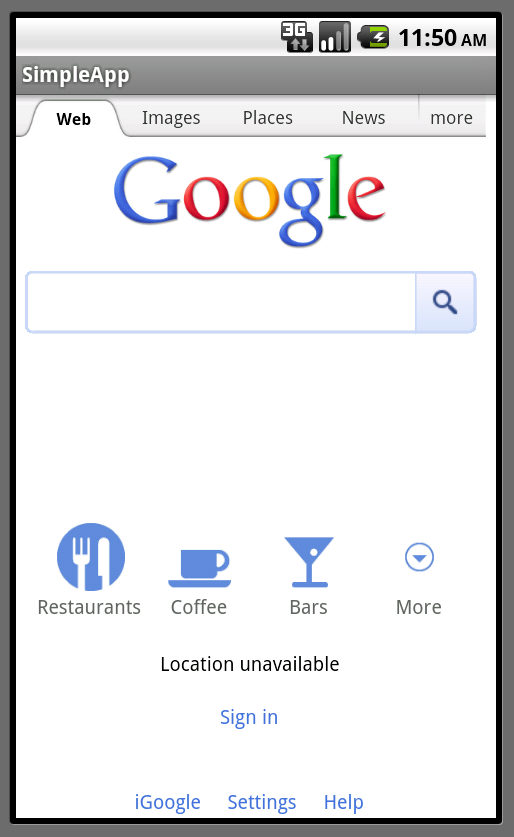
The test below opens www.google.com on Android and issues a query for “weather in san francisco”. The test will verify that Google returns search results and that the first result returned is giving the weather in San Francisco.

public void testGoogleCanGiveWeatherResults() {
// Create a WebDriver instance with the activity in which we want the test to run.
WebDriver driver = new AndroidDriver(getActivity());
// Let’s open a web page
driver.get(“http://www.google.com”);

// Lookup for the search box by its name
WebElement searchBox = driver.findElement(By.name(“q”));

// Enter a search query and submit
searchBox.sendKeys(“weather in san francisco”);
searchBox.submit();

// Making sure that Google shows 11 results
WebElement resultSection = driver.findElement(By.id(“ires”));
List searchResults = resultSection.findElements(By.tagName(“li”));
assertEquals(11, searchResults.size());

// Let’s ensure that the first result shown is the weather widget
WebElement weatherWidget = searchResults.get(0);
assertTrue(weatherWidget.getText().contains(“Weather for San Francisco, CA”));
}

Now let’s see our test in action! When you launch your test through your favorite IDE or using the command line, WebDriver will bring up a WebView in the foreground allowing you to see your web application as the test code is executing. You will see www.google.com loading, and the search query being typed in the search box.


We mentioned above that the WebDriver supports creating advanced gestures to interact with the device. Let’s use WebDriver to throw an image across the screen by flicking horizontally, and ensure that the next image in the gallery is displayed.

WebElement toFlick = driver.findElement(By.id(“image”));
// 400 pixels left at normal speed
Action flick = getBuilder(driver).flick(toFlick, 0, -400, FlickAction.SPEED_NORMAL)
.build();
flick.perform();
WebElement secondImage = driver.findElement(“secondImage”);
assertTrue(secondImage.isDisplayed());

Next, let’s rotate the screen and ensure that the image displayed on screen is resized.


assertEquals(landscapeSize, secondImage.getSize())
((Rotatable) driver).rotate(ScreenOrientation.PORTRAIT);
assertEquals(portraitSize, secondImage.getSize());

Let’s take a look at the local storage on the device, and ensure that the web application has set some key/value pairs.


// Get a handle on the local storage object
LocalStorage local = ((WebStorage) driver).getLocalStorage();
// Ensure that the key “name” is mapped
assertEquals(“testUser”, local.getItem(“name”));

What if your test reveals a bug? You can easily take a screenshot for help in future debugging:


File tempFile = ((TakesScreenshot) driver).getScreenshotAs(OutputType.FILE);

High Level Architecture

WebDriver has two main components: the server and the tests themselves. The server is an application that runs on the phone, tablet, emulator, or simulator and listens for incoming requests. It runs the tests against a WebView (the rendering component of mobile Android and iOS) configured like the browsers. Your tests run on the client side, and can be written in any languages supported by WebDriver, including Java and Python. The WebDriver tests communicate with the server by sending RESTful JSON requests over HTTP. The tests and server pieces don’t have to be on the same physical machine, although they can be. For Android you can also run the tests using the Android test framework instead of the remote WebDriver server.

Infrastructure Setup

At Google, we have wired WebDriver tests to our cloud infrastructure allowing those tests to run at scale and making it possible to have them run in our continuous integration system. External developers can run their mobile tests either on emulators/simulators or real devices for Android and iOS phones and tablets.
Android emulators can run on most OSes because they are virtualized, so we run them on our generic cloud setup. Though there are many advantages to using Android emulators because they emulate a complete virtual device (including the virtual CPU, MMU, and hardware devices), it makes the test environment slower. You can speed up the tests by disabling animations, audio, skins, or even by running in the emulator headless mode. To do so, start the emulator with the options –no-boot-anim, –no-audio, –noskin, and –no-window. If you would like your tests to run even faster, start the emulator from a previously created snapshot image. That reduces the emulator startup time from 2 minutes to less than 2 seconds!
iOS simulators can’t be virtualized and hence need to run on Mac machines. However, because iOS simulators don’t try to emulate the virtual device or CPU at all, they can run as applications at “full speed,” this allows the test to run much faster.
Stay tuned for more mobile feature in Selenium WebDriver, and updates on the Selenium blog.

Ice Cream Sandwich on the Galaxy Nexus

Beaming a video with a single tap or unlocking a device with only a smile sounds like science fiction. Now, you can actually do these things (and more) with a phone that fits in the palm of your hand.

Wednesday morning in Hong Kong—together with Samsung—we unveiled Galaxy Nexus, the first phone designed for the latest release of Android 4.0, also known as Ice Cream Sandwich.

With a super slim profile, Galaxy Nexus features a 4.65” Contour Display with true high definition (720p) resolution and a lightning-fast dual core 1.2ghz processor combined with 4G LTE or HSPA+ technology. Galaxy Nexus also features the latest in software: Ice Cream Sandwich makes Android simple and beautiful, and takes the smartphone to beyond smart.

Beauty and simplicity
With Ice Cream Sandwich, our mission was to build a mobile OS that works on both phones and tablets, and to make the power of Android enticing and intuitive. We created a new font that’s optimized for HD displays and eliminated all hardware buttons in favor of adaptable software buttons. We also dramatically improved the keyboard, made notifications more interactive and created resizable widgets.

The desktop-class browser is significantly faster, featuring a refined tab manager and the ability to sync your bookmarks with Google Chrome. Ice Cream Sandwich also features the best mobile Gmail experience to date, with a new design that lets you quickly swipe through your inbox and search messages even when you’re offline. Calendar boasts a clean new look and you can zoom into your schedule with a pinch.

Connect and share
People are at the heart of Ice Cream Sandwich. We rethought how you browse your contacts with the new People app, which combines high-resolution photos and updates from Google+ and other social services. It’s also easier to capture and share your life with family and friends. Galaxy Nexus sports a high-end camera with zero shutter lag, automatic focus, top notch low-light performance and a simple way to capture panoramic pictures. Shoot amazing photos or 1080p video, and then edit and share them directly from your phone.

Beyond smart
Galaxy Nexus isn’t just a smartphone—it’s beyond smart. Ice Cream Sandwich gives you complete control over the amount of mobile data you use by helping you better understand and manage it. We’re also introducing Android Beam, which uses near field communication (NFC) to instantly share webpages, YouTube videos, maps, directions and apps by simply tapping two phones together. Face Unlock uses state-of-the-art facial recognition technology to unlock your phone with nothing more than a smile.

This weekend marks the third birthday of the G1, the first-ever Android phone. Nine releases later, more than 550,000 Android devices are activated daily.

Starting in November, Galaxy Nexus will be available in the United States, Canada, Europe and Asia. Check out the Nexus website for a product tour and more info.

The Changes to OAuth 2.0 endpoint


In the coming weeks we will be making three changes to the experimental OAuth 2.0 endpoint. We expect the impact to be minimal, and we’re emailing developers who are most likely to be affected.

We will be releasing these changes on November 15, 2011. This post describes the changes, their impact, and how they can be mitigated.

Change #1: Error responses for client-side web applications

The first change relates to the way errors are returned in OAuth 2.0 client-side web applications. It does not impact server-side, native, or device flows.

The current behavior of the OAuth 2.0 endpoint in certain error conditions is to return the error to the application as a query string parameter, for example:

https://www.example.com/back?error=access_denied.

The OAuth 2.0 specification indicates that the error should be returned in the fragment of the response. We are updating our OAuth 2.0 implementation to support the most recent draft of the specification. As a result, we will be changing the way we return errors to applications in the client-side flow.

As an example, today an error returns to your application as

https://www.example.com/back?error=access_denied. After this change, it will be returned as

https://www.example.com/back#error=access_denied.

There is no mitigation for this change, so your application will have to handle these types of errors in client-side script.

Change #2: Offline access as a separate parameter

The second change impacts the OAuth 2.0 server-side flow only. It does not impact client-side, native, or device flows. For context, this flow consists of the following steps:

  1. Redirect the browser to the Google OAuth 2.0 endpoint.
  2. The user will be shown a consent page.
  3. If the user consents, parse the authorization code from the query string of the response.
  4. Exchange the authorization code for a short-lived access token and a long-lived refresh token.

Once your application has obtained a long-lived refresh token (step 4), it may access a Google API at any time. This means server-side applications do not require the end-user to be present when obtaining new access tokens. We’re calling this type of access offline.

The client-side flow, in contrast, requires the user to be present when obtaining an access token. This type of access is called online.

With this change, we will be exposing online and offline access as a separate parameter that’s available only in the server-side flow.

When your application requests offline access, the consent page shown to a user will reflect that your application requests offline access and your application will receive an access and a refresh token. Once your application has a refresh token, it may obtain a new access token at any time.

When your application requests online access, your application will only receive an access token. No refresh token will be returned. This means that a user must be present in order for your application to obtain a new access token.

If unspecified in the request, online is the default.

A mitigation for this change is described at the end of this post.

Change #3: Server-side auto-approval

This change also impacts the OAuth 2.0 server-side flow only.

In the current implementation of OAuth2, every time your application redirects a user to Google, that user must give explicit consent before an authorization code is given to your application. As a result, sending a user through the flow another time requires them to see the consent screen again. Most applications don’t do this, but rather use the existing server-side flow as it was intended: a one-time association (import contacts, calendar operations, etc.) where the result is a refresh token which may be used to obtain new access tokens.

The behavior is changing to the following:

  • Users will only see the consent screen on their first time through the sequence.
  • If the application requests offline access, only the first authorization code exchange results in a refresh token.

To put it another way, consent will be auto-approved for returning users unless the user has revoked access. Refresh tokens are not returned for responses that were auto-approved.

The next section describes how to mitigate this change.

Mitigation of offline access (#2) and auto-approval (#3) changes

If you want to keep the existing behavior in your server-side applications, include the approval_prompt=force and access_type=offline parameters in an authorization code request.

For example, if the following is a target URL for obtaining an authorization code today:

https://accounts.google.com/o/oauth2/auth?
client_id=21302922996.apps.googleusercontent.com&
redirect_uri=https://www.example.com/back&
scope=https://www.google.com/m8/feeds/&
response_type=code

You can maintain the current behavior by changing the target URL to:

https://accounts.google.com/o/oauth2/auth?
client_id=21302922996.apps.googleusercontent.com&
redirect_uri=https://www.example.com/back&
scope=https://www.google.com/m8/feeds/&
response_type=code&
access_type=offline&
approval_prompt=force

You may start including these parameters in authorization code requests today.