Updating all signatures to make them adopt the same visually appealing style sounds like a perfect task to automate, however we’d still need to collect various pieces of information for each user, such as phone number or job title, and the Email Settings API has no knowledge of them.
The Google Apps Profiles API provides exactly what we are looking for and in the rest of this article we’ll see how to have the two APIs interact to reach our goal.
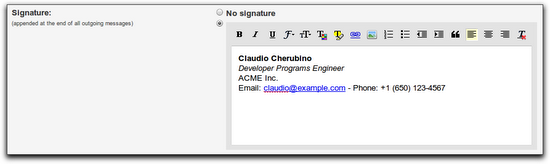
Let’s assume we want our signatures to look like the one in the screenshot below, with a bold name, italic job title and clickable link for the email address. Of course you can edit the style as you like with a bit of HTML skills:
Python is the programming language of our choice for this small script and we use the Google Data APIs Python Client Library to send requests to the Email Settings and Profiles APIs.
The first few lines of the script import the required libraries and set the values of the credentials that will be used to authorize our requests. You can find the consumer key and secret for your domain in your Control Panel, under Advanced Tools – Manage OAuth domain key. Remember to replace the dummy values in the script below with yours before running it:
import gdata.apps.emailsettings.client

import gdata.contacts.client

# replace these values with yours

CONSUMER_KEY = 'mydomain.com'

CONSUMER_SECRET = 'my_consumer_secret'

company_name = 'ACME Inc.'

admin_username = 'admin'
We’ll use 2-legged OAuth as the authorization mechanism and set the administrator’s email address as the value of the xoauth_requestor_id parameter, identifying the user we are sending the requests on behalf of.
The consumer key and secret plus the requestor id are the only parameters needed to create an OAuth token that we can pass to the Email Settings and Profiles clients:
# request a 2-legged OAuth token

requestor_id = admin_username + '@' + CONSUMER_KEY

two_legged_oauth_token = gdata.gauth.TwoLeggedOAuthHmacToken(

  CONSUMER_KEY, CONSUMER_SECRET, requestor_id)

# Email Settings API client

email_settings_client = gdata.apps.emailsettings.client.EmailSettingsClient(

  domain=CONSUMER_KEY)

email_settings_client.auth_token = two_legged_oauth_token

# User Profiles API client

profiles_client = gdata.contacts.client.ContactsClient(

  domain=CONSUMER_KEY)

profiles_client.auth_token = two_legged_oauth_token
Let’s define a class that generates the signatures for our users on the basis of a set of optional attributes (occupation, phone number, email, etc). This is the class you need to edit or extend if you want to change the style of the signatures for your domain. In the example below, the HtmlSignature() method simply concatenates some strings with hard-coded styling, but you may want to use a more elaborate templating system instead:
# helper class used to build signatures

class SignatureBuilder(object):

def HtmlSignature(self):

  signature = '%s' % self.name

  if self.occupation:

    signature += '%s' % self.occupation

  if self.company:

    signature += '%s' % self.company

  signature += 'Email: %s - Phone: %s' % (

      self.email, self.email, self.phone_number)

  return signature

def __init__(

    self, name, company='', occupation='', email='', phone_number=''):

  self.name = name

  self.company = company

  self.occupation = occupation

  self.email = email

  self.phone_number = phone_number
Let’s use profiles_client to retrieve a feed containing all profiles for the domain. Each call to GetProfilesFeed() only returns a page of users, so we need to follow the next links until we get all users:
# get all user profiles for the domain

profiles = []

feed_uri = profiles_client.GetFeedUri('profiles')

while feed_uri:

  feed = profiles_client.GetProfilesFeed(uri=feed_uri)

  profiles.extend(feed.entry)

  feed_uri = feed.FindNextLink()
At this point profiles will contain the list of users we want to process. For each of them, we instantiate a SignatureBuilder object and set its properties name, company, occupation, email and phone_number with the data for that user.
A call to the HtmlSignature() method of the SignatureBuilder instance will provide us with a properly formatted HTML-encoded signature.
# extract relevant pieces of data for each profile

for entry in profiles:

builder = SignatureBuilder(entry.name.full_name.text)

builder.company = company_name

if entry.occupation:

  builder.occupation = entry.occupation.text

for email in entry.email:

  if email.primary and email.primary == 'true':

    builder.email = email.address

for number in entry.phone_number:

  if number.primary and number.primary == 'true':

    builder.phone_number = number.text

# build the signature

signature = builder.HtmlSignature()
The Email Settings API client exposes a method called UpdateSignature to set the signature for a target user. This methods accepts two parameters, the username of the user to be affected and a string containing the signature. We just built the latter, so we only need the retrieve the unique username that identifies each user and that can be easily inferred from the entry identifier returned by the Profiles API, as described in the code and the comment below.
It is worth mentioning that you can also retrieve usernames with the Provisioning API, but for the sake of simplicity we’ll rely on this small hack:
# entry.id has the following structure:

# http://www.google.com/m8/feeds/profiles/domain/DOMAIN_NAME/full/USERNAME

# the username is the string that follows the last /

username = entry.id.text[entry.id.text.rfind('/')+1:]
It’s time to send the requests to the Email Settings API and update the signature:
# set the user's signature using the Email Settings API

email_settings_client.UpdateSignature(username=username, signature=signature)
For further details on what can be accomplished with the Google Apps APIs, please check our documentation .