The Gnucash mentor students

Gnucash, a free accounting program for Linux, Microsoft Windows, and Apple Macintosh OSX, had its second opportunity to mentor students in the Google Summer of Code program this summer. Two of our three students successfully completed their projects.

Muslim Chochlov wrote unit tests for several critical modules of Gnucash’s core Query Object Framework. This is an important first step to some necessary refactoring of the framework so that Gnucash can move from an in-memory processing model to a transactional database model allowing simultaneous multiple user access.

Nitish Dodagetta extended the experimental Qt GUI “Cutecash” (Gnucash’s primary GUI is Gtk+) by writing a unified accounting transaction entry window. The Gnucash development team is investigating Qt and C++ as a future direction for Gnucash, and this struck a chord for Google Summer of Code students: half of the proposals we received from the student applicants prior to the start of the program were for Cutecash projects.
Overall we were pleased with the progress we made this summer; we found that the successful students leveraged the work of their mentors and moved forward some important aspects of the project. We’re continuing to work with the students this fall, integrating them into the regular development team. Mentoring up-and-coming programmers is very rewarding, and we enjoy encouraging them to use their skills for altruistic goals.

SketchUp: Speed Up Using Fast Styles

You might not realize that the display settings you choose to apply to your models can affect SketchUp’s speed and general responsiveness. Turning on fancy edge effects and other doodads will slow you down when your model gets big.

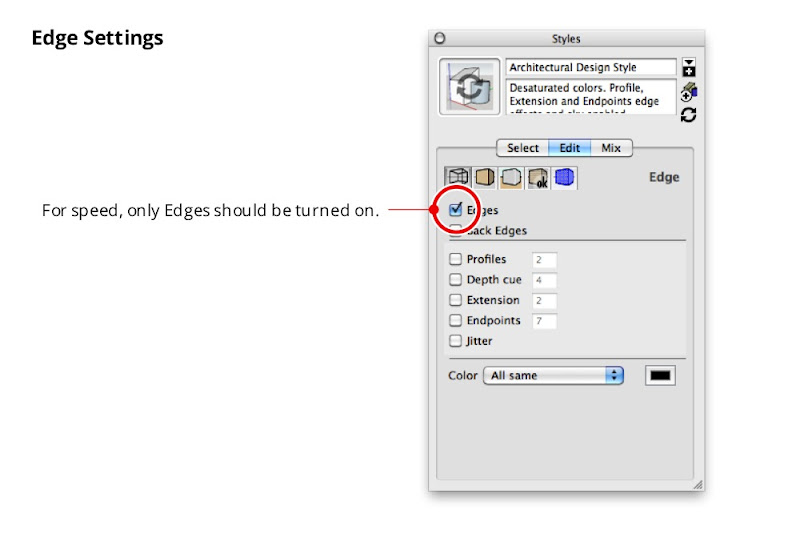
When you’re working on a big model, you want to make sure that you’re using a style whose Edge Settings panel looks like the one in the image below. Everything but “Edges” should be turned off.

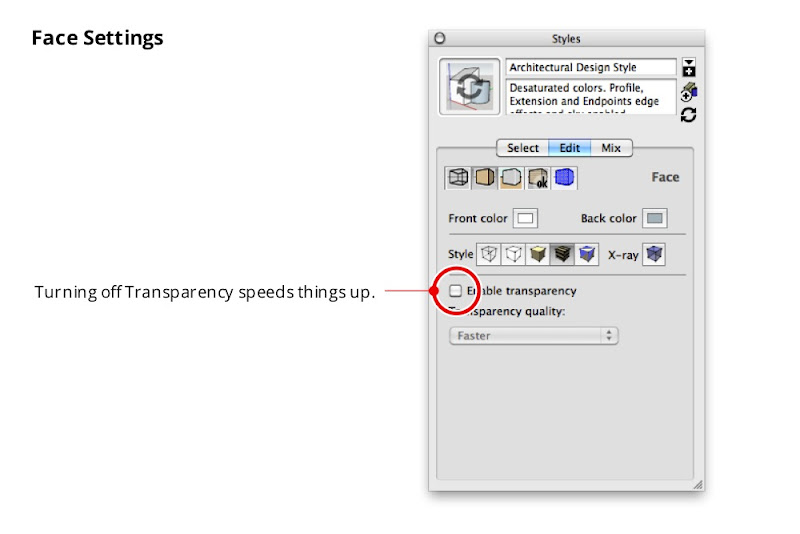
The Face Settings panel is where you can choose not to display Transparency. When Transparency is turned on, SketchUp has to redraw your model on the screen several times—each time you change your viewpoint. If you don’t need to see through your windows just now, opt to temporarily view these faces without transparency.

The Background Settings panel is handy for turning off Sky and Ground, both of which cause your computer to do extra thinking while you’re working.

Unless you absolutely need them, you should use the checkbox in the Watermark Settings panel to turn off Watermarks.

The only toggles in the Modeling Settings panel you really need to worry about are the ones for Hidden Geometry and Section Planes. Obviously, you shouldn’t have wither of these displayed if speed is what you’re aiming for.


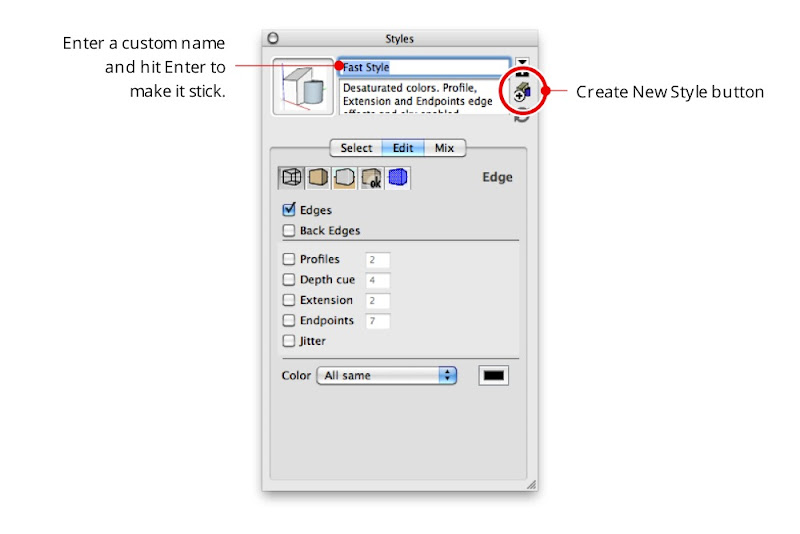
Once you’ve configured your own fast style, you should save it. Just give it a new name (I suggest “Fast Style”), hit Enter, and click the Create New Style button in the Styles Browser. You new style is saved in the “In Model” collection of styles, which is only associated with the model you’re currently working on.

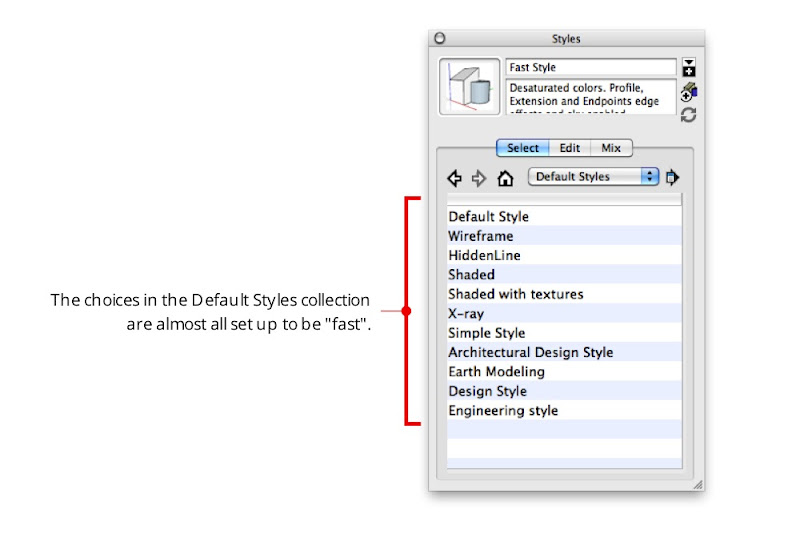
Incidentally, almost all of the choices in SketchUp’s Default Styles collection are so-called “Fast styles” — their Edge Display settings are already configured for speed. Choosing any one of these styles will switch off extraneous effects.

Make a Fast Scene

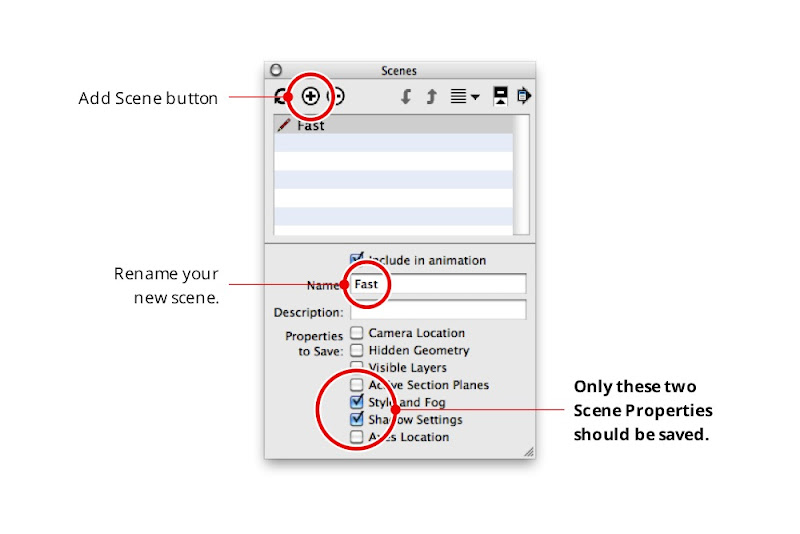
True SketchUp whizzes invariably go one step further and add a special “Fast” scene that they can activate whenever they need to. Rather than having to mess with the Styles Browser every time they want to activate their Fast Style, they just click a scene tab at the top of the modeling window. This Fast scene is usually set up to do three things: Switch to a Fast style, turn off Shadows, and turn off Fog.

Follow these steps to add a Fast scene to your model:

  1. Apply a Fast style to your model by choosing it from the Style Browser’s Select tab.
  2. Make sure Shadows and Fog are both turned off. These toggles are in the View menu.
  3. Choose Window > Scenes to open the Scenes Manager.
  4. Expand the Scenes Manager by clicking the Show Details button in the upper right corner.
  5. Click the Add Scene button to add a new scene to your model.
  6. Rename your new scene “Fast” (or something similarly descriptive) and hit Enter on your keyboard.
  7. Make sure that only the “Style and Fog” and “Shadow Settings” checkboxes are selected in the Properties to Save section of the Scenes Manager.

SketchUp: André Silva

This case study comes to us from André Silva. André is a freelancer in Lisbon, Portugal who mainly works on industrial projects and technical illustrations. He’s also currently working on some architecture and archaeology projects.

I was first introduced to SketchUp about three years ago, while I was searching for simple software to model mechanical devices in 3D. My first contact with it was not very promising and I felt a bit skeptical about its real possibilities to build good mechanical models — mainly because it seemed to be a software intended to build models for Google Earth.

However, after some days of training, I became really surprised with how easy and fast someone can model almost anything with this software. As an example of simplicity, a chain link which took me about 4 hours to model with “Mechanical Desktop” (an Autodesk application that I was using then), was done only in 50 minutes with SketchUp.

Of course, there are important differences between these softwares: SketchUp is not a CAD software, but I believe that when the problems you have to solve are simple you must always look for a simple solution and for what I need to produce in my work, SketchUp is without a doubt, the best solution.

Since those days, I’m modeling with SketchUp on a daily basis, not only to produce schemes and 3D model views for technical documents (usually for parts lists and exploded views) but also as an important helper in the development of small mechanical projects. Basic analysis about interference between machine parts or assembly sequence studies are easy with SketchUp.

A good and recent example of how SketchUp helps me in my work is the set of studies and schemes I made for a simple lifting adaptor for copper cylinders. This was a simple project entirely developed with SketchUp since the first sketch, up to the final product. All presentation and assembly schemes, and even a presentation video, were made easily and rapidly with SketchUp.


Some time ago I also started to use SketchUp in another way: as a pre-modeling tool for some architectural or “inorganic” models in Blender. Working this way dramatically simplifies the modeling work with Blender and I think is a technique that I will keep exploring.

In my humble opinion and to conclude this note, I only find one “problem” with SketchUp: the non-existence of a dedicated version for Linux. But what can we do? We all know that the world is not a perfect place.