Android applications have historically been limited to a maximum size of 50MB. This works for most apps, and smaller is usually better — every megabyte you add makes it harder for your users to download and get started. However, some types of apps, like high-quality 3D interactive games, require more local resources.
So today, we’re expanding the Android app size limit to 4GB.
The size of your APK file will still be limited to 50MB to ensure secure on-device storage, but you can now attach expansion files to your APK.
- Each app can have two expansion files, each one up to 2GB, in whatever format you choose.
- Android Market will host the files to save you the hassle and cost of file serving.
- Users will see the total size of your app and all of the downloads before they install/purchase.
On most newer devices, when users download your app from Android Market, the expansion files will be downloaded automatically, and the refund period won’t start until the expansion files are downloaded. On older devices, your app will download the expansion files the first time it runs, via a downloader library which we’ve provided below.
While you can use the two expansion files any way you wish, we recommend that one serve as the initial download and be rarely if ever updated; the second can be smaller and serve as a “patch carrier,” getting versioned with each major release.
Helpful Resources
In order to make expansion file downloading as easy as possible for developers, we’re providing sample code and libraries in the Android SDK Manager.
- In the Google Market Licensing package, an updated License Verification Library (LVL). This minor update mostly adds the ability to obtain expansion file details from the licensing server.
- From the Google Market APK Expansion package, the downloader service example. The library makes it relatively simple to implement a downloader service in your application that follows many of our best practices, including resuming downloads and displaying a progress notification.
Because many developers may not be used to working with one or two large files for all of their secondary content, the example code also includes support for using a Zip file as the secondary file. The Zip example implements a reasonable patching strategy that allows for the main expansion file to “patch” the APK and the patch file to “patch” both the APK and the main expansion file by searching for asset files in all three places, in the order patch->main->APK.
Expansion File Basics
Expansion files have a specific naming convention and are located in a specific place for each app. As expansion files are uploaded to the publisher site, they are assigned a version code based upon the version of the APK that they are associated with. The naming convention and location are as follows:
Location:
/Android/obb//
Filename:[main|patch]...obb
Example:/sdcard/Android/obb/com.example.myapp/main.5.com.example.myapp.obb
Expansion files are stored in shared storage. Unlike APK files, they can be read by any application.
Downloading and Using the Expansion Files
When the primary activity for the app is created, it should check to make sure the expansion files are available. The downloader library provides helper functions (for example the “Helpers” class in the code below) to make this easy.
boolean expansionFilesDelivered() {
    // get filename where main == true and version == 3
    String fileName = Helpers.getExpansionAPKFileName(this, true, 3);
    // does the file exist with FILE_SIZE?
    if (!Helpers.doesFileExist(this, fileName, FILE_SIZE, false)) {
        return false;
    }
    return true;
}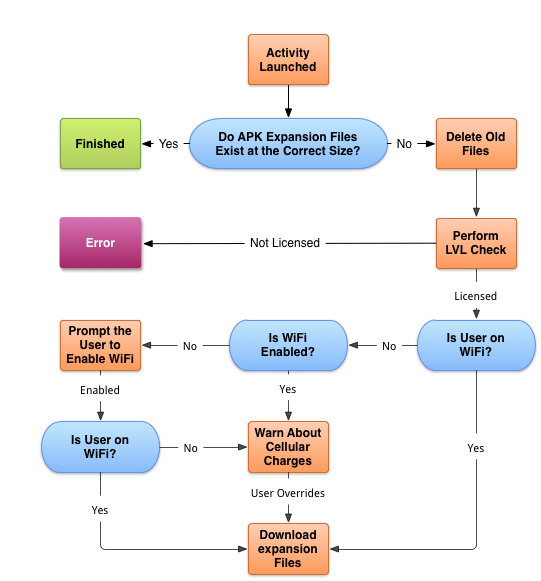
If the file does not exist, fire up the downloader service with DownloaderClientMarshaller.startDownloadServiceIfRequired(). The downloader will perform an LVL check against the server. This check will deliver the names of the files, file sizes, and the file URLs.
Once that check has been completed, it will begin downloading the files. You don’t have to use our download solution, but you might want to because we:
- Include a notification UI that provides progress and estimated completion time in layouts customized for ICS and pre-ICS devices
- Resume large files safely
- Handle redirection with appropriate limits
- Run in the background as a service
- Pause and resume downloads when WiFi is not available
Enjoy! We can’t wait to see what kinds of things developers do with this! For more information about how to use expansion files with your app, read the APK Expansion Files developer guide.


 and that’s it! Thanks to Frank for continuing to maintain such a great add-on.