Just as there are many different formats in which vector spatial data may be represented: Well-Known Text (WKT), Well-Known Binary (WKB), Geography Markup Language (GML), and Keyhole Markup Lanuage (KML), to name but a few – so too are there many different formats of raster spatial data. In fact, almost any image format can be used to encode raster spatial data – since each pixel in an image naturally corresponds to an X,Y location in a raster grid. Any regular BMP, GIF, PNG, JPG, or TIFF image file can therefore be used to store spatial data, so long as the real-world coordinates corresponding to the pixels in each corner of the image are known (and thus the coordinates of each other pixel in the image can be determined). The process of assigning coordinates from a spatial reference system to a raster image is known as geo-referencing.
Some dedicated spatial raster formats, such as GeoTIFF, encode coordinate metadata along with the image data in a single file. However, the raster images used by Open Street Maps, Bing Maps, and Google Maps don’t use GeoTIFFs – they are formed from a series of 256px x 256px tiles saved as regular PNG and JPG images. The metadata describing the geographic extent of each tile is encoded entirely in the filename, which, in Bing Maps, uses the quadkey numbering system as described here.
For example, the following tile shows the Bing Maps road map style tile for quadkey 031311, retrieved from http://ecn.t1.tiles.virtualearth.net/tiles/r031311.png?g=685&mkt=en-us

Knowing nothing but the quadkey number, 031311, and the formulas in the MSDN article linked above, I can calculate that the exact geographic extent of features shown on this tile lie from longitude of –5.625 to 0, and latitude between 52.4827802220782 and 55.7765730186677. Like all Bing Maps tiles, they are projected using the Spherical Mercator projection.
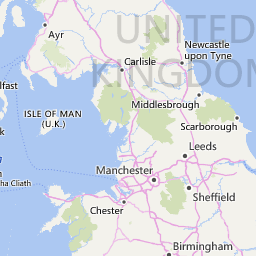
Here’s another tile – this time 120200223:

Once again, I can immediately determine from the quadkey that the extent of this tile has longitude ranging from 0.703125 to 1.40625 and latitude from 52.4827802220782 to 52.9089020477703.
The quadkey system is quite beautiful in its simplicity and efficiency. There are, of course, some limitations with this sort of tiling system – all raster data must be represented using the same projection, and every tile must be regularly-sized, for example, but these limitations are offset by the ease with which it’s possible to place any tile at any zoom level at the correct position on the map with minimum amount of coding.
Preparing Custom Tiles
To get your own raster data into Bing Maps (such as a digitized map or floor plan), you need to prepare a series of individual quadkey tile images following the structure outlined above. Applications such as Safe FME and Microsoft MapCruncher provide the ability to prepare raster images for use as background tile layers in Bing Maps (or Google Maps), or you can write your own script to do so. The process is generally known as “tile-cutting”, and the steps are described below:
1.) First, start out with a source image. Here’s John Snow’s famous map of the Cholera outbreak that occurred in Broad Street in London, 1854:

2.) Georeference the image, by assigning coordinates to corresponding pixel positions in the image. If the image is not already in the correct projection, it might need to be warped to bring features into line with the Mercator projection as used by Bing Maps. The image below shows the interface provided by Mapcruncher for placing reference points in the source image (left hand pane) and Bing Maps (right hand pane):

3.) The geo-referenced, transformed image must then be cut into a series of 256px x 256px tiles at different levels of magnification, numbered according to quadkey. For example, the tile below shows a single tile from zoom level 16 of the above image (quadkey 0313131311122330):
4.) Finally, create a tilelayer that references the set of quadkey tile images. Assuming that the tiles are all saved in the same directory, this is as simple as adding the following lines of javascript. the Bing Maps v7 control will expand the {quadkey} placeholder to the appropriate quadkey filename for each tile request:

The result
Once the tilelayer is added to the map, whenever a part of that tilelayer comes into view Bing Maps will automatically request and stitch together the appropriate tile images and overlay them at the appropriate position on the map.
The screenshot below shows the result of overlaying Jon Snow’s Cholera map onto a modern day map of London using Bing Maps’ default road map style using the steps described above. Notice how well the roads that cross the edges of the tile layer line up – John Snow was not only the father of epidemiology, but also a highly talented cartographer:
