SketchUp: Speed Up Using Fast Styles

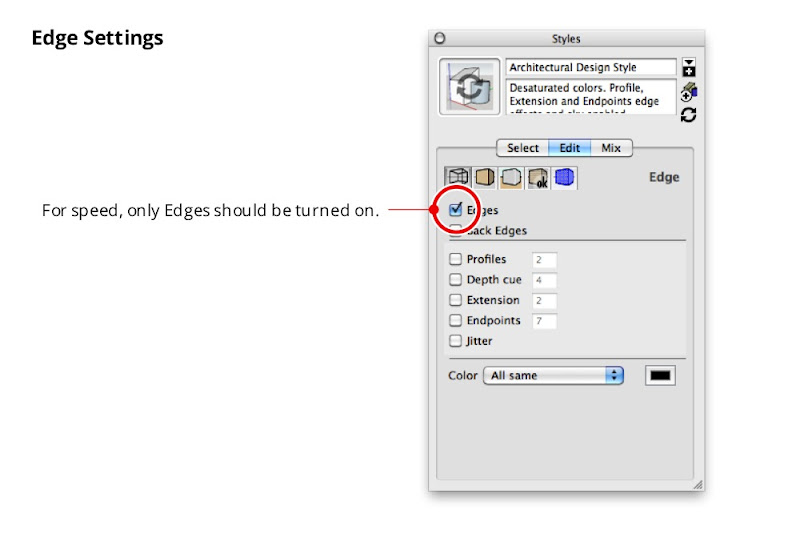
You might not realize that the display settings you choose to apply to your models can affect SketchUp’s speed and general responsiveness. Turning on fancy edge effects and other doodads will slow you down when your model gets big.

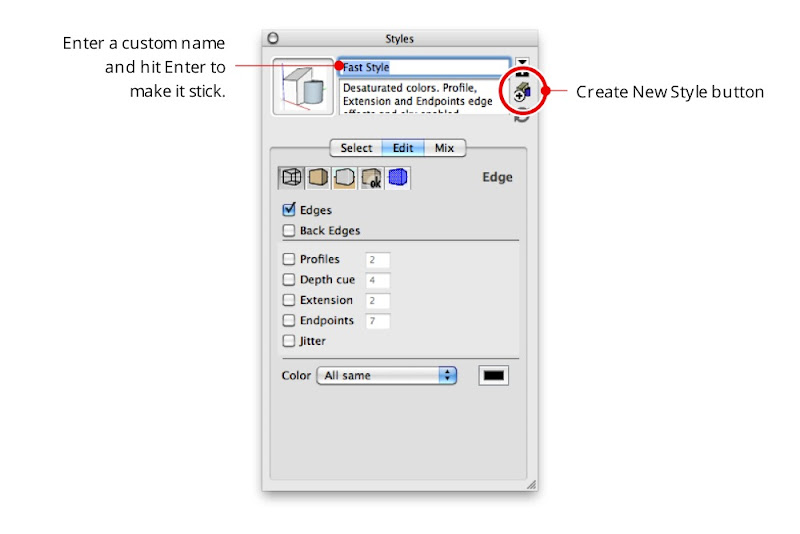
When you’re working on a big model, you want to make sure that you’re using a style whose Edge Settings panel looks like the one in the image below. Everything but “Edges” should be turned off.

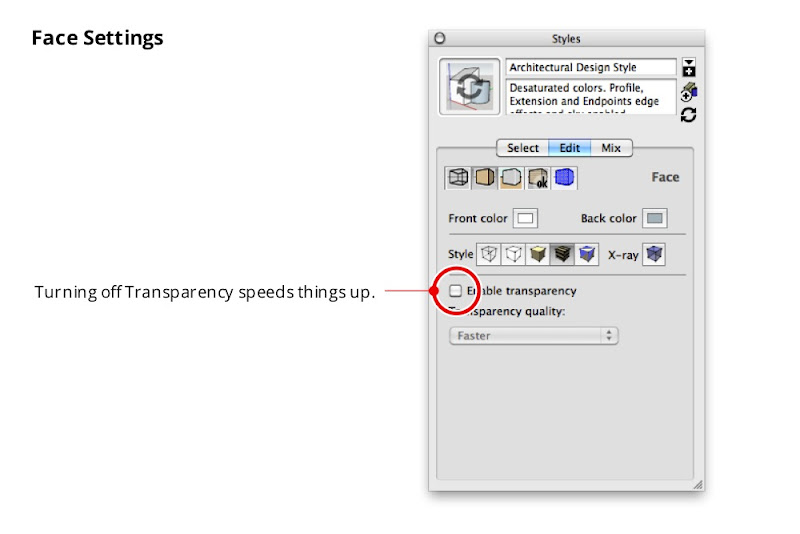
The Face Settings panel is where you can choose not to display Transparency. When Transparency is turned on, SketchUp has to redraw your model on the screen several times—each time you change your viewpoint. If you don’t need to see through your windows just now, opt to temporarily view these faces without transparency.

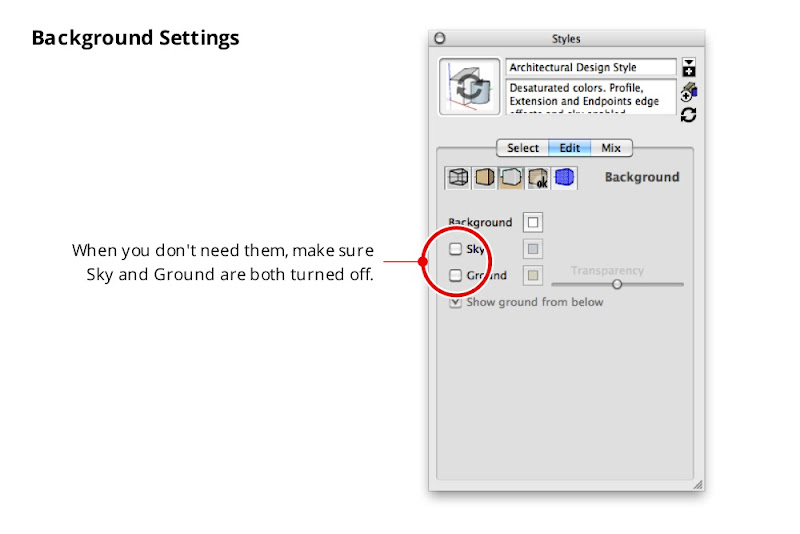
The Background Settings panel is handy for turning off Sky and Ground, both of which cause your computer to do extra thinking while you’re working.

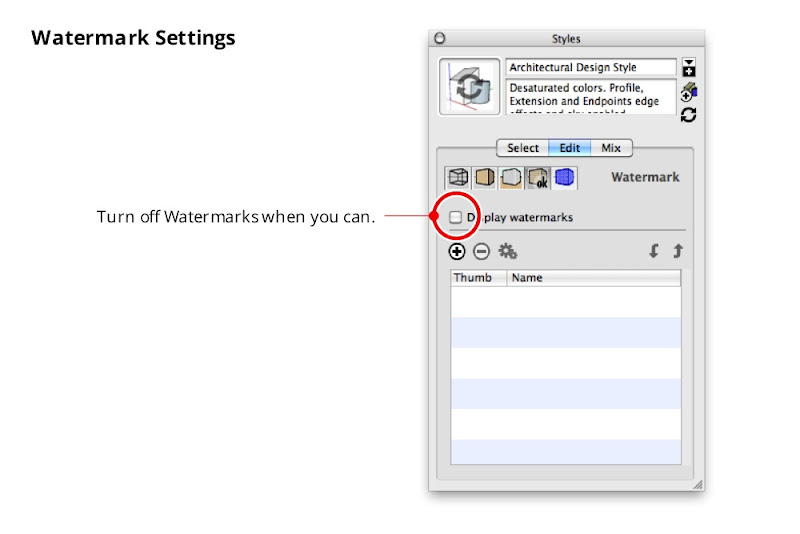
Unless you absolutely need them, you should use the checkbox in the Watermark Settings panel to turn off Watermarks.

The only toggles in the Modeling Settings panel you really need to worry about are the ones for Hidden Geometry and Section Planes. Obviously, you shouldn’t have wither of these displayed if speed is what you’re aiming for.


Once you’ve configured your own fast style, you should save it. Just give it a new name (I suggest “Fast Style”), hit Enter, and click the Create New Style button in the Styles Browser. You new style is saved in the “In Model” collection of styles, which is only associated with the model you’re currently working on.

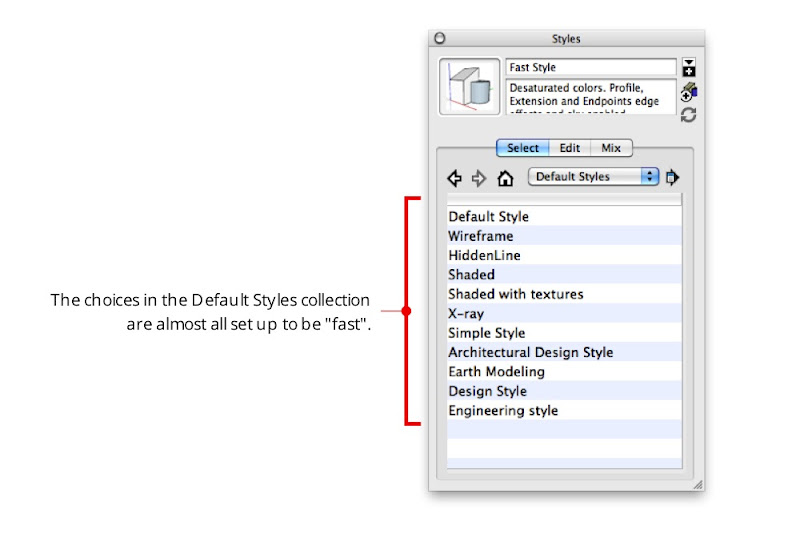
Incidentally, almost all of the choices in SketchUp’s Default Styles collection are so-called “Fast styles” — their Edge Display settings are already configured for speed. Choosing any one of these styles will switch off extraneous effects.

Make a Fast Scene

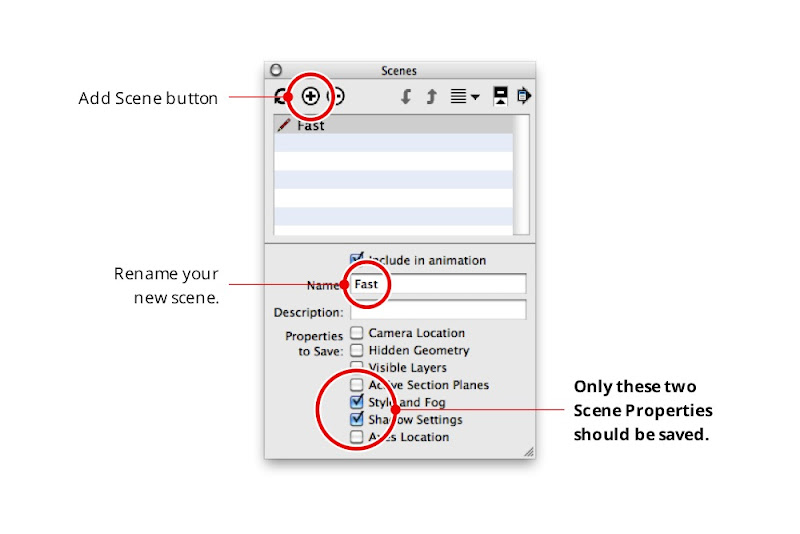
True SketchUp whizzes invariably go one step further and add a special “Fast” scene that they can activate whenever they need to. Rather than having to mess with the Styles Browser every time they want to activate their Fast Style, they just click a scene tab at the top of the modeling window. This Fast scene is usually set up to do three things: Switch to a Fast style, turn off Shadows, and turn off Fog.

Follow these steps to add a Fast scene to your model:

  1. Apply a Fast style to your model by choosing it from the Style Browser’s Select tab.
  2. Make sure Shadows and Fog are both turned off. These toggles are in the View menu.
  3. Choose Window > Scenes to open the Scenes Manager.
  4. Expand the Scenes Manager by clicking the Show Details button in the upper right corner.
  5. Click the Add Scene button to add a new scene to your model.
  6. Rename your new scene “Fast” (or something similarly descriptive) and hit Enter on your keyboard.
  7. Make sure that only the “Style and Fog” and “Shadow Settings” checkboxes are selected in the Properties to Save section of the Scenes Manager.

The SketchUp Halloween Challenge

With Halloween just a few weeks away, nerds here in the Google Boulder office are in a tizzy about their costumes. We take this particular holiday very seriously.

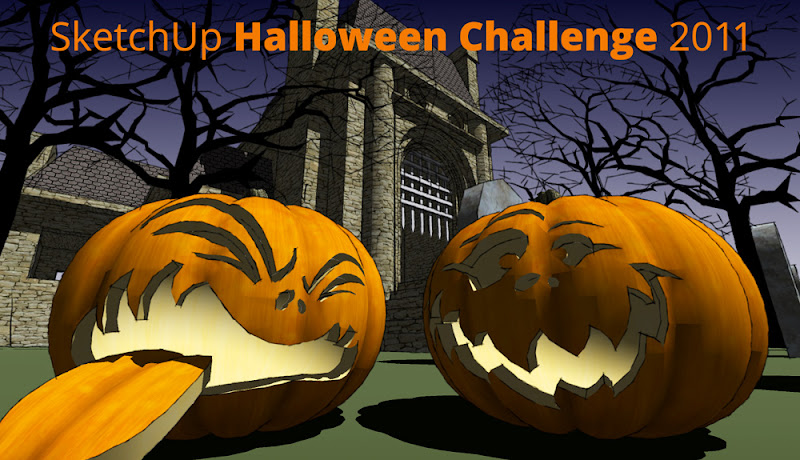
A haunted house I modeled years ago, with two pumpkins by IDW. He modeled them for SketchUp Island’s Pumpkin Patch collection on the 3D Warehouse.


This year, we thought it might be fun to host a SketchUp Halloween Challenge for folks who are looking for something to do in their spare time. The nitty gritty:

Categories

There are two: Use SketchUp to model either a jack-o’-lantern or a haunted house. Or both.

How to submit an entry

  1. Upload your model to the 3D Warehouse and make sure it’s publicly-downloadable.
  2. Upload between two and ten images of your model to a public photo sharing site like Picasaweb. You can use any photo sharing site you like, but make sure your images are grouped into an album by themselves. Images should be at least 1000 pixels wide or tall, depending on their orientation.
  3. Fill out the Challenge Submission Form, including links to both your model on the 3D Warehouse and your album of online images.

Judging

On Friday, October 28th, a group of us from the SketchUp team will get together to review the entries. We’ll be looking mostly at the images you submit; models will be examined when we’re picking the top three entries in each category. For an idea of what we’ll be looking for, consider these points:

  • Displays of SketchUp expertise are always impressive.
  • Anything that makes us say (out loud) “How’d he/she DO that?!!” is worth extra points.
  • We don’t want to see anything you wouldn’t show your grandma or your kids.
  • Beverages will almost certainly be involved in the judging process.

Multiple Entries

Submit as many models as you like, but fill out a separate entry form for each one. The more the ghastlier!

Rendering Rules

You can (if you like) include photo-rendered images of your model with the images you submit. You have to have at least one unrendered image, though; we’d like to see your work in its purest, SketchUp-only state.

Deadline

The deadline for submissions is 11:59 PM PST on Thursday, October 27th 2011.

Prizes

For fun little modeling challenges like this one, we prefer to keep things simple. Instead of prizes, we’ll publish our favorite entries right here on this blog, on October 31st. The best three models from each of the two categories (pumpkins and houses) will be featured in the November edition of the SketchUpdate newsletter, which goes to millions of people around the world.

Why no fancier prizes? When companies host big, international competitions, it takes months for their lawyers to figure everything out. On top of that, people from certain places (like Quebec and Brazil) end up being excluded because of specific laws that apply only to them. Ugh.

Other Stuff

If you’d like a blank pumpkin to start with, this collection contains a few. Other questions about the Challenge? Please ask ‘em in the Comments for this post.

Extrude curves with fewer sides in SketchUp

The most sure-fire way to mitigate your model’s geometric complexity (its count of faces and edges) is to pay attention to extruded circles and arcs. Experienced modelers know that curves in SketchUp are actually constructed out of multiple, straight edges. By default, circles have 24 sides and arcs have 12 sides. Zoom in and you’ll see what I mean:

By default, circles you draw in SketchUp have 24 sides.


Arcs you draw in SketchUp are 12-sided by default.


When you extrude a default, 24-sided circle with the Push/Pull tool, you create a cylinder with 26 faces. Choosing View > Hidden Geometry shows the smoothed edges between the faces:

Turning on Hidden Geometry shows a default cylinder for what it really is: a 24-sided extruded polygon.


Using two default arcs and the Follow Me tool to create an fancy bullnose along the perimeter of a rectangular countertop yields no fewer than 90 new faces:

Using the Follow Me tool to extrude compound curves made out of default, 12-sided arcs results in seriously high polygon (face) counts. Thumbs-down — this is bad SketchUp practice.


Modeling a simple bike rack using a combination of 24-sided circles, 12-sided arcs and Follow Me, then placing ten of those bike racks in your design, adds more than 86,000 entities (faces and edges) to your model. Oof.

A single bike rack made by extruding a 24-sided circle along a path made from 12-sided arcs. Unless you’re designing the bike rack itself, there’s no call for adding this much geometry to your model.


A close-up of the high-polygon bike rack. Individual faces and edges are made visible by turning on Hidden Geometry. Images like this one cause expert SketchUp modelers to have nightmares.

The Solution

To dramatically reduce the amount of geometry in your models, change the number of sides in your circles and arcs before you extrude them into 3D shapes. It’s easy:

1) Create a circle or an arc using the appropriate tool.

2) Before doing anything else, type “6s” and hit Enter.

This tells SketchUp to draw the curve you just created using six sides. The “s” tells it that you’re changing the side-count and not the radius. Of course, you don’t have to choose six sides — you can type in any number you like.

Change the number of sides in the circles and arcs you draw. I know, I know — a hexagon isn’t a circle. Suspend your disbelief in order to have usable models.


Note: Once you’ve manually changed the number of sides in a circle or an arc, every subsequent circle or arc you draw will have that same number of sides.

I modeled the bike rack below using 5-sided circles and 6-sided arcs. It only has 322 faces — an 89% reduction over the bike rack I modeled using curves with the default number of sides.

Crafting a bike rack by extruding a 5-sided circle along a path with 6-sided arcs yields a perfectly usable model with substantially fewer faces and edges.


When it’s used as context in my model, can you tell the difference between the “high-poly” (geometrically heavy) and low-poly versions? I thought not.

Is the quality difference between the high-polygon (top) and low-polygon versions of the bike rack worth making your model twice as heavy? Nope.

Parker on The Model


“Remember… People are watching you. And, we lead by example… one way or the other.”

–Sam Parker (1965 – )
Co-founder of JustSell.com

A simple challenge where everyone wins (you and those around you). No risk. No additional time required.

Within the next three weeks, set a 2-day period as your days (or your team’s days) to inspire others. Two days where you’ll put on blinders to anything negative and be the one in the office who everyone else can count on for words and actions that inspire and encourage. Two days where you’re the light for other people – your colleagues, your prospects, your customers – no matter what.

Allow nothing negative and focus only on your service to others.

Remember, you wake with an option for your daily attitude. Challenges will come up regardless.

Choose positive. Spread it for two days.

____________