When composing Gmail conversations, the auto-complete feature allows us to see our matching personal contacts as we type and quickly make our contact selections. This time-saving feature can be duplicated when creating Google Apps Script applications. For instance, if you design an application that requires sending emails, you can leverage this auto-complete feature by using a personal contact list.
Defining the Requirements
By observing the behavior while composing Gmail conversations, we can define the requirements of our application.
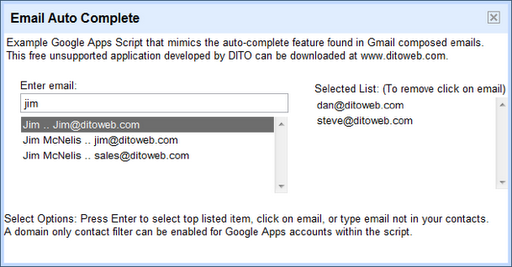
1. As the user begins typing, a list of matches based on first and last name and email address need to appear under the text box. In other words, the user can begin typing the contacts first name, last name, or their email address.
2. If the desired contact email is listed at the top of the matching list, the user can simply press the Enter key to select it.
3. Another option is to click on any of the contacts in the list.
4. Just in case the user would like to enter an email that is not in their contact list, they may enter the email and press the Enter key.
As an added feature if the email is not formatted correctly, then the invalid email is ignored and not selected. For our application when emails are selected, they will be compiled in a separate list on the right where only the email address is stored. If an email is selected by accident, the user can remove the email by clicking on it.
Designing the Application
The application was designed to mimic the behavior of composing Gmail messages. By doing so, the application avoided the use of buttons, providing an improved user experience.
1. Apps Script Services
The Apps Script’s Spreadsheet Service was used to store a user’s contact data. The Ui Service provided the application interaction with the user, and the Contacts Service was leveraged to gather all the user’s contacts. You may apply a Google Apps domain only filter for the contacts by changing the global variable to “true” in the script.
2. Visualize the Layout
Before writing code, the layout was sketched out to include a text box, some space beneath to list matches, and an area to the right to display the selected emails.
3. Choose your widgets
A text box widget was chosen to allow email entry, and two open list boxes were leveraged to display contact matches and selected emails. List boxes provided the use of click handlers to process email selections.
4. Challenges
To mimic the Gmail auto-complete behavior, the text box needed the ability to handle both keystrokes and a pressed Enter key. To accomplish this, a KeyUpHandler calls a function to identify contact matches via a search. The same function used an e.parameter.keyCode == 13 condition to determine when the enter key is pressed.
[php]<span>//create text box for auto-complete during email lookup in left grid</span>
var textBox = app.createTextBox().setName(<span>’textBox'</span>)
.setWidth(<span>’330px'</span>).setId(<span>’textBox'</span>);
var tBoxHandler = app.createServerKeyHandler(<span>’search_'</span>);
tBoxHandler.addCallbackElement(textBox); textBox.addKeyUpHandler(tBoxHandler);
…function search_(e){ var app = UiApp.getActiveApplication(); app.getElementById(<span>’list'</span>).clear();
var searchKey = new RegExp(e.parameter.textBox,<span>"gi"</span>);
<span>if</span> (searchKey == "") app.getElementById(<span>’textBox'</span>).setValue(<span>”</span>);
var range = sheetOwner.getRange(1, 1, sheetOwner.getLastRow(), 2).getValues(); var listBoxCount = 0;
var firstOne = <span>true</span>; <span>for</span> (var i in range){
// if first/last name available, display name and email address <span>if</span>
(range[i][0].search(searchKey) != -1 || range[i][1].search(searchKey) != -1){ <span>if</span>
(range[i][0].toString()){ app.getElementById(<span>’list'</span>).addItem(range[i][0].toString()+
‘ .. ‘+range[i][1].toString(), range[i][1].toString());
var listBoxCount = listBoxCount + 1; } <span>else</span> { // else just display the email address
app.getElementById
(<span>’list'</span>).addItem(range[i][1].toString()); var listBoxCount = listBoxCount + 1; }
<span>if</span> (firstOne) var firstItem = range[i][1].toString(); var firstOne = <span>false</span>;
} }
// set the top listbox item as the default <span>if</span> (listBoxCount > 0) app.getElementById(<span>’list’
</span>)
.setItemSelected(0, true);
<span>
// if enter key is pressed in text box, assume they want to add</span> <span>// the email that’s not in the list</span> <span>if</span>
(e.parameter.keyCode==13 && listBoxCount < 1 && searchKey !== <span>""</span>) { …[/php]
As this application shows, Apps Script is very powerful. Apps Script has the ability to create applications which allow you to integrate various Google services while building complex user interfaces.
You can find Dito’s Email Auto-Complete Script here. To view a video demonstration click here. You can also find Dito Directory on the Google Apps Marketplace.
