Google Earth: High-resolution imagery in Antarctica

As Google has continually improved the quality of their imagery across the globe, one area always seemed to stay low-res — Antarctica. Thanks to the help of the Polar Geospatial Center (PCG), that’s beginning to change.

A great example of that is the Mackay Glacier Tongue, located in Granite Harbor, seen here:

mackay.jpg

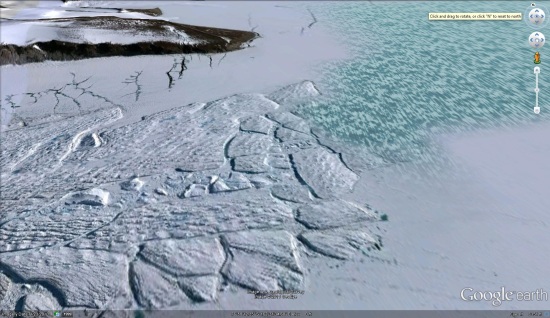
You can see it for yourself, as shown in the article, using this KML file.

So far, the PGC has helped Google update nearly 1,000,000 square kilometers, with another 275,000 square kilometers added every three months. While it will take a while to get the entire continent updated (more than 14,000,000 sq km), they’re certainly making great progress.

Along with updating the quality of the imagery, they’re also working to improve the accuracy of the location of the imagery. The PGC’s Paul Morin will be heading down to the Antarctic Peninsula soon to help improve the imagery from being off by as much as 30 meters to being accurate within a single meter.

The full article at The Antarctic Sun is quite interesting and well worth your time to read. We all enjoy the constantly improving imagery quality in Google Earth, and the PGC is just one of many companies working with Google to help move things forward.

(via @OgleEarth)

Google Adds Plus to Search

Google seems to be adding Plus content just about every place these days and folks are none too happy about it. It seems that they have now added it to the search suggestions as well (this may have been seen perviously but this is the first I had seen it.). Now that’s annoying…and it gets more so the more people you follow on Plus.

The Bing Maps Windows Presentation Foundation Control v1

Back in August, was announced the Beta for our Bing Maps WPF control. The uptake in the Microsoft Developer Community has been stellar and the feedback – immensely helpful. As a result and as promised to those across the Microsoft Developer Network, we’re officially releasing The Bing Maps Windows Presentation Foundation Control, Version 1.

Bing Maps WPF Control with an ESRI Topographic Map Tile Overlay

The control was built atop of the beta, so we still have all of the touch enabled greatness for Surface v 2’s Pixel Sense, inertia and full rotation. We’ve kept most of the classes, methods and properties in place from the beta – requiring little work to install and register v1. And, per community feedback on the Bing Maps MSDN Forums we added the following features (and fixed a few bugs):

  1. Support for tile layers – you can now overlay your own tile layers atop the map control.
  2. Turning off the base tile layer – this is useful for when you don’t need/want to use our base map tiles and instead would prefer to use your own without overlaying them atop of ours. The control won’t request the tiles which reduces downloads and improves rendering performance.
  3. SSL Support – since many of you are using the WPF control in secure applications, you can now make tile and service request over SSL without issue.
  4. Hiding the scale bar – if you don’t want a scale bar (perhaps your map is small and the scale bar clutters the map) you can turn it off. In fact, the only elements you can’t turn off are the Bing logo and the copyrights.
  5. New copyright service – provides accurate copyright for our data vendors.
  6. Additional inertia – inertia is now enabled for the mouse and is on by default for touch.
  7. Miscellaneous bug fixes – thanks for the feedback on the MSDN Forums, the Bing Maps Blog, e-mail and Twitter. Good finds people.

I have to give it up for my (small) crack team of people involved in the making of the WPF Control. This was one of those 10% projects that we all really had a passion to get done because it was the right thing to do for the Microsoft Developer Community. So, we found the time, slipped the release a month (for quality) and, as the guys over in Surface said, “just got it done.” Our internal motto kept stoking the fire to push this bad boy out the door…”WPF, FTW!”

Now, download the Bing Maps WPF Control, build a killer app and make us proud.

Doodles for Google Apps


Since 1998, when the first doodle was released, they have been one of the most loved features of the Google home page. There have been doodles to celebrate all kinds of events, including national holidays, birthdays of artists and scientists, sports competitions, scientific discoveries and even video games! Also, doodles have evolved from simple static images to complex applications, such as the interactive electric guitar used to celebrate the birthday of Les Paul.

Want your company logo to change for selected events or holidays, just like doodles? The Admin Settings API allows domain administrators to write scripts to programmatically change the logo of their Google Apps domain, and Google App Engine offers the ability to configure regularly scheduled tasks, so that those scripts can run automatically every day.

With these two pieces combined, it is pretty easy to implement a complete solution to change the domain logo on a daily basis (assuming the graphic designers have prepared a doodle for each day), as in the following screenshot:


Let’s start with a Python App Engine script called doodleapps.py:

import gdata.apps.adminsettings.service
from google.appengine.ext import webapp
from google.appengine.ext.webapp import util
from datetime import date

class DoodleHandler(webapp.RequestHandler):
  # list of available doodles
  DOODLES = {
    '1-1': 'images/newyearsday.jpg',
    '2-14': 'images/valentinesday.jpg',
    '10-31': 'images/halloween.jpg',
    '12-25': 'images/christmas.jpg'
  }

  # returns the path to the doodle corresponding to the date
  # or None if no doodle is available
  def getHolidayDoodle(self, date):
    key = '%s-%s' % (date.month, date.day)
    if key not in self.DOODLES:
      return None

    return self.DOODLES[key]

  # handles HTTP requests by setting today’s doodle
  def get(self):
    doodle = self.getHolidayDoodle(date.today())
    self.response.out.write(doodle)

    if doodle:
      service = gdata.apps.adminsettings.service.AdminSettingsService()
      // replace domain, email and password with your credentials
      // or change the authorization mechanism to use OAuth
      service.domain = 'MYDOMAIN.COM'
      service.email = 'ADMIN@MYDOMAIN.COM'
      service.password = 'MYPASSWORD'
      service.source = 'DoodleApps'
      service.ProgrammaticLogin()

      # reads the doodle image and update the domain logo
      doodle_bytes = open(doodle, "rb").read()
      service.UpdateDomainLogo(doodle_bytes)

# webapp initialization
def main():
    application = webapp.WSGIApplication([('/', DoodleHandler)],
                                         debug=True)
    util.run_wsgi_app(application)

if __name__ == '__main__':
    main()

The script uses a set of predefined doodles which can be edited to match your list of images or replaced with more sophisticated logic, such as using the Google Calendar API to get the list of holidays in your country.

Every time the script is triggered by an incoming HTTP request, it will check whether a doodle for the date is available and, if there is one, update the domain logo using the Admin Settings API.

In order for this script to be deployed on App Engine, you need to to configure the application by defining a app.yaml file with the following content:

application: doodleapps
version: 1
runtime: python
api_version: 1

handlers:
- url: .*
  script: doodleapps.py

We want the script to run automatically every 24 hours, without the need for the administrator to send a request, so we also have to define another configuration file called cron.yaml:

cron:
- description: daily doodle update
  url: /
  schedule: every 24 hours

Once the application is deployed on App Engine, it will run the script on a daily basis and update the logo.

OAuth 1.0 Tokens with the Python Client Library


The OAuth Playground is a great tool to learn how the OAuth flow works. But at the same time it can be used to generate a “long-lived” access token that can be stored, and used later by applications to access data through calls to APIs. These tokens can be used to make command line tools or to run batch jobs.

In this example, I will be using this token and making calls to the Google Provisioning API using the Python client library for Google Data APIs. But the following method can be used for any of the Google Data APIs. This method requires the token is pushed on the token_store, which is list of all the tokens that get generated in the process of using Python client libraries. In general, the library takes care of it. But in cases where it’s easier to request a token out of band, it can be a useful technique.

Step 1: Generate an Access token using the OAuth Playground.
Go through the following process on the OAuth Playground interface:

  • Choose scope(s) of every API you want to use in your application (https://apps-apis.google.com/a/feeds/user/ for the Provisioning API) . Here you can also add scopes which are not visible in the list.
  • Choose an encryption method that is the signature method to encode your consumer credentials. (“HMAC-SHA1” is the most common)
  • Enter your consumer_key and consumer_secret in the respective text fields. The consumer_key identifies your domain and is unique to each domain.

After entering all the required details you need to press these buttons on the OAuth Playground in sequence:

  • Request token: This will call Google’s OAuth server to issue you a request token.
  • Authorize: This will then redirect you to the authorization URL where you can authorize or deny access. At this point if you deny the access you will not be able to generate the Access token. Accepting this will convert the Request token generated in the last step into an Authorized Request token.
  • Access token: Finally, this step will exchange the authorized Request token for an Access token.

After the last step the text field captioned auth_token in the OAuth Playground has the required Access token and that captioned access_token_secret has the corresponding token secret to be used later.

Step 2: Use the above token when making calls to the API using a Python Client Library.

Here is an example in Python which uses the OAuth access token that was generated from OAuth Playground to retrieve data for a user.

CONSUMER_KEY = “CONSUMER_KEY”
CONSUMER_SECRET = “CONSUMER_SECRET”
SIG_METHOD = gdata.auth.OAuthSignatureMethod.HMAC_SHA1
TOKEN = “GENERATED_TOKEN_FROM_PLAYGROUND”
TOKEN_SECRET = “GENERATED_TOKEN_SECRET_FROM_PLAYGROUND”

DOMAIN = “your_domain”

client = gdata.apps.service.AppsService(source=”app”, domain=DOMAIN)
client.SetOAuthInputParameters(SIG_METHOD, CONSUMER_KEY, consumer_secret=CONSUMER_SECRET)
temp_token = gdata.auth.OAuthToken(key=TOKEN, secret=TOKEN_SECRET);
temp_token.oauth_input_params = client.GetOAuthInputParameters()
client.SetOAuthToken(temp_token)
#Make the API calls
user_info = client.RetrieveUser(“username”)

It is important to explicitly set the input parameters as shown above. Whenever you call SetOuthToken it creates a new token and pushes it into the token_store. That becomes the current token. Even if you call SetOauthToken and SetOAuthInputParameters back to back, it won’t set the input params for the token you set.