PHP and UTF-8 BOM

I recently wrote some PHP for the first time in ages, and noticed some of my pages were appearing on one development machine, in some browsers, preceded by the characters . These characters didn’t show up when editing the pages, and they didn’t show up at all when served from a different server or when viewed in some other browsers.

Initially, I thought that it was something to do with not having configured the correct character set in the response header (which is generally the main cause of garbled characters appearing in webpages), but, checking the response header it seemed ok – I was outputting UTF-8 as desired:

[php]header(‘Content-type: text/html; charset=UTF-8’) ;[/php]

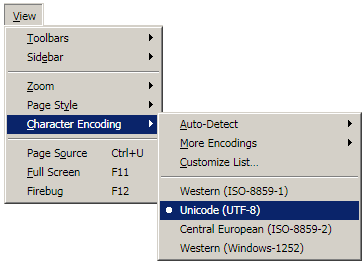
And browsers viewing the page were correctly auto-detecting the character encoding as UTF-8:


image

Then I checked the configuration of the server, which was also set up with Unicode support correctly. And then I checked the encoding of the PHP scripts themselves, which were all encoded using Unicode UTF-8 – (Windows Codepage 65001). So far, everything seemed consistent, so where were those garbled characters coming from?

UTF-8 with or without signature – your choice. (Or not).

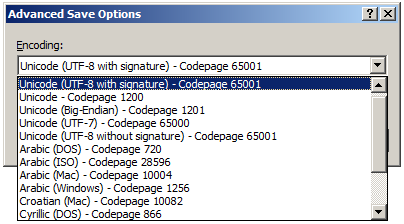
The reason, as I found out, was that one of my development environments (Visual Studio – from which I’d made the most recent edits to the affected pages) was configured to save UTF-8 encoded files with signature. Here’s the options for Unicode character encoding in Visual Studio, showing UTF-8 both with and without signature (notice that they’re both the same codepage – 65001):

image

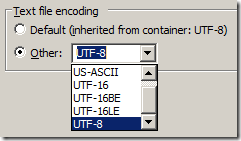
There seems to be very little convention or standardisation as to the use of this “signature”. I hadn’t really come across this problem before because I generally use Eclipse for PHP development. The encoding options there are shown below:

image

Notice that, although there are several flavours of UTF-16 available in Eclipse, there is only version of UTF-8, which is equivalent to Visual Studio’s without signature.

Then again, here are the options in Windows Notepad (yes, I use that sometimes as well). As in Eclipse, there is only one choice of UTF-8, but this time the sole option available  provides the opposite behaviour – always saving UTF-8 with signature:

BOM BOM!

The optional “signature” in question is the Byte-Order Marker, or BOM. A byte-order marker is required for multibyte encoded data, including UTF-16, to indicate big-endianness or little-endianness – the order in which bytes are arranged. All of the save dialogs above give you the choice for specifying the byte order for Unicode UTF-16, since in a multibyte format the byte order matters. However, for UTF-8, which uses only a single byte for each character (that’s what the “8” stands for – 8 bits = 1 byte) a BOM is not required and doesn’t really make sense.

Even though UTF-8 always uses the same byte-order, a UTF-8 encoded file can begin with the bytes EF BB BF, which merely signifies that it is in UTF-8 format. It’s not really a BOM, hence why Visual Studio calls it a “signature”. The problem is that some clients don’t expect UTF-8 to have a BOM and, as it turns out, the PHP engine is one of them. At least,some builds of the PHP engine. One of my PHP servers, running on a linux machine, interpreted the UTF-8 file with signature fine, whereas another, running under Windows, tried to display the leading bytes as content on the page, which is how you end up with .

The combination of different default encoding behaviours across different editors combined with different server/browser behaviours when interpreting UTF-8 files with BOM means that this problem can be a little tricky to diagnose.

This is reported as a PHP bug at http://bugs.php.net/bug.php?id=22108, but the workarounds are actually quite straightforward (once you know what the problem is!):

  • If you’re using Visual Studio, make sure you save your PHP files as UTF-8 withoutsignature. If you’re using Eclipse, this is the default anyway.
  • Compile your PHP with the –enable-zend-multibyte option, which will correctly parse the BOM at the start of the file
  • If you don’t need unicode at all, you could use ISO-8566-1, or another non-UTF-8  encoding
Modular plug-in for customizable infobox control

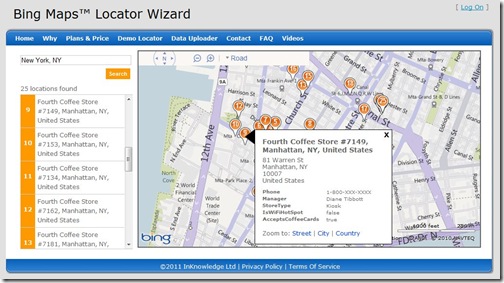
As many of you know, the Bing Maps Locator Wizard is a portal that allows you to generate a Bing Maps Locator in minutes, and then have it hosted in Windows Azure for free. One of the steps in the wizard allows you to customize the style of various elements of the locator.
I was recently working on the wizard and required a highly customizable infobox control that would likely be put in an iframe. This article highlights some of the key features of the modular plug-in we created to allow for this requirement. The result far exceeded our expectations and InKnowledge has since released the code to the Bing Maps community so you can use it in your own applications. Feel free to download the complete source code, with sample implementations and documentation.


Modular Design The Bing Maps 7.0 Control was released last fall and is a complete rebuild from the ground up when compared to previous versions of Bing Maps. We have seen huge improvements in API performance and the size of the control. One feature of the map control was to use a modular framework; this allows you to register and load modules as they are needed. One result of this is faster loading speeds. Those interested in creating your own reusable modular plug-ins for Bing Maps should have a look at the documentation.
Custom Infoboxes When the 7.0 Control was originally released there were no infoboxes. The infobox control that Microsoft soon added was a bit different from past versions and was designed to be more flexible. While this is a great improvement, there are a couple of caveats to using this infobox control. The first is that the infobox always points up and to the right and does not reposition itself. This means that infoboxes that are anchored near the top are displayed outside of the map. This can be an issue if the map is being put in an iframe or the map is placed at the end of a webpage. The second caveat is that using custom HTML requires you to also generate the infobox arrow and content area, in addition to the content you want to display. Ideally we would be able to put custom HTML into the frame of the built-in infobox.
Positioning Our goal was to have the content positioned in the center of the map to ensure users can see the infobox. The solution: break the map into quadrants and modify the layout of the infobox such that the content is positioned in the middle of the map. For example, if the anchor point of an infobox is in the lower-left part of the map we want the infobox to be positioned to the right of the anchor point and pushed up. The easiest way to figure out what quadrant the anchor is located in is to convert the anchor coordinate to a pixel coordinate relative to the upper-left corner of the map. To determine if the anchor is to the left or right of the center of the map, simply check to see if the x-pixel coordinate is more or less than half the width of the map. Similar logic can be used to figure out if the anchor is above or below the middle of the map. Once we know if it is left or right of the center and above or below the center, we simply need to place the infobox so that it is in the opposite direction.
The Infobox Arrow One common issue that developers run into when trying to create customizable infoboxes is with the infobox arrow. In the past, these were almost always images that required edits if you wanted to change something as simple as the color. After a lot of research and experimenting, I found an ingenious solution: CSS borders. Years ago, when the web was young, webpages used to use really big borders to make things look like they were in a frame. As time went on the borders got smaller and smaller to the point where they are either not used or only 1 or 2 pixels wide. So where am I going with this? Well, if you look at a picture frame you might notice that the sides of the frame are connected in the corner at a 45-degree angle. This angle also occurs with CSS borders. If we take this and use a bit of fancy styling, we can modify the color and width of four edges of the border CSS class and generate an arrow. Not only can we generate an arrow, but with a little bit of logic and CSS styling, we can control the width, length. and color of the arrow. Check out this good article on creating angled shapes using the border style.
Additional Features The API for this custom infobox control is pretty basic. There are only four public methods that are exposed: hide, show, getOptions, and setOptions. The show method is pretty straightforward; it takes in a coordinate and content (either text or HTML). The content will be placed inside the infobox frame, rather than replacing it. By making the input generic we are able to use this infobox with pushpins, polylines, polygons, or on its own. As for options, not only can you set the dimensions and color of the arrow, you can also:
•    Set the background color of the content area of the infobox.
•    Set the color of the border on the infobox.
•    Specify minimum width and height for the content area.
•    Specify an offset distance from the anchor point.
•    Hide the arrow.
•    Hide the default close button.
•    Tether the infobox. The tether option allows one of two user experiences. When enabled the infobox will stay open and reposition itself as you move the map around until you close it. When disabled, the infobox will close when the map moves.
Implementing the Plug-in Implementing the custom infobox is easy. The first thing you must do is register the plug-in with the map control. You can do this using code similar to the following:
var map, customInfobox;
function GetMap() {
map = new Microsoft.Maps.Map(document.getElementById(“myMap”), { credentials: “Your_Bing_Maps_Key” });
//Register and load the Custom Infobox Module
Microsoft.Maps.registerModule(“CustomInfoboxModule”, “scripts/V7CustomInfobox.min.js”);
Microsoft.Maps.loadModule(“CustomInfoboxModule”, { callback: function () {
//Create an instance of the custom infobox control
customInfobox = new CustomInfobox(map);
}
});
}
To display an infobox, specify a coordinate and some content like the following:
customInfobox.show(map.getCenter(), “<b>Hello World</b>”);
We hope you find the plug-in helpful.

If You Can’t find your Google Earth icon

google-earth-icon.pngThis is a problem we’ve seen happening more and more often lately, so we thought we’d address it here. I’m not sure if the bug has become more widespread, or if Google Earth is simply reaching an increasingly wider audience.

In some configurations of Windows, the Google Earth icon will disappear from your system after you install a Google Earth software update. In many cases, the icon won’t come back even after you reinstall, presumably because the software already thinks that it’s there.

Fortunately, there are a few easy solutions.

A – Automatically restore the icon

Google has created a simple program called the Google Earth Icon Restorer that should take care of it for you with a few simple steps:

1 – Download the Google Earth Icon Restorer application.
2 – The application name “geicons.exe” will appear in your download bar. Select Save.
3 – Run the application by selecting Open, or double clicking “geicons.exe”
4 – Look at your desktop and find the newly created shortcut icon for Google Earth
5 – Delete the application by selecting “geicons.exe” in your download bar > [Open in Folder] > [Delete]

B – Manually restore the icon

If the automatically restore solution didn’t work for you, or you’d rather simply do it yourself, you can follow the instructions for your system below.

Windows XP and Vista:

– Go to “C:Program FilesGoogleGoogle Earthclient” and find googleearth.exe
– Right click on googleearth.exe and choose “create shortcut”
– Move a copy of that shortcut to your desktop and a copy to “C:Documents and SettingsAll UsersStart MenuProgramsGoogle Earth” folder

Windows 7:

– Go to “C:Program FilesGoogleGoogle Earthclient” and find googleearth.exe
– Right click on googleearth.exe and choose “create shortcut”
– Move a copy of that shortcut to your desktop and a copy to “C:ProgramDataStart MenuProgramsGoogle Earth” folder

64 bit versions of Windows:

– Go to “C:Program Files (x86)GoogleGoogle Earthclient” and find googleearth.exe
– Right click on googleearth.exe and choose “create shortcut”
– Move a copy of that shortcut to your desktop and a copy to “C:ProgramDataStart MenuProgramsGoogle Earth” folder