Last month InKnowledge released their Bing Maps Locator Wizard, which allows users to create Bing Maps locators in minutes. During development of the wizard, we quickly realized another benefit of the tool: importing Excel data into Bing Maps. With this, it’s easy for anyone to manage the data without the need for a database. Excel files can easily be stored in content management systems such as SharePoint, where updates can be made easily by multiple users. The specific feature of the Bing Maps Locator Wizard used for this is the Bing Maps Data Uploader. The Data Uploader makes it easy to geocode and upload your spatial data into the Bing Spatial Data Services.
Preparing your Excel data
All data uploaded into the Bing Spatial Data Services must meet certain requirements. The first requirement is that you must have at minimum three fields: EntityID, Latitude, and Longitude. If you do not have these columns, add them before continuing.
You will need to create unique values for the EntityID field. The easiest way to do this is to assign the first row a value of 1 and increment it. The Latitude and Longitude fields can be left empty if you are geocoding the data source before uploading it.
If you need to geocode your data you will need to have columns that contain address information. The Bing Maps Data Uploader has added logic that will map common alternative column names. Below you will see a list of columns that can be used to specify address information. Please note that you do not need to provide all of these, only the ones that are relevant to your data.

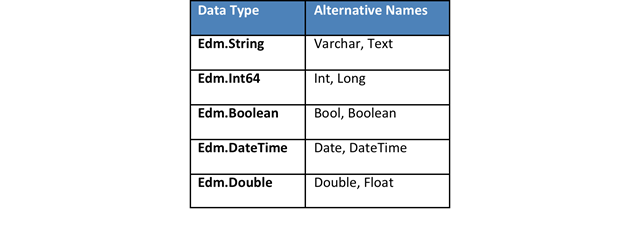
You can add additional columns as needed to specify custom data as long as it meets the required Bing Spatial Data Services Schema. By default, all columns in a data source processed by the Bing Maps Data Uploader are assumed to be strings. You can specify alternate data types by enclosing the type name in brackets and appending it to the column header name, for example, CustomColumn(Edm.Boolean).
The Bing Maps Data Uploader also has added logic that will map common alternative data type names. Here is a list of supported data type names:
Once you have created your data source file, save it as an Excel file (.xlsx) for easy access later. Save a second copy of the file using the “Save as” button and set the “Save as type” to tab delimited. A sample Excel file can be downloaded here.
Uploading your data source to the Bing Spatial Data Services
You should now have your data source ready to be uploaded to the Bing Spatial Data Services. To begin, open a browser and navigate to the Bing Maps Data Uploader. When you arrive you will see a form that looks like this:

http://mapsys.info/wp-content/uploads/2011/06/be01d08e06491541.jpg.jpg
Follow these steps to upload your data source:
1) If your data is already geocoded, change the Job Type to Upload Only. Otherwise, leave it as GeocodeAndUpload.
2) Set the Input File Type as Tab.
3) Specify a Bing Maps key. This key will be the “master key” for your data source. A master key not only allows you to query a data source but also allows you to perform additional data source tasks, such as deleting it.
4) If you want, you can then specify a Bing Maps query key. A query key is only capable of querying a data source. It is recommended to do this for any data sources that will be used in production. Note that the Bing Maps query key must be different from the Bing Maps master key.
5) Specify a data source name and data source entity type name. The data source name is the name that describes the data set (such as MyStores) and the entity type name is the name that describes a single record (such as Shop).
6) Click Create Job and choose the data source you want to upload. The first time you do this you will likely be prompted to increase the size of your isolated storage. After this is done, simply click Create Job again and select your data source.
This will create a job in the Data Uploader that will upload your data source. By clicking the Job Status tab you will be able to monitor the progress of the job.
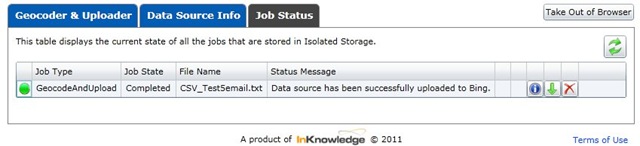
We recommend leaving your browser open until the job has completed. Jobs can take anywhere from a few minutes to several hours. If a job takes longer than 24 hours, send an email to mpnet@microsoft.com so that they can investigate. For those who will be using this tool on a regular basis we recommend that you install the application onto your computer. A video walkthrough about using the Bing Maps Data Uploader can be found here.
Downloading geocoded data sources
When your data source has been uploaded you may want to download a copy of your data source that has the geocoded data in it. To do this, press Download. This will allow you to save a tab delimited version of your data source with geocoded coordinates to your computer. You can then use Excel to open the file.
Please remember that it’s possible that some addresses will not be able to be geocoded. If this occurs there will be no values for the Latitude and Longitude coordinate fields for the particular record in question. When this happens an additional error information button will appear on the status panel that can give more insight into which records failed to geocode. To correct these records you can either alter the address information or manually specify the coordinates and re-upload the data source. Note that records that have values specified for the latitude and longitude values will be skipped in the geocoding process of data sources to ensure that manually corrected locations do not get overwritten.
Accessing your data
Now that you have uploaded your data to the Bing Spatial Data Services you need information on how to query your data. In particular, you need the access ID, data source name, and data source entity type name of your data source. To get this information go to the Data Source Info tab of the Data Uploader and type the Bing Maps key you used to upload your data source. Then press Get Info.
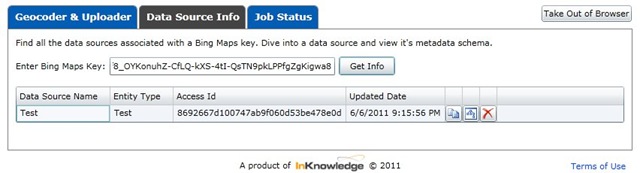
You will then see a list of all the data sources associated to the Bing Maps key you provided. Find your data source in the list and press the![]() button. This will copy all the basic data source information to your clipboard. Open Notepad and paste the information there. You now have all the information required to query your data source. From here you can either use the Bing Spatial Data Services Query API to build your search queries or use the Bing Maps Locator Wizard to create a locator in minutes. The Locator Wizard creates the search queries for you and wraps them into an easy-to-use locator.
button. This will copy all the basic data source information to your clipboard. Open Notepad and paste the information there. You now have all the information required to query your data source. From here you can either use the Bing Spatial Data Services Query API to build your search queries or use the Bing Maps Locator Wizard to create a locator in minutes. The Locator Wizard creates the search queries for you and wraps them into an easy-to-use locator.