Contact Sharing using Google Apps Script

You just created your own contact group in Google Apps Contact Manager and now you want to share this contact group with a few other coworkers (not the entire company). Over the last couple of years, our team at Dito often got this request from our customers. We decided to leverage Google Spreadsheets & Google Apps Script to allow sharing of user’s “personal contact group” with only a select group of coworkers.

How does it work?

The Apps Script implements a three step wizard. Upon completion of the wizard, the script sends the sharing recipients a link to open the spreadsheet to import the user’s recently shared contact group. The three steps in the wizard are.

  • Step 1 lists all the current contact groups in user’s account. The user can select the group he/she wants to share.
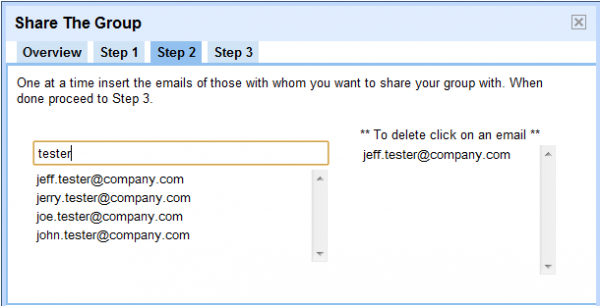
  • Step 2 allows user to select the colleagues with whom the user wants to share his/her personal contact group with.
  • Step 3 lets the user submit the sharing request.

    Designing using Apps Script Services

    Apps Script has various services which can be used to build the user interface, access the user’s contact list and send emails without the need to compile and deploy any code.

    1. Security (guide)

    Before a script can modify a user’s contacts, it needs to be authorized by that user. The authorization process takes place when a user executes the script for the first time. When a user makes a request to share his/her contacts, our script sends a link to the intended recipients by email. Upon clicking this link and the “Run Shared Contact Groups” button in the spreadsheet, the recipient will first need to grant authorization to execute the script. By clicking the “Run Shared Contacts Groups” button again, the script will proceed with creating the shared contact group.

    2. Spreadsheet Service

    In developing this script, there was a fair amount of data that needed to be exchanged between different users. We used Apps Script’s Spreadsheet Service for temporarily storing this data.

    // grab the group titled “Sales Department”
    var group = ContactsApp.getContactGroup(“Sales Department”);
    // from that group, get all of the contacts
    var contacts = group.getContacts();
    // get the sheet that we want to write to
    var ss = SpreadsheetApp.getActiveSpreadsheet();
    var sheet = ss.getSheetByName(“Contact Data”);
    // iterate through contacts
    for (var i in contacts) {
    //save each of the values into their own columns
    sheet.getRange(i, 1, 1, 1).setValue(contacts[i].getGivenName());
    sheet.getRange(i, 2, 1, 1).setValue(contacts[i].getFamilyName());

    sheet.getRange(i, 13, 1, 1).setValue(contacts[i].getWorkFax());
    sheet.getRange(i, 14, 1, 1).setValue(contacts[i].getPager());
    sheet.getRange(i, 15, 1, 1).setValue(contacts[i].getNotes());
    }

    3. Ui Service

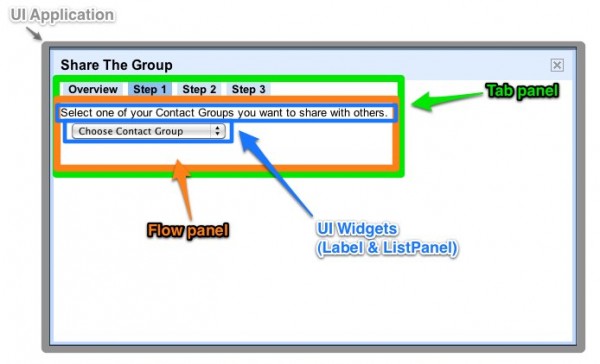
    Ui Services in Google Apps Scripts have an underlying Google Web Toolkit implementation. Using Ui Services in Apps Script, we easily built the user interface consisting of a 3 step wizard. In designing Ui using Ui Services, we used two main types of Ui elements – Layout Panels and Ui widgets. The layout panels, like FlowPanel, DockPanel, VerticalPanel, etc., allow you to organize the Ui widgets. The Ui widgets (TextBoxes, RadioButtons, etc.) are added to layout panels. Ui Services make it very easy to assemble and display a Ui interface very quickly.

    We built each of the components on their own, and then nested them by using the “add” method on the desired container. The UI widgets in the screenshot above were constructed by the code below:

    // create app container, chaining methods to set properties inline.
    var app = UiApp.createApplication().setWidth(600).setTitle(‘Share The Group’);
    // create all of the structural containers
    var tabPanel   = app.createTabPanel();
    var overviewContent = app.createFlowPanel();
    var step1Content = app.createFlowPanel();
    var step2Content = app.createFlowPanel();
    var step3Content = app.createFlowPanel();
    // create u/i widgets
    var selectLabel = app.createLabel(“Select one of your Contact Groups you want to share with others.”);
    var contactGroupDropdown = app.createListBox().setName(‘groupChooser’);
    // add all children to their parents
    overviewContent.add(selectLabel);
    overviewContent.add(contactGroupDropdown);
    tabPanel.add(overviewContent,”Overview”);
    tabPanel.add(step1Content,”Step 1″);
    tabPanel.add(step2Content,”Step 2″);
    tabPanel.add(step3Content,”Step 3″);
    app.add(tabPanel);
    // tell the spreadsheet to display the app we’ve created.
    SpreadsheetApp.getActiveSpreadsheet().show(app);

    Continuing with this pattern, we created a pretty complex design using the UI Services. The next step in building a useful user interface is actually building in event handlers for the UI Widgets. Event Handlers let Apps Script know which function you want to run when your script needs to respond to a given user interaction. The code below is an example of a DropDownHandler that we used in our script in Step 1 of the wizard.

    // create a function to execute when the event occurs. the
    // callback element is passed in with the event.
    function changeEventForDrowdown(el) {
    Browser.msgBox(“The dropdown has changed!”);
    }
    // create event handler object, indicating the name of the function to run
    var dropdownHandler = app.createServerChangeHandler(‘changeEventForDrowdown’);
    // set the callback element for the handler object.
    dropdownHandler.addCallbackElement(tabPanel);
    // add the handler to the “on change” event of the dropdown box
    contactGroupDropdown.addChangeHandler(dropdownHandler);

    4. Contacts Service

    When a user of the script chooses to share a specific group, the script saves that group contact data into a spreadsheet. When a sharing recipient clicks on the run button to accept the contacts share request, the script fetches the contact group data from the spreadsheet and uses theContacts Service to create contacts for the share recipients.

    var group = ContactsApp.createContactGroup(myGroupName);
    for (var i = 0; i < sheet.getLastRow(); i++) {
    var firstName = sheet.getRange(i, 1, 1, 1).getValue();
    var lastName = sheet.getRange(i, 2, 1, 1).getValue();
    var email = sheet.getRange(i, 3, 1, 1).getValue();
    var myContact = ContactsApp.createContact(firstName, lastName, email);
    // …
    // set other contact details
    // …
    myContact.addToGroup(group);
    }

    As this application shows, Apps Script is very powerful. Apps Script has the ability to create applications which allow you to integrate various Google and non-Google services while building complex user interfaces.

    You can find Dito’s Personal Contact Group Sharing Script hereClick here to view the video demonstration of this application. You can also find Dito Directory on the Google Apps Marketplace.

    Android 3.0 Hardware Acceleration


    One of the biggest changes we made to Android in this release is the addition of a new rendering pipeline so that applications can benefit from hardware accelerated 2D graphics. Hardware accelerated graphics is nothing new to the Android platform, it has always been used for windows composition or OpenGL games for instance, but with this new rendering pipeline applications can benefit from an extra boost in performance. On a Motorola Xoom device, all the standard applications like Browser and Calendar use hardware-accelerated 2D graphics.

    In this article, I will show you how to enable the hardware accelerated 2D graphics pipeline in your application and give you a few tips on how to use it properly.

    Go faster

    To enable the hardware accelerated 2D graphics, open your AndroidManifest.xml file and add the following attribute to the tag:

        android:hardwareAccelerated="true"

    If your application uses only standard widgets and drawables, this should be all you need to do. Once hardware acceleration is enabled, all drawing operations performed on a View’s Canvas are performed using the GPU.

    If you have custom drawing code you might need to do a bit more, which is in part why hardware acceleration is not enabled by default. And it’s why you might want to read the rest of this article, to understand some of the important details of acceleration.

    Controlling hardware acceleration

    Because of the characteristics of the new rendering pipeline, you might run into issues with your application. Problems usually manifest themselves as invisible elements, exceptions or different-looking pixels. To help you, Android gives you 4 different ways to control hardware acceleration. You can enable or disable it on the following elements:

    • Application
    • Activity
    • Window
    • View

    To enable or disable hardware acceleration at the application or activity level, use the XML attribute mentioned earlier. The following snippet enables hardware acceleration for the entire application but disables it for one activity:


    If you need more fine-grained control, you can enable hardware acceleration for a given window at runtime:

        getWindow().setFlags(
            WindowManager.LayoutParams.FLAG_HARDWARE_ACCELERATED,
            WindowManager.LayoutParams.FLAG_HARDWARE_ACCELERATED);

    Note that you currently cannot disable hardware acceleration at the window level. Finally, hardware acceleration can be disabled on individual views:

        view.setLayerType(View.LAYER_TYPE_SOFTWARE, null);

    Layer types have many other usages that will be described later.

    Am I hardware accelerated?

    It is sometimes useful for an application, or more likely a custom view, to know whether it currently is hardware accelerated. This is particularly useful if your application does a lot of custom drawing and not all operations are properly supported by the new rendering pipeline.

    There are two different ways to check whether the application is hardware accelerated:

    If you must do this check in your drawing code, it is highly recommended to use Canvas.isHardwareAccelerated() instead of View.isHardwareAccelerated(). Indeed, even when a View is attached to a hardware accelerated window, it can be drawn using a non-hardware accelerated Canvas. This happens for instance when drawing a View into a bitmap for caching purpose.

    What drawing operations are supported?

    The current hardware accelerated 2D pipeline supports the most commonly used Canvas operations, and then some. We implemented all the operations needed to render the built-in applications, all the default widgets and layouts, and common advanced visual effects (reflections, tiled textures, etc.) There are however a few operations that are currently not supported, but might be in a future version of Android:

    • Canvas
      • clipPath
      • clipRegion
      • drawPicture
      • drawPoints
      • drawPosText
      • drawTextOnPath
      • drawVertices
    • Paint
      • setLinearText
      • setMaskFilter
      • setRasterizer

    In addition, some operations behave differently when hardware acceleration enabled:

    • Canvas
      • clipRect: XOR, Difference and ReverseDifference clip modes are ignored; 3D transforms do not apply to the clip rectangle
      • drawBitmapMesh: colors array is ignored
      • drawLines: anti-aliasing is not supported
      • setDrawFilter: can be set, but ignored
    • Paint
      • setDither: ignored
      • setFilterBitmap: filtering is always on
      • setShadowLayer: works with text only
    • ComposeShader
      • A ComposeShader can only contain shaders of different types (a BitmapShader and a LinearGradientShader for instance, but not two instances of BitmapShader)
      • A ComposeShader cannot contain a ComposeShader

    If drawing code in one of your views is affected by any of the missing features or limitations, you don’t have to miss out on the advantages of hardware acceleration for your overall application. Instead, consider rendering the problematic view into a bitmap or setting its layer type to LAYER_TYPE_SOFTWARE. In both cases, you will switch back to the software rendering pipeline.

    Dos and don’ts

    Switching to hardware accelerated 2D graphics is a great way to get smoother animations and faster rendering in your application but it is by no means a magic bullet. Your application should be designed and implemented to be GPU friendly. It is easier than you might think if you follow these recommendations:

    • Reduce the number of Views in your application: the more Views the system has to draw, the slower it will be. This applies to the software pipeline as well; it is one of the easiest ways to optimize your UI.
    • Avoid overdraw: always make sure that you are not drawing too many layers on top of each other. In particular, make sure to remove any Views that are completely obscured by other opaque views on top of it. If you need to draw several layers blended on top of each other consider merging them into a single one. A good rule of thumb with current hardware is to not draw more than 2.5 times the number of pixels on screen per frame (and transparent pixels in a bitmap count!)
    • Don’t create render objects in draw methods: a common mistake is to create a new Paint, or a new Path, every time a rendering method is invoked. This is not only wasteful, forcing the system to run the GC more often, it also bypasses caches and optimizations in the hardware pipeline.
    • Don’t modify shapes too often: complex shapes, paths and circles for instance, are rendered using texture masks. Every time you create or modify a Path, the hardware pipeline must create a new mask, which can be expensive.
    • Don’t modify bitmaps too often: every time you change the content of a bitmap, it needs to be uploaded again as a GPU texture the next time you draw it.
    • Use alpha with care: when a View is made translucent using View.setAlpha(), an AlphaAnimation or an ObjectAnimator animating the “alpha” property, it is rendered in an off-screen buffer which doubles the required fill-rate. When applying alpha on very large views, consider setting the View’s layer type to LAYER_TYPE_HARDWARE.

    View layers

    Since Android 1.0, Views have had the ability to render into off-screen buffers, either by using a View’s drawing cache, or by using Canvas.saveLayer(). Off-screen buffers, or layers, have several interesting usages. They can be used to get better performance when animating complex Views or to apply composition effects. For instance, fade effects are implemented by using Canvas.saveLayer() to temporarily render a View into a layer and then compositing it back on screen with an opacity factor.

    Because layers are so useful, Android 3.0 gives you more control on how and when to use them. To to so, we have introduced a new API called View.setLayerType(int type, Paint p). This API takes two parameters: the type of layer you want to use and an optional Paint that describes how the layer should be composited. The paint parameter may be used to apply color filters, special blending modes or opacity to a layer. A View can use one of 3 layer types:

    • LAYER_TYPE_NONE: the View is rendered normally, and is not backed by an off-screen buffer.
    • LAYER_TYPE_HARDWARE: the View is rendered in hardware into a hardware texture if the application is hardware accelerated. If the application is not hardware accelerated, this layer type behaves the same as LAYER_TYPE_SOFTWARE.
    • LAYER_TYPE_SOFTWARE: the View is rendered in software into a bitmap

    The type of layer you will use depends on your goal:

    • Performance: use a hardware layer type to render a View into a hardware texture. Once a View is rendered into a layer, its drawing code does not have to be executed until the View calls invalidate(). Some animations, for instance alpha animations, can then be applied directly onto the layer, which is very efficient for the GPU to do.
    • Visual effects: use a hardware or software layer type and a Paint to apply special visual treatments to a View. For instance, you can draw a View in black and white using a ColorMatrixColorFilter.
    • Compatibility: use a software layer type to force a View to be rendered in software. This is an easy way to work around limitations of the hardware rendering pipeline.

    Layers and animations

    Hardware-accelerated 2D graphics help deliver a faster and smoother user experience, especially when it comes to animations. Running an animation at 60 frames per second is not always possible when animating complex views that issue a lot of drawing operations. If you are running an animation in your application and do not obtain the smooth results you want, consider enabling hardware layers on your animated views.

    When a View is backed by a hardware layer, some of its properties are handled by the way the layer is composited on screen. Setting these properties will be efficient because they do not require the view to be invalidated and redrawn. Here is the list of properties that will affect the way the layer is composited; calling the setter for any of these properties will result in optimal invalidation and no redraw of the targeted View:

    • alpha: to change the layer’s opacity
    • x, y, translationX, translationY: to change the layer’s position
    • scaleX, scaleY: to change the layer’s size
    • rotation, rotationX, rotationY: to change the layer’s orientation in 3D space
    • pivotX, pivotY: to change the layer’s transformations origin

    These properties are the names used when animating a View with an ObjectAnimator. If you want to set/get these properties, call the appropriate setter or getter. For instance, to modify the alpha property, call setAlpha(). The following code snippet shows the most efficient way to rotate a View in 3D around the Y axis:

        view.setLayerType(View.LAYER_TYPE_HARDWARE, null);
        ObjectAnimator.ofFloat(view, "rotationY", 180).start();

    Since hardware layers consume video memory, it is highly recommended you enable them only for the duration of the animation. This can be achieved with animation listeners:

        view.setLayerType(View.LAYER_TYPE_HARDWARE, null);
        ObjectAnimator animator = ObjectAnimator.ofFloat(
             view, "rotationY", 180);
        animator.addListener(new AnimatorListenerAdapter() {
            @Override
            public void onAnimationEnd(Animator animation) {
                view.setLayerType(View.LAYER_TYPE_NONE, null);
            }
        });
        animator.start();

    New drawing model

    Along with hardware-accelerated 2D graphics, Android 3.0 introduces another major change in the UI toolkit’s drawing model: display lists, which are only enabled when hardware acceleration is turned on. To fully understand display lists and how they may affect your application it is important to also understand how Views are drawn.

    Whenever an application needs to update a part of its UI, it invokes invalidate() (or one of its variants) on any View whose content has changed. The invalidation messages are propagated all the way up the view hierarchy to compute the dirty region; the region of the screen that needs to be redrawn. The system then draws any View in the hierarchy that intersects with the dirty region. The drawing model is therefore made of two stages:

    1. Invalidate the hierarchy
    2. Draw the hierarchy

    There are unfortunately two drawbacks to this approach. First, this drawing model requires execution of a lot of code on every draw pass. Imagine for instance your application calls invalidate() on a button and that button sits on top of a more complex View like a MapView. When it comes time to draw, the drawing code of the MapView will be executed even though the MapView itself has not changed.

    The second issue with that approach is that it can hide bugs in your application. Since views are redrawn anytime they intersect with the dirty region, a View whose content you changed might be redrawn even though invalidate() was not called on it. When this happens, you are relying on another View getting invalidated to obtain the proper behavior. Needless to say, this behavior can change every time you modify your application ever so slightly. Remember this rule: always call invalidate() on a View whenever you modify data or state that affects this View’s drawing code. This applies only to custom code since setting standard properties, like the background color or the text in a TextView, will cause invalidate() to be called properly internally.

    Android 3.0 still relies on invalidate() to request screen updates and draw() to render views. The difference is in how the drawing code is handled internally. Rather than executing the drawing commands immediately, the UI toolkit now records them inside display lists. This means that display lists do not contain any logic, but rather the output of the view hierarchy’s drawing code. Another interesting optimization is that the system only needs to record/update display lists for views marked dirty by an invalidate() call; views that have not been invalidated can be redrawn simply by re-issuing the previously recorded display list. The new drawing model now contains 3 stages:

    1. Invalidate the hierarchy
    2. Record/update display lists
    3. Draw the display lists

    With this model, you cannot rely on a View intersecting the dirty region to have its draw() method executed anymore: to ensure that a View’s display list will be recorded, you must call invalidate(). This kind of bug becomes very obvious with hardware acceleration turned on and is easy to fix: you would see the previous content of a View after changing it.

    Using display lists also benefits animation performance. In the previous section, we saw that setting specific properties (alpha, rotation, etc.) does not require invalidating the targeted View. This optimization also applies to views with display lists (any View when your application is hardware accelerated.) Let’s imagine you want to change the opacity of a ListView embedded inside a LinearLayout, above a Button. Here is what the (simplified) display list of the LinearLayout looks like before changing the list’s opacity:

        DrawDisplayList(ListView)
        DrawDisplayList(Button)

    After invoking listView.setAlpha(0.5f) the display list now contains this:

        SaveLayerAlpha(0.5)
        DrawDisplayList(ListView)
        Restore
        DrawDisplayList(Button)

    The complex drawing code of ListView was not executed. Instead the system only updated the display list of the much simpler LinearLayout. In previous versions of Android, or in an application without hardware acceleration enabled, the drawing code of both the list and its parent would have to be executed again.

    It’s your turn

    Enabling hardware accelerated 2D graphics in your application is easy, particularly if you rely solely on standard views and drawables. Just keep in mind the few limitations and potential issues described in this document and make sure to thoroughly test your application!
    SketchUp Pro Case Study: Randy Wilkins

    Randy Wilkins is a Hollywood veteran who’s worked on such films as “TRON: Legacy”, “The Social Network”, “The Girl with the Dragon Tattoo”, “The Curious Case of Benjamin Button” and “Catch Me if You Can”. We sat down with Randy to find out more about what he does and how he incorporates SketchUp (and our recently released Advanced Camera Tools plugin) into his workflow.

    Where did you grow up and where do you live and work now?

    I grew up in Ohio and moved out to Los Angeles to go to graduate school. I started working in the film industry immediately afterward.

    What did you study in school?

    My favorite subjects were architecture, history and woodworking. Of the three, I decided architecture was the best career choice. That is, it was until I fell in love with cameras. I ended up dropping out of school to work as a photographer and by the time I returned to school I had decided to get a degree in film. I graduated with a Bachelor of Fine Arts degree in Cinema from the Ohio State University. During my senior year, my thesis film at OSU was selected as a finalist for a Student Oscar. That led to a Directing Fellowship at The American Film Institute.

    What do you do for a living?

    Primarily, I work as a Set Designer in the film industry here in Los Angeles. I realized that being an independent filmmaker is a tough way to pay the bills; luckily, I sort of fell into set design. It was a good fit considering my architectural , drafting and photography experience and it has allowed me to work in the industry while I pursue my own films.

    What projects have your worked on that folks might have heard about?

    I’ve worked on over 50 films and television series over the years. The great thing about set design is that you’re always doing something different and you’re always learning something new. I just finished working on “The Girl With The Dragon Tattoo” for Production Designer Don Burt, and I also recently worked on “The Social Network” and “TRON: Legacy”.

    Which of your projects are you most proud of?

    I’d have to say “The Curious Case Of Benjamin Button” is one of the films I’m most proud to have worked on. I’ll always jump at a chance to do historical or classical architecture. I was also happy with the way “Catch Me If You Can” turned out. It was a very tough picture from our perspective. There were over 170 sets to create during a 70 day shoot. The fact that they were all period 1960’s and 70’s pieces made it a real challenge.

    How did you first hear about SketchUp?

    I first heard about SketchUp in 2003 when I saw another Set Designer using it. I was impressed with how simple it seemed to be to learn and how fast she could generate a model. It’s very hard for people who aren’t used to looking at orthographic drawings to be able to visualize them in three dimensions. We always used to build a lot of foamcore models, which can be very time consuming. To be able to quickly build something in 3D to show someone is a lifesaver when you’re working on a tight schedule.

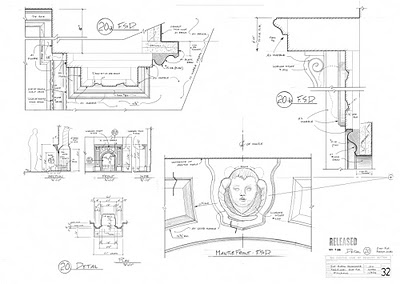
    I started learning the program in 2004 but didn’t become really proficient with it until I took a class from Mike Tadros, which was great. He’s an excellent instructor. After that I was doing most of my preliminary design work in SketchUp and then executing the drawings by hand. Until recently, most Set Designers were drawing by hand for a variety of reasons. The image below is an example of a traditional drawing for film scenery. We often do a lot of character scenery that requires us to show age or organic shapes and that’s hard to do with AutoCAD.

    An example of a typical hand drawing for film scenery: A fireplace detail from “The Curious Case Of Benjamin Button”

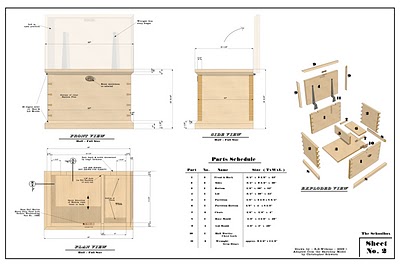
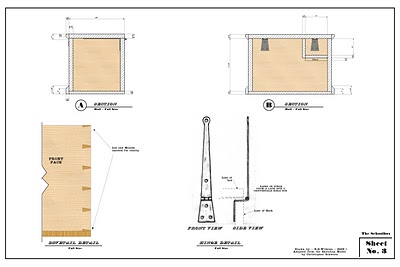
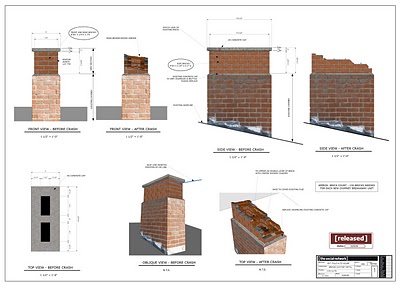
    The next three images are good examples of some of the things I love about LayOut. I can add textures, shading or even paste in some of my hand drawings into the documents. They just have a lot more “life” than CAD drawings do.

    Measured drawings created in LayOut, based on a model by Popular Woodworking editor Christopher Schwarz.
    A drawing of the collapsing chimney from “The Social Network

    How does SketchUp relate to what you do?

    Since LayOut was added to Sketchup Pro, I pretty much do 95% of all my work in SketchUp and LayOut, and I’m always finding new ways to use it. We have to create a lot of our drawings from photographs, either to recreate a historic building or furniture piece, or to match a location for sets built on stage or on a backlot.

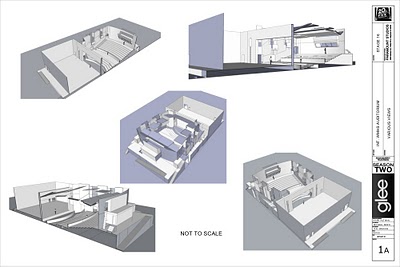
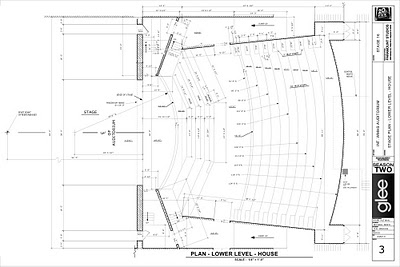
    People are slowly realizing that SketchUp is much more than a modeling program. I still get surprised responses from some people when they see a drawing package I’ve done in SketchUp. I did some work last year for the television series “Glee”. They wanted to recreate the theater they used for the first season, so I surveyed the location and modeled a slightly smaller version in SketchUp and executed the drawings in LayOut. The Key Grip looked at the perspective sections I included with the drawings and said, “What program did you do this with?” He was surprised when I told him it was SketchUp.

    Perspectives of the theater set model from Glee.
    Plan view of Glee theater stage set.

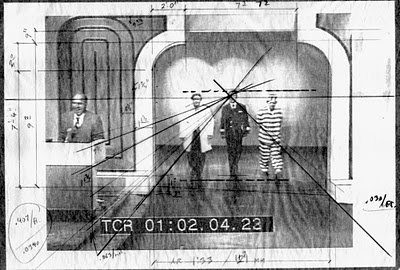
    The film “Catch Me If You Can” opens with a recreation of a popular television show from the 70’s called “To Tell The Truth”. Production Designer Jeannine Oppewall had me create construction drawings to build a replica of the original set that was accurate enough to matte-in portions of video from the original show. The original drawings were long gone and the only reference I had was a still from the video.

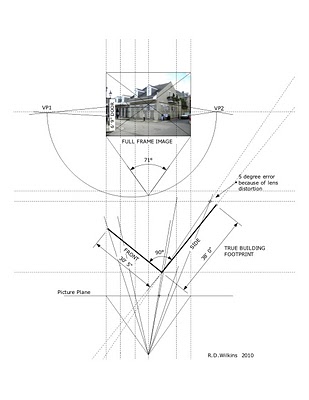
    We have a technique called back-projection which basically uses the rules of perspective in reverse, as in Figure 5. From a photo we can figure out the scale to create measured drawings as well as determine the lens used, camera height and tilt and so on. I figured out it was much easier to do the process in SketchUp, where I could create the plan view right in the model, to scale (see below).

    An example of back-projection calculations in pencil.
    A back-projection done in SketchUp.

    I’m currently working for Darren Gilford who was the Production Designer for “TRON:Legacy” and is also a big proponent of SketchUp. He does most of his design work in SketchUp which makes it great when he passes his models on to the Set Designers. There’s no scaling or back-projection involved—I know exactly what he wants.

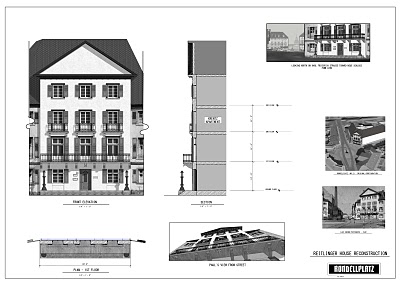
    Another SketchUp tool I use a lot is Match Photo, which is a nice companion to doing a back-projection. I’ve been using it to create models of buildings that no longer exist. I have a film called “A Question Of Loyalty” which did really well on the festival circuit and several people encouraged me to expand it into a feature -length film. It takes place in Germany and deals with the loss of civil liberties in the late 1930’s. It’s set mostly in an apartment of the Reitlinger House designed by the architect Friedrich Weinbrenner which was destroyed during World War II. I used several period photos and Weinbrenner’s original plan to reconstruct a SketchUp model to determine how much of the building needed to be a physical set and how much could be digital (below).

    LayOut drawing of the reconstructed Reitlinger building.

    Is there a specific time you can recall when SketchUp was particularly important/helpful?

    There were several times while I was working on the television show “Heroes” that I really began to see the potential of the program. The show was very ambitious; it was like making a feature film every eight days.

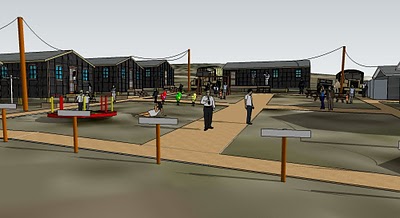
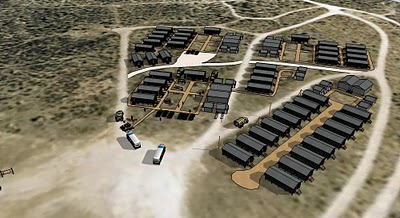
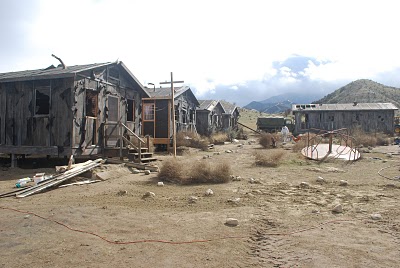
    For one episode, we had to create an internment camp similar to Manzanar. We had three days to do the design and drawings and eight days to build it. After it was shot, the construction crew and painters had 14 hours to add 45 years of age. The Production Designer Ruth Ammon gave me sketches of what she wanted as she was leaving for the location scout of the build site. I asked her to send me the GPS coordinates of the center of the camp and a photo showing the orientation. By the time they got back from the scout I had downloaded the site with the topography from Google Earth, dropped the camp model onto it and laid in the new road. It saved me at least two days.

    SketchUp model of camp for “Heroes”
    Finished camp
    Camp after being “aged” 45 years

    The program is also great for designing photo backings or translites for stage work.
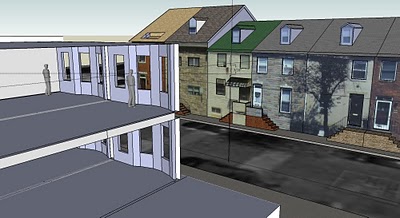
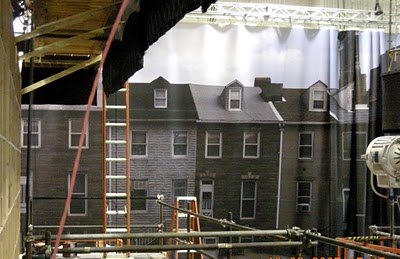
    We used to lay them out on paper but doing them in SketchUp is great because there isn’t any guess work. You can “paint” the photos of the location on the wall outside the model at the right scale and show the Production Designer exactly what it will look like.

    A layout for a photo backing.
    The finished translite when hung on the stage


    How are you using the Advanced Camera Tools plugin in your work?

    I’ve been hoping for an update to the old Film & Stage plugin for some time now and was really excited to learn Google was working on it. It really was the missing piece of the package for me. I can now say that SketchUp really is the perfect software for film design. There is very little I can think of that I can’t do with it.

    When you have a digital model up on the screen, the first thing a Production Designer or Director or DP will ask is, “What focal length is that?” Because the most important thing really is: What is the camera going to see? Everything else for us is secondary. If it can’t be shot it won’t work.

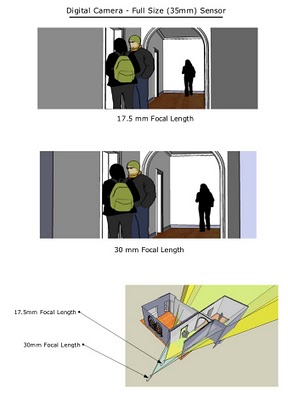
    I had a work-around process for using camera angles that I’ve been using but it’s cumbersome. The new Advanced Camera Tools plugin is fantastic. I can change the focal length while in the camera mode and not have the camera move its current position, or I can change the aspect ratio or tilt or height without having to reposition anything. And having the data right on the screen is a big help.

    This means SketchUp is now very useful for the other two “VIS’s”. In the industry, visualization is now broken up into three parts: D-VIZ (Design Visualization), PRE-VIZ and POST-VIZ. D-VIZ is the traditional pre-production design phase where the sets and environments are created and SketchUp is already the most-used modeling program in that respect.

    Pre- and Post-visualization are more concerned with exactly what is seen through the camera and combining real and computer-generated elements. With the Advanced Camera Tools, you can now view a model and be very specific as to camera position, aspect ratio and lens focal length. That for me was the missing piece of the software.

    What advantages does it give you over other similar programs?

    For a software package that would give you the same ability to use specific camera data and lens data you would have to consider a much more expensive program. To get data and camera control comparable to the new Advanced Camera Tools I would have had to bring the model into another program such as Maya or Rhino. Now I don’t need to go to that trouble.

    It also suddenly becomes a very much more useful tool for storyboarding. There are a number of programs such as Frame Forger that are popular 3D storyboarding programs because they provide specific camera and lens data. You now have all those capabilities with SketchUp. And when you create those boards in LayOut, they are automatically updated when there are changes to the model. That’s a huge advantage.

    I’m going to begin teaching seminars on Visualization For Filmmakers (email if you’re interested) here in Los Angeles and almost all of the curriculum has been created in SketchUp or LayOut. The ACT plugin will be very useful for the sections when I’ll talk about both lenses and digital storyboarding.

    Focal length comparison diagram

    What would advice would you give to aspiring set designers and filmmakers?

    I always recommend that people who want to direct take an acting class such as the Judith Weston Acting Studio, which is excellent. You’ll have more empathy for actors and it will be easier to communicate with them. Even if you want to make animated films or create CG characters, understanding the acting process and character development will make your digital characters more emotionally real. Learn about what the camera does. The book “Film Directing: Shot by Shot: Visualizing from Concept to Screen” is a good resource, as is “Digital Moviemaking 3.0“.

    Make short films. You used to have to go to film school just to have access to the equipment you needed to make a good looking film but not anymore. Today, all the equipment you need to shoot and edit in your own home is affordable.

    Traditionally, Production Designers got their start as Art Directors or Set Designers, but now they come from all fields: illustration, product design, visual effects and others. The Art Directors Guild publishes a magazine called Perspective which is available online and contains articles about the design of current films. You’ll need to be able to communicate visually, which means drawing and modeling are both very useful skills as well as the ability to read architectural drawings. Study architecture, design, history, technology. There’s nothing you’ll learn that won’t be useful. The Production Designer, to be really effective, should know the basics about all the other aspects of film making.