The Intelligent Business Apps with the Google Prediction API

The Google Prediction API exposes Google’s machine learning algorithms as a RESTful API for use by applications around the web. This allows developers to replace repetitive manual processes with automated and smarter code, saving users valuable time and preventing headaches. The Prediction API first launched in at I/O 2010 and the team recently added a number of enhancements that make it more powerful for many types of business applications.

What can the Prediction API do?

The basic job of machine learning is to recognize historical patterns in data and use those patterns to make intelligent predictions in the future.


Some great use cases:

  • Spam detection: Does your product allow users to submit content? Do some users abuse this opportunity by submitting spam? Instead of maintaining a large number of regular expressions trying to catch common types of spam, you can use the Prediction API to automatically detect it and react accordingly.
  • Sentiment analysis: Are you building a CRM that keeps track of exchanges with customers? You could use the Prediction API to analyze correspondence with customers and detect when a customer might be communicating with a really negative or positive tone. This can alert you to when you might need to improve a relationship or even start writing a customer success story.
  • Tagging & organizing: Does your application store a lot of unstructured content? You can provide organization for this content by automatically tagging it based on how your users have previously tagged similar content.
  • Message routing: If you have a CRM that needs to route leads to the most appropriate people or a helpdesk ticket system that needs to route tickets to the correct support team, the Prediction API can help. Instead of writing a set of rules for which leads or tickets get routed to which people, use machine learning to predict the routing based on historical patterns.

On example: We built a demo app that uses the Prediction API to predict what types of applications a company might want to add from the Google Apps Marketplace based on the demographics of the company and a sampling of previous install data.

You can also try out some pre-built demonstration models in the Hosted Model Gallery.

How does it work?

Simple process:

  1. Upload training data to Google Storage. Training data is formatted as a CSV file with the first column representing the result (categorical or real-valued) and the remaining columns representing separate features contributing to the result.Example for predicting the size of a person in meters:
    “Height in meters”, “Gender”, “Father’s height”, “Mother’s height”, “Country of origin”

    1.71,”Male”,1.74,1.62,”France”1.51,”Female”,1.61,1.50,”India”….
  2. Train a model based on the uploaded data. You only need to make a single REST call to start the asynchronous training process.
  3. Predict results based on new data
  4. (Optional) Tune the training model with new results. If you have new training data, you can now add it to your existing model to tune it.
  5. (Optional) Make your model available to others via the forthcoming Hosted Model Gallery.

New Organic modeling with the Artisan plugin

SketchUp plugin wizard Dale Martens (a.k.a. Whaat) recently released an amazing and incredibly useful organic modeling toolset called Artisan. Based on Dale’s popular Subdivide & Smooth tools, Artisan is perfect for people who want to use SketchUp to model organic shapes and terrain features. Artisan includes a set of “deformation” tools that allow you to sculpt, smooth, flatten, pinch and apply textures just like you would with a brush.

The toolbar for Dale Martens’ Artisan Organic Toolset for SketchUp
Eric Lay modeled Patrick Beaulieu’s “Bobby Bubble” character, then rendered him (her?) with Twilight Render.
Use Artisan’s Sculpt tools to “paint” 3D deformation onto surfaces.

You can add or reduce polygon complexity in your model, allowing for more or less detail. There’s also a suite of vertex tools that you can use to model based on controlling vertex points. Oh—and did I mention that it’s a ton of fun to use? Have a look at some of the features yourself…

As anyone at the office can tell you, I’m no artist or designer, but I thought I would give the Artisan tool a try over the weekend. Below is something that I whipped up; not too shabby for an hour’s worth of work.

I modeled this hamburger. Er, yum?

If slimy, unappetizing hamburgers aren’t your thing, no worries. It’s not a stretch to see how the Artisan tools might be applied to a whole range of different markets and use cases: character design, product design, environmental design, construction, civil engineering, architecture and, of course, landscape architecture.

Peter Stoppel modeled this scooter.
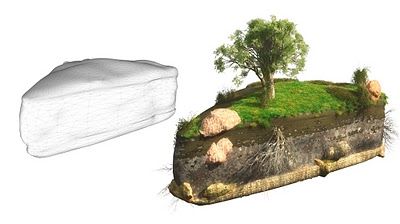
Peter also modeled this wedge of landscape.
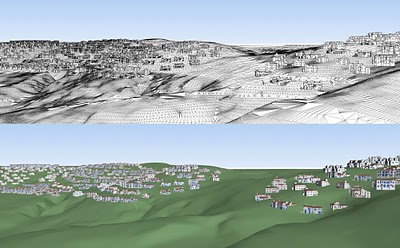
Artisan is also incredibly useful for freeform terrain modeling. This model is by Daniel Tal.

For more information and video tutorials on the Artisan Organic Toolset for SketchUp, check out this website. You’ll also find a great writeup on the Artisan tools in SketchUcation’s February issue of the CatchUp news magazine.

Thank you to Dale for building this great plugin, and special thanks to Eric Lay (a.k.a. Boofredlay), Peter Stoppel (a.k.a. Solo) and Daniel Tal for your great graphics.

SketchUp Pro Case Study: Peter Wells Design

Peter Wells is a Glendale, Wisconsin-based independent remodeling designer serving Milwaukee and the southeastern part of the state. Working through builders or direct with homeowners, Wells creates award-winning residential design solutions for kitchens, bathrooms, lower levels and additions. He belongs to the local NARI chapter & his new company is in its fourth year of production.

In the remodeling business, every new project brings its own unique design challenge. Solutions often have to be submitted with in very short window of time. For one project, the Milwaukee Neighborhood Improvement Development Corporation (NIDC) sent out an RFP to area contractors for a whole-house remodel on a foreclosed property on the city’s north side.

The deadline was a very tight two-and-a-half weeks from the issuing of the RFP to the submission of proposals. My time frame was made even shorter as it took several days for us to determine the feasibility of the project after meeting with the director of the program at the contractors’ open house.

Using SketchUp Pro provided us a way to meet the short deadlines and easily communicate our design ideas in detail in order to fulfill RFP requirements.

When we decided to give the project a go, the site was measured on a Tuesday. A rough ‘as-built’ model was created and preliminary plans were reviewed with my builder on Friday (three days later). By the following Tuesday, the “proposed” model was completed, and the next day the LayOut documentation shown below was finished—two days before deadline!

“As-built” SketchUp model in a LayOut document

We were not allowed to present our design in person at the first stage of the review process, so we wanted to include as much information in our documentation as possible. Using LayOut’s ability to annotate the drawings, we made our case page by page.

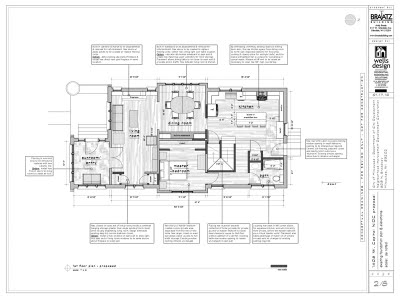
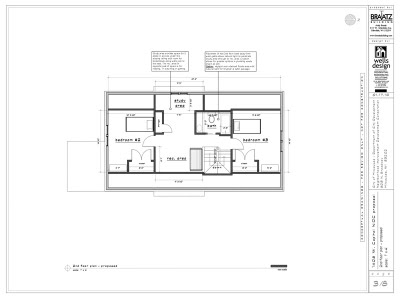
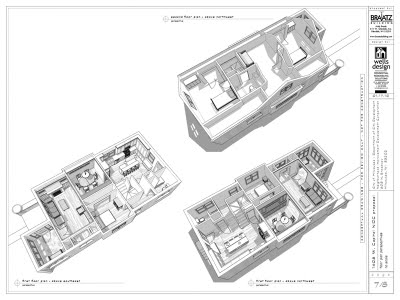
Floor plans with details addressing RFP requirements

The floor plans show all of the descriptive text boxes explaining where we met the RFP requirements, as well as where we proposed changes to enhance the plan or simplify the construction.

The house itself was in good structural shape, but the interior was pretty rough, with the RFP acknowledging that the north end of the 1st floor and the entire 2nd floor would need to be gutted and refurbished. Using the Google 3D Warehouse to best effect, I was able to quickly populate the model with furniture and appliances to provide a human scale and clues as to how the home might be lived in.

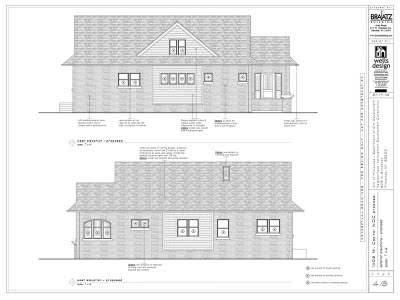
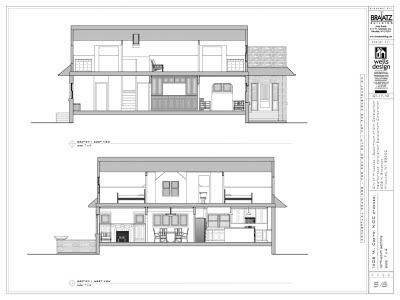
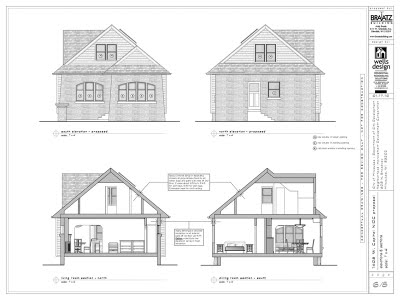
The exterior elevations and sections are created from the same model, continuing the annotation that would satisfy the RFP. The section cuts are “enhanced” with shaded geometry created in LayOut as the time frame didn’t allow for what I might normally more carefully model in SketchUp Pro.

Elevations and Sections (East & West)
Elevation and Sections (North & South)

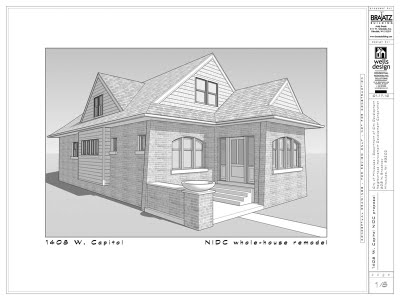
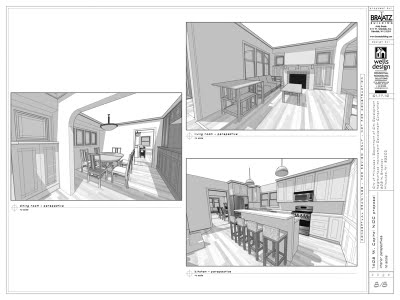
Finally, I added several perspective views to help the committee get a complete understanding of our proposal. One page shows an overhead view of the first and second floors with the ceilings removed to see the home from end to end, and then the final page shows an eye-level perspective from the key rooms on the first floor.

Perspective views help to ensure a complete understanding of the proposal.

With SketchUp’s powerful modeling features, I was able to set all of these plan, elevation, section and perspective views using Scenes. With the model dynamically linked to LayOut, final tweaks and edits done in SketchUp were automatically updated in the LayOut document instead of having to rework entire drawings.

In this instance, the SketchUp Pro and LayOut features enabled me to create a comprehensive presentation under a very tight deadline that impressed both the committee and my builder.

Once our clients see it in 3D, they instantly get the concept. This allows for better feedback and generally leads to a quicker arrival of the final design solution. My favorite compliments come at the end of a project when a client says, “Iit looks just like the model!”