SketchUp: André Silva

This case study comes to us from André Silva. André is a freelancer in Lisbon, Portugal who mainly works on industrial projects and technical illustrations. He’s also currently working on some architecture and archaeology projects.

I was first introduced to SketchUp about three years ago, while I was searching for simple software to model mechanical devices in 3D. My first contact with it was not very promising and I felt a bit skeptical about its real possibilities to build good mechanical models — mainly because it seemed to be a software intended to build models for Google Earth.

However, after some days of training, I became really surprised with how easy and fast someone can model almost anything with this software. As an example of simplicity, a chain link which took me about 4 hours to model with “Mechanical Desktop” (an Autodesk application that I was using then), was done only in 50 minutes with SketchUp.

Of course, there are important differences between these softwares: SketchUp is not a CAD software, but I believe that when the problems you have to solve are simple you must always look for a simple solution and for what I need to produce in my work, SketchUp is without a doubt, the best solution.

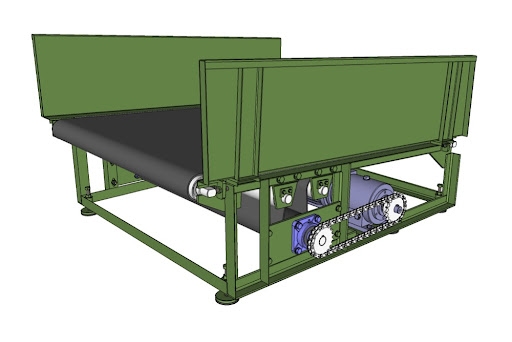
Since those days, I’m modeling with SketchUp on a daily basis, not only to produce schemes and 3D model views for technical documents (usually for parts lists and exploded views) but also as an important helper in the development of small mechanical projects. Basic analysis about interference between machine parts or assembly sequence studies are easy with SketchUp.

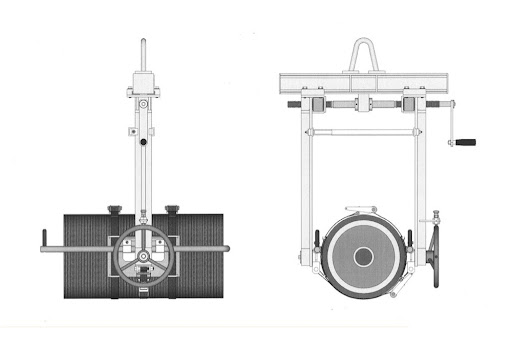
A good and recent example of how SketchUp helps me in my work is the set of studies and schemes I made for a simple lifting adaptor for copper cylinders. This was a simple project entirely developed with SketchUp since the first sketch, up to the final product. All presentation and assembly schemes, and even a presentation video, were made easily and rapidly with SketchUp.


Some time ago I also started to use SketchUp in another way: as a pre-modeling tool for some architectural or “inorganic” models in Blender. Working this way dramatically simplifies the modeling work with Blender and I think is a technique that I will keep exploring.

In my humble opinion and to conclude this note, I only find one “problem” with SketchUp: the non-existence of a dedicated version for Linux. But what can we do? We all know that the world is not a perfect place.

Extrude curves with fewer sides in SketchUp

The most sure-fire way to mitigate your model’s geometric complexity (its count of faces and edges) is to pay attention to extruded circles and arcs. Experienced modelers know that curves in SketchUp are actually constructed out of multiple, straight edges. By default, circles have 24 sides and arcs have 12 sides. Zoom in and you’ll see what I mean:

By default, circles you draw in SketchUp have 24 sides.


Arcs you draw in SketchUp are 12-sided by default.


When you extrude a default, 24-sided circle with the Push/Pull tool, you create a cylinder with 26 faces. Choosing View > Hidden Geometry shows the smoothed edges between the faces:

Turning on Hidden Geometry shows a default cylinder for what it really is: a 24-sided extruded polygon.


Using two default arcs and the Follow Me tool to create an fancy bullnose along the perimeter of a rectangular countertop yields no fewer than 90 new faces:

Using the Follow Me tool to extrude compound curves made out of default, 12-sided arcs results in seriously high polygon (face) counts. Thumbs-down — this is bad SketchUp practice.


Modeling a simple bike rack using a combination of 24-sided circles, 12-sided arcs and Follow Me, then placing ten of those bike racks in your design, adds more than 86,000 entities (faces and edges) to your model. Oof.

A single bike rack made by extruding a 24-sided circle along a path made from 12-sided arcs. Unless you’re designing the bike rack itself, there’s no call for adding this much geometry to your model.


A close-up of the high-polygon bike rack. Individual faces and edges are made visible by turning on Hidden Geometry. Images like this one cause expert SketchUp modelers to have nightmares.

The Solution

To dramatically reduce the amount of geometry in your models, change the number of sides in your circles and arcs before you extrude them into 3D shapes. It’s easy:

1) Create a circle or an arc using the appropriate tool.

2) Before doing anything else, type “6s” and hit Enter.

This tells SketchUp to draw the curve you just created using six sides. The “s” tells it that you’re changing the side-count and not the radius. Of course, you don’t have to choose six sides — you can type in any number you like.

Change the number of sides in the circles and arcs you draw. I know, I know — a hexagon isn’t a circle. Suspend your disbelief in order to have usable models.


Note: Once you’ve manually changed the number of sides in a circle or an arc, every subsequent circle or arc you draw will have that same number of sides.

I modeled the bike rack below using 5-sided circles and 6-sided arcs. It only has 322 faces — an 89% reduction over the bike rack I modeled using curves with the default number of sides.

Crafting a bike rack by extruding a 5-sided circle along a path with 6-sided arcs yields a perfectly usable model with substantially fewer faces and edges.


When it’s used as context in my model, can you tell the difference between the “high-poly” (geometrically heavy) and low-poly versions? I thought not.

Is the quality difference between the high-polygon (top) and low-polygon versions of the bike rack worth making your model twice as heavy? Nope.

New book: Google SketchUp Workshop

When it comes to instructions for building your first house, or your first bench, or your first Google Earth model, there is no shortage of available materials. But what happens after you’re a SketchUp rockstar? Where are all the tomes full of delicious inspiration for those of us who have mastered inference locking and nested section planes and scene properties? It’s all fine and well to read about how SketchUp works, but real progress comes from peeking over our peers’ shoulders to see what they’re working on.

And that’s exactly the concept behind Laurent Brixius’ brilliant new book Google SketchUp Workshop. Translated from the original “Créer avec SketchUp” (originally published a few years ago in French) this full-color volume presents sixteen beautifully illustrated case studies authored by expert SketchUp users from a multitude of different disciplines. Each one includes high-level workflows, tips and techniques for using SketchUp in a different field of design. Architecture, urban design, engineering, process plant design, woodworking, theater set design and architectural graphics are all represented.

Our friends over at SketchUpArtists.org conducted a nice interview with Laurent (the book’s editor) before the English edition came out. An architect, architectural 3D artist and author from Belgium, he’s done an amazing job of assembling a collection of projects that are pure inspiration. This is a book that belongs on the shelf of every SketchUp aficionado.