OAuth 1.0 Tokens with the Python Client Library


The OAuth Playground is a great tool to learn how the OAuth flow works. But at the same time it can be used to generate a “long-lived” access token that can be stored, and used later by applications to access data through calls to APIs. These tokens can be used to make command line tools or to run batch jobs.

In this example, I will be using this token and making calls to the Google Provisioning API using the Python client library for Google Data APIs. But the following method can be used for any of the Google Data APIs. This method requires the token is pushed on the token_store, which is list of all the tokens that get generated in the process of using Python client libraries. In general, the library takes care of it. But in cases where it’s easier to request a token out of band, it can be a useful technique.

Step 1: Generate an Access token using the OAuth Playground.
Go through the following process on the OAuth Playground interface:

  • Choose scope(s) of every API you want to use in your application (https://apps-apis.google.com/a/feeds/user/ for the Provisioning API) . Here you can also add scopes which are not visible in the list.
  • Choose an encryption method that is the signature method to encode your consumer credentials. (“HMAC-SHA1” is the most common)
  • Enter your consumer_key and consumer_secret in the respective text fields. The consumer_key identifies your domain and is unique to each domain.

After entering all the required details you need to press these buttons on the OAuth Playground in sequence:

  • Request token: This will call Google’s OAuth server to issue you a request token.
  • Authorize: This will then redirect you to the authorization URL where you can authorize or deny access. At this point if you deny the access you will not be able to generate the Access token. Accepting this will convert the Request token generated in the last step into an Authorized Request token.
  • Access token: Finally, this step will exchange the authorized Request token for an Access token.

After the last step the text field captioned auth_token in the OAuth Playground has the required Access token and that captioned access_token_secret has the corresponding token secret to be used later.

Step 2: Use the above token when making calls to the API using a Python Client Library.

Here is an example in Python which uses the OAuth access token that was generated from OAuth Playground to retrieve data for a user.

CONSUMER_KEY = “CONSUMER_KEY”
CONSUMER_SECRET = “CONSUMER_SECRET”
SIG_METHOD = gdata.auth.OAuthSignatureMethod.HMAC_SHA1
TOKEN = “GENERATED_TOKEN_FROM_PLAYGROUND”
TOKEN_SECRET = “GENERATED_TOKEN_SECRET_FROM_PLAYGROUND”

DOMAIN = “your_domain”

client = gdata.apps.service.AppsService(source=”app”, domain=DOMAIN)
client.SetOAuthInputParameters(SIG_METHOD, CONSUMER_KEY, consumer_secret=CONSUMER_SECRET)
temp_token = gdata.auth.OAuthToken(key=TOKEN, secret=TOKEN_SECRET);
temp_token.oauth_input_params = client.GetOAuthInputParameters()
client.SetOAuthToken(temp_token)
#Make the API calls
user_info = client.RetrieveUser(“username”)

It is important to explicitly set the input parameters as shown above. Whenever you call SetOuthToken it creates a new token and pushes it into the token_store. That becomes the current token. Even if you call SetOauthToken and SetOAuthInputParameters back to back, it won’t set the input params for the token you set.
OAuth 2.0, Python & Google Data APIs


Since March of this year, Google has supported OAuth 2.0 for many APIs, including Google Data APIs such as Google Calendar, Google Contacts and Google Documents List. Google’s implementation of OAuth 2.0 introduces many advantages compared to OAuth 1.0 such as simplicity for developers and a more polished user experience.

We’ve just added support for this authorization mechanism to the gdata-python-client library– let’s take a look at how it works by retrieving an access token for the Google Calendar and Google Documents List APIs and listing protected data.

Getting Started

First, you will need to retrieve or sync the project from the repository using Mercurial:

hg clone https://code.google.com/p/gdata-python-client/

For more information about installing this library, please refer to the Getting Started With the Google Data Python Library article.

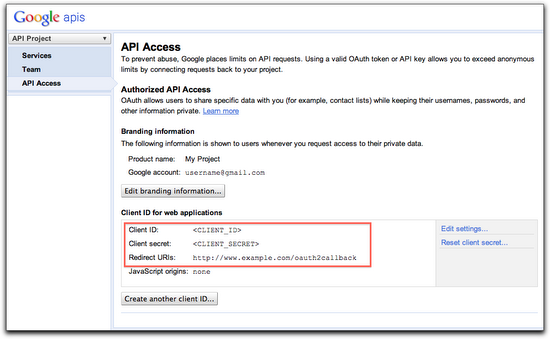
Now that the client library is installed, you can go to your APIs Console to either create a new project, or use information about an existing one from the API Access pane:

Getting the Authorization URL

Your application will require the user to grant permission for it to access protected APIs on their behalf. It must redirect the user over to Google’s authorization server and specify the scopes of the APIs it is requesting permission to access.

Available Google Data API’s scopes are listed in the Google Data FAQ.

Here’s how your application can generate the appropriate URL and redirect the user:

import gdata.gauth

# The client id and secret can be found on your API Console.
CLIENT_ID = ''
CLIENT_SECRET = ''

# Authorization can be requested for multiple APIs at once by specifying multiple scopes separated by # spaces.
SCOPES = ['https://docs.google.com/feeds/', 'https://www.google.com/calendar/feeds/']  
USER_AGENT = ''

# Save the token for later use.
token = gdata.gauth.OAuth2Tokens(
   client_id=CLIENT_ID, client_secret=CLIENT_SECRET, scope=' '.join(SCOPES),
   user_agent=USER_AGENT)

# The “redirect_url” parameter needs to match the one you entered in the API Console and points
# to your callback handler.
self.redirect(
    token.generate_authorize_url(redirect_url='http://www.example.com/oauth2callback'))

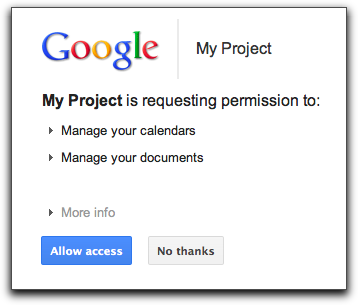
If all the parameters match what has been provided by the API Console, the user will be shown this dialog:

When an action is taken (e.g allowing or declining the access), Google’s authorization server will redirect the user to the specified redirect URL and include an authorization code as a query parameter. Your application then needs to make a call to Google’s token endpoint to exchange this authorization code for an access token.

Getting an Access Token

import atom.http_core

url = atom.http_core.Uri.parse_uri(self.request.uri)
if 'error' in url.query:
  # The user declined the authorization request.
  # Application should handle this error appropriately.
  pass
else:
# This is the token instantiated in the first section.
  token.get_access_token(url.query)

The redirect handler retrieves the authorization code that has been returned by Google’s authorization server and exchanges it for a short-lived access token and a long-lived refresh token that can be used to retrieve a new access token. Both access and refresh tokens are to be kept private to the application server and should never be revealed to other client applications or stored as a cookie.

To store the token object in a secured datastore or keystore, the gdata.gauth.token_to_blob() function can be used to serialize the token into a string. The gdata.gauth.token_from_blob() function does the opposite operation and instantiate a new token object from a string.

Calling Protected APIs

Now that an access token has been retrieved, it can be used to authorize calls to the protected APIs specified in the scope parameter.

import gdata.calendar.client
import gdata.docs.client

# Access the Google Calendar API.
calendar_client = gdata.calendar.client.CalendarClient(source=USER_AGENT)
# This is the token instantiated in the first section.
calendar_client = token.authorize(calendar_client)
calendars_feed = client.GetCalendarsFeed()
for entry in calendars_feed.entry:
  print entry.title.text

# Access the Google Documents List API.
docs_client = gdata.docs.client.DocsClient(source=USER_AGENT)
# This is the token instantiated in the first section.
docs_client = token.authorize(docs_client)
docs_feed = client.GetDocumentListFeed()
for entry in docs_feed.entry:
  print entry.title.text