Since March of this year, Google has supported OAuth 2.0 for many APIs, including Google Data APIs such as Google Calendar, Google Contacts and Google Documents List. Google’s implementation of OAuth 2.0 introduces many advantages compared to OAuth 1.0 such as simplicity for developers and a more polished user experience.
We’ve just added support for this authorization mechanism to the gdata-python-client library– let’s take a look at how it works by retrieving an access token for the Google Calendar and Google Documents List APIs and listing protected data.
Getting Started
First, you will need to retrieve or sync the project from the repository using Mercurial:
hg clone https://code.google.com/p/gdata-python-client/
For more information about installing this library, please refer to the Getting Started With the Google Data Python Library article.
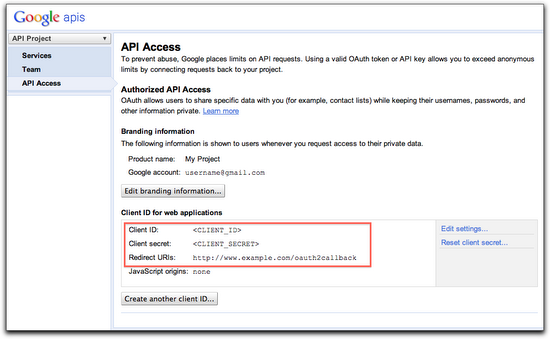
Now that the client library is installed, you can go to your APIs Console to either create a new project, or use information about an existing one from the API Access pane:
Getting the Authorization URL
Your application will require the user to grant permission for it to access protected APIs on their behalf. It must redirect the user over to Google’s authorization server and specify the scopes of the APIs it is requesting permission to access.
Available Google Data API’s scopes are listed in the Google Data FAQ.
Here’s how your application can generate the appropriate URL and redirect the user:
import gdata.gauth

# The client id and secret can be found on your API Console.
CLIENT_ID = ''
CLIENT_SECRET = ''

# Authorization can be requested for multiple APIs at once by specifying multiple scopes separated by # spaces.
SCOPES = ['https://docs.google.com/feeds/', 'https://www.google.com/calendar/feeds/']
USER_AGENT = ''

# Save the token for later use.
token = gdata.gauth.OAuth2Tokens(
   client_id=CLIENT_ID, client_secret=CLIENT_SECRET, scope=' '.join(SCOPES),
   user_agent=USER_AGENT)

# The “redirect_url” parameter needs to match the one you entered in the API Console and points
# to your callback handler.
self.redirect(
    token.generate_authorize_url(redirect_url='http://www.example.com/oauth2callback'))
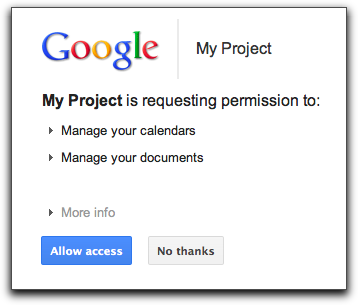
If all the parameters match what has been provided by the API Console, the user will be shown this dialog:
When an action is taken (e.g allowing or declining the access), Google’s authorization server will redirect the user to the specified redirect URL and include an authorization code as a query parameter. Your application then needs to make a call to Google’s token endpoint to exchange this authorization code for an access token.
Getting an Access Token
import atom.http_core

url = atom.http_core.Uri.parse_uri(self.request.uri)
if 'error' in url.query:
  # The user declined the authorization request.
  # Application should handle this error appropriately.
  pass
else:
# This is the token instantiated in the first section.
  token.get_access_token(url.query)
The redirect handler retrieves the authorization code that has been returned by Google’s authorization server and exchanges it for a short-lived access token and a long-lived refresh token that can be used to retrieve a new access token. Both access and refresh tokens are to be kept private to the application server and should never be revealed to other client applications or stored as a cookie.
To store the token object in a secured datastore or keystore, the gdata.gauth.token_to_blob() function can be used to serialize the token into a string. The gdata.gauth.token_from_blob() function does the opposite operation and instantiate a new token object from a string.
Calling Protected APIs
Now that an access token has been retrieved, it can be used to authorize calls to the protected APIs specified in the scope parameter.
import gdata.calendar.client
import gdata.docs.client

# Access the Google Calendar API.
calendar_client = gdata.calendar.client.CalendarClient(source=USER_AGENT)
# This is the token instantiated in the first section.
calendar_client = token.authorize(calendar_client)
calendars_feed = client.GetCalendarsFeed()
for entry in calendars_feed.entry:
  print entry.title.text

# Access the Google Documents List API.
docs_client = gdata.docs.client.DocsClient(source=USER_AGENT)
# This is the token instantiated in the first section.
docs_client = token.authorize(docs_client)
docs_feed = client.GetDocumentListFeed()
for entry in docs_feed.entry:
  print entry.title.text


