The Changes to OAuth 2.0 endpoint


In the coming weeks we will be making three changes to the experimental OAuth 2.0 endpoint. We expect the impact to be minimal, and we’re emailing developers who are most likely to be affected.

We will be releasing these changes on November 15, 2011. This post describes the changes, their impact, and how they can be mitigated.

Change #1: Error responses for client-side web applications

The first change relates to the way errors are returned in OAuth 2.0 client-side web applications. It does not impact server-side, native, or device flows.

The current behavior of the OAuth 2.0 endpoint in certain error conditions is to return the error to the application as a query string parameter, for example:

https://www.example.com/back?error=access_denied.

The OAuth 2.0 specification indicates that the error should be returned in the fragment of the response. We are updating our OAuth 2.0 implementation to support the most recent draft of the specification. As a result, we will be changing the way we return errors to applications in the client-side flow.

As an example, today an error returns to your application as

https://www.example.com/back?error=access_denied. After this change, it will be returned as

https://www.example.com/back#error=access_denied.

There is no mitigation for this change, so your application will have to handle these types of errors in client-side script.

Change #2: Offline access as a separate parameter

The second change impacts the OAuth 2.0 server-side flow only. It does not impact client-side, native, or device flows. For context, this flow consists of the following steps:

  1. Redirect the browser to the Google OAuth 2.0 endpoint.
  2. The user will be shown a consent page.
  3. If the user consents, parse the authorization code from the query string of the response.
  4. Exchange the authorization code for a short-lived access token and a long-lived refresh token.

Once your application has obtained a long-lived refresh token (step 4), it may access a Google API at any time. This means server-side applications do not require the end-user to be present when obtaining new access tokens. We’re calling this type of access offline.

The client-side flow, in contrast, requires the user to be present when obtaining an access token. This type of access is called online.

With this change, we will be exposing online and offline access as a separate parameter that’s available only in the server-side flow.

When your application requests offline access, the consent page shown to a user will reflect that your application requests offline access and your application will receive an access and a refresh token. Once your application has a refresh token, it may obtain a new access token at any time.

When your application requests online access, your application will only receive an access token. No refresh token will be returned. This means that a user must be present in order for your application to obtain a new access token.

If unspecified in the request, online is the default.

A mitigation for this change is described at the end of this post.

Change #3: Server-side auto-approval

This change also impacts the OAuth 2.0 server-side flow only.

In the current implementation of OAuth2, every time your application redirects a user to Google, that user must give explicit consent before an authorization code is given to your application. As a result, sending a user through the flow another time requires them to see the consent screen again. Most applications don’t do this, but rather use the existing server-side flow as it was intended: a one-time association (import contacts, calendar operations, etc.) where the result is a refresh token which may be used to obtain new access tokens.

The behavior is changing to the following:

  • Users will only see the consent screen on their first time through the sequence.
  • If the application requests offline access, only the first authorization code exchange results in a refresh token.

To put it another way, consent will be auto-approved for returning users unless the user has revoked access. Refresh tokens are not returned for responses that were auto-approved.

The next section describes how to mitigate this change.

Mitigation of offline access (#2) and auto-approval (#3) changes

If you want to keep the existing behavior in your server-side applications, include the approval_prompt=force and access_type=offline parameters in an authorization code request.

For example, if the following is a target URL for obtaining an authorization code today:

https://accounts.google.com/o/oauth2/auth?
client_id=21302922996.apps.googleusercontent.com&
redirect_uri=https://www.example.com/back&
scope=https://www.google.com/m8/feeds/&
response_type=code

You can maintain the current behavior by changing the target URL to:

https://accounts.google.com/o/oauth2/auth?
client_id=21302922996.apps.googleusercontent.com&
redirect_uri=https://www.example.com/back&
scope=https://www.google.com/m8/feeds/&
response_type=code&
access_type=offline&
approval_prompt=force

You may start including these parameters in authorization code requests today.

Visibility versus Authentication and Authorization: Service On/Off

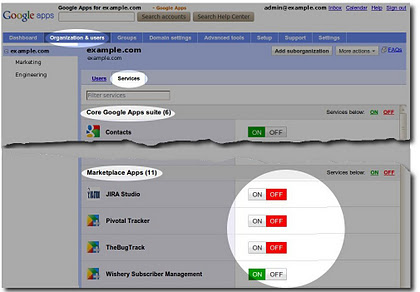
You may have already noticed, but the controls to enable and disable individual apps in Google Apps are now all in one place on the domain Control Panel under Organization & users > Services.

Domain administrators were already able to use this tab to enable and disable the Core Google Apps suite. Now they can do the same for apps they’ve acquired from the Google Apps Marketplace. This replaces the old link labeled “Disable {app name}” in the Dashboard > {app name} > “App status” page.

App and Gadget Visibilty

This on/off switch controls app and gadget visibility. Users in suborganizations where a Marketplace App is ON will see that app in the universal navigation bar under “More”, and will see the app’s contextual gadgets in Gmail. Users where the App is OFF will not see these links or gadgets.

Your customers still configure all apps through the Dashboard tab, but now the Control Panel Services tab unifies how they enable and disable every app.

New Scoping by Suborganization

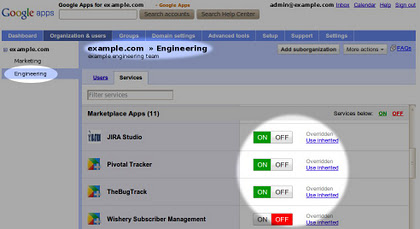
The unified controls also share an important new scoping capability: now a domain administrator can select a suborganization and control which Marketplace Apps are visible to that organizational unit, just like the Core Google Apps suite!

In the example below, the administrator has overridden the domain settings for four Marketplace Apps to make three new tools visible to just the “Engineering” suborganization and to hide one application.

Visibility versus Authentication and Authorization

As developers, you should note that for any valid Google Apps domain user who goes directly to your website, OpenID/Single Sign On will always authenticate them if their domain has OpenID enabled. This includes users who are in suborganizations where your app is OFF. That means this visibility toggle feature is not a substitute for checking that the users accessing your app have a valid license.

Similarly, the on/off switch does not affect the OAuth scopes your app has been granted when the domain admin installed your app — the admin only revokes those by explicitly revoking data access or by deleting your app. The control panel on/off switch is just a way for a domain administrator to control the visibility of apps and gadgets that would otherwise be site-wide.

Google Apps Script And Calorie Counting

It’s in the news lately that by 2030, 50% of the population will be obese. Well, I’m a bit (ok, maybe more than a bit) overweight now and was looking to do something about it. So for my diet, I’ve started counting calories. I’ve tried a number of other diets with mixed results, but calorie counting for me always works. However, counting calories can be a bit of a pain. There are a number of ways to figure out how many calories are in things, such as the container the item comes from, websites like http://caloriecount.about.com/, http://fatsecret.com/ or search on your favorite search engine. Finding out the calorie content of a food isn’t really so much of a problem in and of itself because after awhile you just know how many calories are in the usual things you eat. But where is the best place to keep track the current running total for the day? It has to be easily accessible to me or I don’t do it. I don’t always have paper, nor am I in places where I have connectivity. Android, Gmail and of course, Google Apps Script to the rescue!

Counting Calories using Apps Script


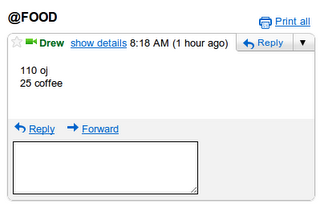
The process is simple. I send an email to myself with the subject “@FOOD” where the body contains the number of calories in the food and the name of the food, one per line. I wrote a script which, every 15 minutes, scans my email and computes the total of calories I’ve consumed in the last 24 hours and updates a spreadsheet with the total.

Why do it this way? Using Gmail for the recording makes it so if I’m offline on my phone, the gmail app will send it when I’m online. Putting it in a Google spreadsheet means I can make a shortcut for it in chrome, and a desktop web shortcut icon on my Android phone for easy access. Additionally, using a spreadsheet allows me to perform other calculations, make charts, etc.

How do you set it up?

First create a new spreadsheet, and click on Tools > Script Editor. Click on File > New > From Script Template. Search for “Calorie Counting” and you will be able to locate the script. Then, click Install and you are all set. Save the script, run it, at which point you’ll get two authorization dialogs, click ok through them. Run it again to make sure it populates the sheet properly. Then, in the script editor, click Triggers>Current script’s triggers and add a new trigger:

And you’re all set! Your spreadsheet, after the script runs will look like this:

From here the possibilities are endless. I’m thinking I could make a UiApp script which uses the new Charts bean to draw a graph. Perhaps make a service to view/change calories because I mess things up every once in awhile. You could also add code for “@WEIGH” messages to track weight and could graph that too. Your imagination is the limit! And if you have an even better idea for how to use Apps Script to improve Gmail and Spreadsheets, you can post it to our Gallery (Script Editor > Share > Publish Project) to share with the world.