Dynamic Animated Tile Layers in Bing Maps (AJAX v7) 3

Now that I’ve got a working animated tile class, it’s time to look and see what performance improvements I can make to it. As in my first post in this series, the frames of my animation are going to be built from weather RADAR data collected from the NOAA at regular intervals in time (every 15 minutes), over a 6 hour period. This means that, every time my animation runs through a complete cycle, I will have requested 24 times the number of tiles normally required to construct the background of the map display. The absolute key to making this solution usable was going to be in ensuring those tiles were as small filesize as possible.

Reducing the Bit Depth

My weather data was retrieved and the tile images constructed dynamically using a PHP script. Since I wanted my tiles to retain transparency (so that they could be overlaid on top of other layers), but didn’t want to use GIF format, my only choice was to opt for PNG files which can be created with the PHP imagepng function.

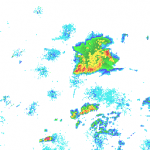
By default, PHP creates true colour (i.e. 32bit) PNG images. However, my NOAA radar imagery was only using a 256 colour palette so, as suggested by a commentator on one of my previous posts (thanks Chris!), I could save some space without affecting image quality by ensuring all my tile images were saved as 8bit PNG rather than 32bit PNG. To compare, here’s the RADAR image for tile quadkey 02311, recorded at 10:15am on 27th May 2011:

02311

32Bit PNG (192kb)

02311

8Bit PNG (9kb)

192kb reduced to 9kb with no change in appearance – that’s a pretty good start!

Compressing the Tiles

My next option was to compress the tiles. The PNG file format uses the Deflate compression algorithm, which has two key features: a.) It’s a lossless algorithm, so (unlike JPG) there is no reduction in image quality in a compressed image file, and b.) it has a static decompression rate. What that means is that, however much you compress a PNG file, it will not take longer to decompress. Unlike some archive formats, there is no trade-off between having a smaller compressed filesize, only for it to take longer to unpack or for it to be lower quality – with PNG, compression is always desirable. You can read a good introductory guide to PNG compression at http://optipng.sourceforge.net/pngtech/optipng.html

There are a number of different PNG compression tools out there. For comparison, I tried both an online service (PunyPNG), and a small downloadable Windows application that provides a front-end for a series of command-line PNG utilities (PNG Monster). Both are free to use, and don’t add any watermarks to your images.

PunyPNG compressed my 8bit PNG, original size 9,212 bytes, down to 7,270 bytes (a 22% reduction). PNG Monster did even better, reducing it to just 5,793 bytes (a 37% reduction).

02311

PunyPNG compressed 8Bit PNG image (8 bytes)

02311

PNG Monster compressed 8Bit PNG image (6 bytes)

What makes PNG Monster even more useful is that you can set it to batch process and compress all the PNG files in a directory, rather than having to upload them one by one to an online webservice. The interface isn’t much to look at (except for the nice icon of the Cookie Monster), but if it gets the job done, who cares?!

I set it to work in a directory that contained 256 tiles representing the tiles for one frame of animation, at zoom levels 5, 6, and 7. This reduced the total size from 1.2Mb down to 566Kb – less than half the original size:

image

The Only Way is… PNG?

(If you’re not au fait with pop singles from the late 1980s, that title was meant to be an homage to Yazz. Oh, never mind…).

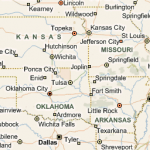
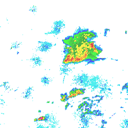
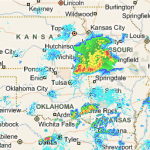
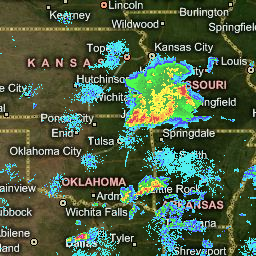
I was pretty pleased with the results from PNG monster, but there was just one more option I wanted to explore. My reason for choosing PNG was because it supported transparency, and could therefore be added as a separate tilelayer overlaid on top of other background layers within the AJAX control. For example, you could place the animated weather tilelayers on top of the base aerial imagery tiles, or the road map tiles:

Base map style Transparent PNG Result
+ =
+ =

But what about, rather than creating the RADAR image as a transparent layer, I created an opaque tile that showed the data ready overlaid onto a Bing Maps imagery tile? That way, I could save the tile as a JPG file instead and take advantage of its (potentially) greater compression ratio.

The aerial image tile shown above, http://ecn.t1.tiles.virtualearth.net/tiles/h02311.jpeg?g=685&mkt=en-gb&n=z, is 24,128 bytes. Setting a compression ratio of 65%, I could create a JPG tile of almost exactly the same filesize as the original Bing Maps tile, but incorporated the radar image as well:

While, at first, I thought that embedding the RADAR imagery onto the background tile image might have been a good idea, (and, it would be, if I was only trying to display a single static tile combining weather data and imagery), the end JPG tile ended up being much greater size than my compressed PNG image tiles. In every frame of the animation, I’d be downloading the entire background map image for that tile again, and I’d also lose the flexibility of being to overlay a transparent layer on top of any other layer. Idea aborted – back to PNGs!


Dynamic Animated Tile Layers in Bing Maps (AJAX v7) 2


I considered various approaches that could be used to animate between tilelayers containing image tiles representing different frames of an animation. The approach I decided on was to buffer tilelayers onto an EntityCollection “queue”. The first entity in the collection would be the tilelayer of the currently displayed frame, and subsequent elements would be pushed onto the end to allow them to be pre-buffered by the time they were to be displayed on the map.

In this post, I’ll look at creating the various methods used to add and transition through the frames in the queue.

Variables

To start with, I defined some variables. The following public properties could be set to change the behaviour of the animation:

  • frames: the URL of the individual frames used to define the animation. This can be supplied in one of two ways:
    • As an array of image URLs, specified in frame order, e.g.:var frames = [“http://mapsys.info/wp-content/uploads/2011/05/9f93ac1bbeadkey.png.png”, “http://mapsys.info/wp-content/uploads/2011/05/5e69b74bbbadkey.png.png”, “http:///www.example.com/frame3/{quadkey}.png”];
    • As a single URL in which the supplied {frame} placeholder would be replaced with the frame number of the requested tile. e.g. var frames = “http://mapsys.info/wp-content/uploads/2011/05/0cf8dc8575adkey.png.png”;
  • loopbehaviour: What should happen when the animation continues beyond the last frame? I defined three possible options:
    • ‘loop’: animation loops back to the first frame and continues playing
    • ‘stop’: animation stops on the last frame
    • ‘bounce’: direction of animation changes and continues to play
  • framerate: The interval (in milliseconds) at which frames should be animated
  • opacity: The opacity at which the tiles should be displayed
  • lookAhead: The number of frames of animation that should be loaded in advance onto the tile queue.

And I also created the following internal variables to help with the mechanics:

  • intervalId: the intervalId assigned by setInterval() – used to start and cancel the animation
  • frame: The integer index used to keep track of the currently displayed frame
  • direction: The current direction of animation: 1 forwards, or –1 backwards

Functions

The basic public methods of my animated tile class would be straightforward, as follows:

  this.play = function() {
    _direction = 1;
    _play();
  }
  this.playbackwards = function() {
    _direction = -1;
    _play();
  }
  this.goToFrame = function(n) {
    _goToFrame(n);
  }
  this.stop = function() {
    _stop();
  }
  this.reset = function() {
    _reset();
  }

And the corresponding private methods that they called would be, for the most part, straightforward as well:

  /* Play the animation in the current direction */
  function _play() {
    if (_intervalId == "") {
      _intervalId = setInterval(_nextFrame, _options.framerate);
    }
  }

  /* Reset the animation back to the first frame */
  function _reset() {
    _animatedTileLayer.clear();
    _frame = 0;
    _redraw();
  }

  /* Stop the animation if currently playing */
  function _stop() {
    if (_intervalId != "") {
      clearInterval(_intervalId);
      _intervalId = "";
    }
  }

  /* Jump to the specified frame index */
  function _goToFrame(n) {
    if (n > 0 && (n < _frames.length || _frames.length == 1)) {
      _animatedTileLayer.clear();
      _frame = n;
      _redraw();
    }
  }

The two functions that actually do the grunt work are _nextFrame(), which is the method called repeatedly by setInterval() when the animation is playing, and _redraw(), which is the method that actually deals with the tilelayers on the queue. Here’s _nextFrame(), which is responsible for determining the next frame to queue up in the currently playing animation, taking account of specified behaviour when the last frame is reached:

function _nextFrame() {

  // Increment (or decrement) the frame counter based on animation direction
  _frame += _direction;

  // Test if requested frame lies outside specified array of frames
  if (_frames.length > 1 && (_frame >= _frames.length || _frame < 0)) {

    // Varies depending on desired loop behaviour
    switch (_options.loopbehaviour) {

      // Loop (default) the animation from the other end
      case 'loop':
        _frame = _frames.length - (_direction * _frame);
        break;

      // Stop the animation
      case 'stop':
        _stop();
        _frame -= _direction;
        break;

      // Continue by reversing direction of animation
      case 'bounce':
       _direction *= -1;
       _frame = _frame + (2 * _direction);
       break;
      }
    }
    // Push the next frame onto the queue
    _redraw();
  }

And here’s version 1 of _redraw(), which removes the currently displayed frame of animation, displays (at full opacity) the next frame on the queue, and ensures that the queue maintains the specified number of tilelayers to preload in advance:

  function _redraw() {

    // Retrieve the URI of the next frame
    var uri = "";
    if (_frames.length > 1) { // Specified array of frames
      uri = _frames[_frame];
    }
    else {
      uri = _frames[0].replace('{frame}', _frame); // Single URL with {frame} placeholder
    }

    // Create a new tilelayer for the requested frame
    // Visibility must be set to true and the tilelayer must have non-zero opacity
    // in order for tiles to be requested
    var tileOptions = {
      mercator: new Microsoft.Maps.TileSource({ uriConstructor: uri }),
      opacity: 0.01,
      visible: true,
      zIndex: 25
    };

    // Add the tilelayer onto the end of the tile queue
    var tileLayer = new Microsoft.Maps.TileLayer(tileOptions);
    _animatedTileLayer.push(tileLayer);

    // If there is only one frame of animation in the queue, make it visible
    if (_animatedTileLayer.getLength() == 1) {
      _animatedTileLayer.get(0).setOptions({ opacity: _options.opacity });
    }
    // Ensure the tile queue maintains specified length
    else while (_animatedTileLayer.getLength() > _options.lookAhead + 1) {

      // Set the opacity of the next frame to full
      _animatedTileLayer.get(1).setOptions({ opacity: _options.opacity });

      // Remove the currently displayed frame
      _animatedTileLayer.removeAt(0);
    }
  }

First Impressions…

Testing out my library for the first time, I was:
a.) surprised to find that it did actually work!, but at the same time…
b.) disappointed that there was a really annoying flicker between each frame change, even though the tiles for the next frame had been fully cached via the tile queue.

Even though my _redraw() function was setting the opacity to full on the next tile layer to be shown (i.e. the tilelayer at position 1 in my entitycollection) before removing the current tilelayer (the tilelayer at position 0), I found that the API was not firing these actions synchronously. Investigating some more, I found that somebody else had already noticed the same problem and had proposed a workaround – rather than use the setOptions() method of the API, I could set the opacity of the layers directly through editing the styles attached to the DOM element.

This approach is a bit risky because, as the other commentator notes, there doesn’t seem to be a reliable way to identify any particular tile layer (or other Bing Map entity) through the DOM – the Bing Maps v7 elements are remarkably lacking in useful things like unique IDs or Classes, so you can only target them by their position. If the animated tile layer is the first entity to be added to the map, I could seem to target it reliably using Map.getModeLayer().children[0].children[1] but I couldn’t guarantee this would always work. Hence, I decided to introduce a new option – to either run the animation in “safe mode” (which used only supported methods of the API) or “dangerous mode”, which achieved a smoother result by transitioning between frames directly through the DOM, but might break at any moment (exciting, huh?).

The required modification to the _redraw() method is as follows:

...
    // If there is more than one frame
    else while (_animatedTileLayer.getLength() > _options.lookAhead + 1) {

      // Display the next frame depending on the mode selected
      switch (_options.mode) {

        case 'safe':
          // Set the opacity using the API method - incurs slight delay
          _animatedTileLayer.get(1).setOptions({ opacity: _options.opacity });
          break;

        case 'dangerous':
          // Can reduce flicker by setting opacity directly through the DOM

          _map.getModeLayer().children[0].children[1].style.opacity = _options.opacity;
          break;
      }
...

Now that I’ve got the basic code working, I’m planning to see what I can do to improve performance.

TripsQ and Foursquare Data

TripsQ

TripsQ is a data visualisation application that aims to help people make full use of the data they’ve generated through Foursquare. It uses all the data you have gathered while travelling, by turning your check-ins at airports into useful travel statistics.

Everyone who uses Foursquare can easily sign in to tripsQ and visualise their trips and travel itineraries. TripsQ also provides users with detailed statistics on the distance they’ve travelled, the amount of CO² they’ve produced during each trip and other information about their travels.

The site uses Google Maps to visualise your travels around the world. The map has been beuatifully styled with the Styled Maps feature to create a map that complements the overall design of the tripsQ website.

There are some other cool features coming soon as well. One planned feature is to show the tips left by your friends in each of the cities you visit. Another planned feature will be to show the distance you have walked during each of your trips.