OAuth 2.0 for native applications

Following our previous post on OAuth 2.0 for web applications, we are now taking a look at how to use the OAuth 2.0 authentication protocol for native applications, presenting examples for the languages that we are supporting at the moment of writing: Java and Python.
Background

We strongly recommend reading Using OAuth 2.0 to Access Google APIs to learn about the Google implementations of OAuth 2.0 before proceeding with this post.
Java

The Google APIs Client Library for Java features a powerful and easy to use OAuth 2.0 library. We can take advantage of the existing GoogleOAuth2ThreeLeggedFlow helper class to easily perform our authentication flow.

First create an instance of GoogleOAuth2ThreeLeggedFlow, passing the following parameters to the constructor:

  • a key that will be used to associate this flow object with an end user
  • the Client ID for your application
  • the Client Secret for your application
  • the scope you are requesting access to (AdSense in your case)
  • the URI to redirect to
GoogleOAuth2ThreeLeggedFlow authFlow = new GoogleOAuth2ThreeLeggedFlow(
  userId, 
  "INSERT_CLIENT_ID_HERE", 
  "INSERT_CLIENT_SECRET_HERE", 
  "https://www.googleapis.com/auth/adsense", 
  "urn:ietf:wg:oauth:2.0:oob");

For native applications, we use a special redirect URI:

"urn:ietf:wg:oauth:2.0:oob"

The “oob” part stands for “out of band” and the rest of the string identifies it as a part of the OAuth 2.0 standard.

When we use this redirect URI, instead of redirecting the user’s browser to a page on our site with an authorization code, Google will display a page and the authorization code or error response in the title of the page. A text field contained in the page will show instructions for the user to copy and paste it into our application.

To start the flow, let’s ask the user to load the authorization URL in their browser:

System.out.println(“Please input authorization code: ”);
Scanner in = new Scanner(System.in);
String authorizationCode = in.nextLine();

The last step is to use the authorization code to obtain an access token.

First you’ll need to initialize a transport for communication with the Authorization server and a factory for handling JSON, as the access token will be returned as a JSON object:

JsonFactory factory = new JacksonFactory();
HttpTransport transport = new NetHttpTransport();
authFlow.setHttpTransport(transport);
authFlow.setJsonFactory(factory);

Now you can finalize the authentication flow by obtaining credentials for your user, and then use those credentials to create the Adsense helper object and then send your signed requests to the API:

Credential credential = authFlow.complete(authorizationCode);
Adsense adsense = new Adsense(transport, credential, factory);
AdClients adClients = adsense.adclients.list().execute();

Python

The home of the Google APIs Client Library for Python is also the home of OAuth2Client, a library designed for connecting to resources protected by OAuth 2.0.

First create an OAuth2WebServerFlow object, passing the following parameters to the constructor:

  • the Client ID for your application
  • the Client Secret for your application
  • the scope you are requesting access to (AdSense in your case)
  • an HTTP User-Agent to identify this application
flow = OAuth2WebServerFlow(
  client_id='INSERT_CLIENT_ID_HERE',
  client_secret='INSERT_CLIENT_SECRET_HERE',
  scope='https://www.googleapis.com/auth/adsense',
  user_agent='your-beautiful-python-app/1.0')

We can perform the authentication calling the ‘run’ function imported from oauth2client.tools, storing the authentication data using a Storage object:

storage = Storage(‘adsense.dat’);
credentials = run(flow, storage);

If the flag ‘auth_local_webserver’ is raised (the default setting), oauth2client.tools will open the authentication URL on a running browser or on the system default browser. After the user performs the authentication, the authorization code will be read from the title of the page shown in the browser. If you don’t want this behaviour, you can disable it like this:

import gflags
gflags.FLAGS.auth_local_webserver = False

In this way we’ll have a flow similar to the one that we have seen in Java: the user will be asked to open the authentication URL in a browser window and then to copy and paste the authorization code back in the application. The only difference is that oauth2client.tools will take care of printing these messages and read the input from the user for us.

The last step is create an httplib2.Http object, authorize it with the previously obtained credentials and then send a request to the API:

http = httplib2.Http()
http = credentials.authorize(http)
service = build(‘adsense’, ‘v1’, http=http)
result = service.adclients().list().execute()

Cool! But I want to know more!

In this post we have seen examples of how to authenticate your native application using the Google implementation of the OAuth 2.0 protocol and the libraries that we are providing to simplify all of the tasks involved.

Now that we know how to perform authentication for both web and native applications, in my next post we are going to see different ways of storing the authentication data.
Google+ Pages – Already HERE!

Google helps to grow your audience by connecting you with new users. They introduced the +1 button so your site would stand out on search and your users could easily share your content on Google+. But, sometimes you want to join the conversation and post content directly to where people are sharing.

Today they’re introducing Google+ for Business, a collection of tools and products that help you grow your audience. At the core of this is Google+ Pages, your site’s identity on Google+.

Google+ Pages: Have real conversations with the right people

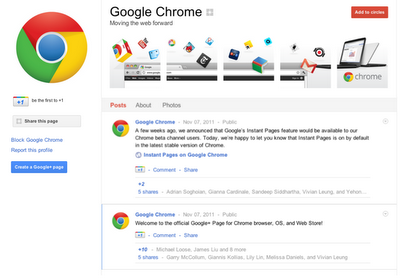
To get your site on Google+, you first need to create a Google+ Page. On your page, you can engage in conversations with your visitors, direct readers back to your site for the latest updates, send tailored messages to specific groups of people, and see how many +1’s you have across the web. Google+ Pages will help you build relationships with your users, encouraging them to spend more time engaging with your content.


Google+ Pages are at the heart of Google+ for Business

Hangouts


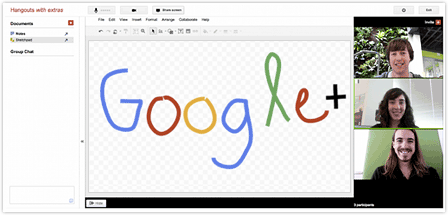
Sometimes you might want to chat with your users face-to-face.  For example, if you run a food blog, you may want to invite a chef to talk about her favorite recipe, or if you manage a fashion review site, beauty specialists might want to hold how-to sessions with makeup tips. Hangouts make this easy, by letting you have high-quality video chats with nine people with a single click. You can use Hangouts to hold live forums, break news or simply get to know people better, all in real time.


Hangouts let you meet your customers, face-to-face

Circles


Circles allow you to group followers of your Page into smaller audiences. You can then share specific messages with specific groups. For example, you could create a Circle containing your most loyal readers and offer them exclusive content.

The Google+ badge: Grow your audience on Google+
To help your users find your page and start sharing, there are two buttons you can add to your site by visiting our Google+ badge configuration tool:

The Google+ icon, a small icon that directly links to your Page.


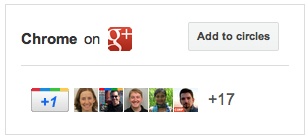
The Google+ badge, which we’re introducing in the coming days. This badge lets people add your page to their circles without leaving your site, and allows them to get updates from your site via Google+.

Extend the power of +1, stand out in Google search
You can also link your site to your Google+ page so that all your +1s — from your Page, your website, and search results — will get tallied together and appear as a single total. Potential visitors will be more likely to see the recommendations your site has received, whether they’re looking at a search result, your website, or your Page, meaning your +1’s will reach not only the 40 million users of Google+, but all the people who come to Google every day. You can link your site to your Page either using the Google+ badge or with a  piece of code. To set this up, visit our Google+ badge configuration tool.

Bringing Google+ to the rest of Google


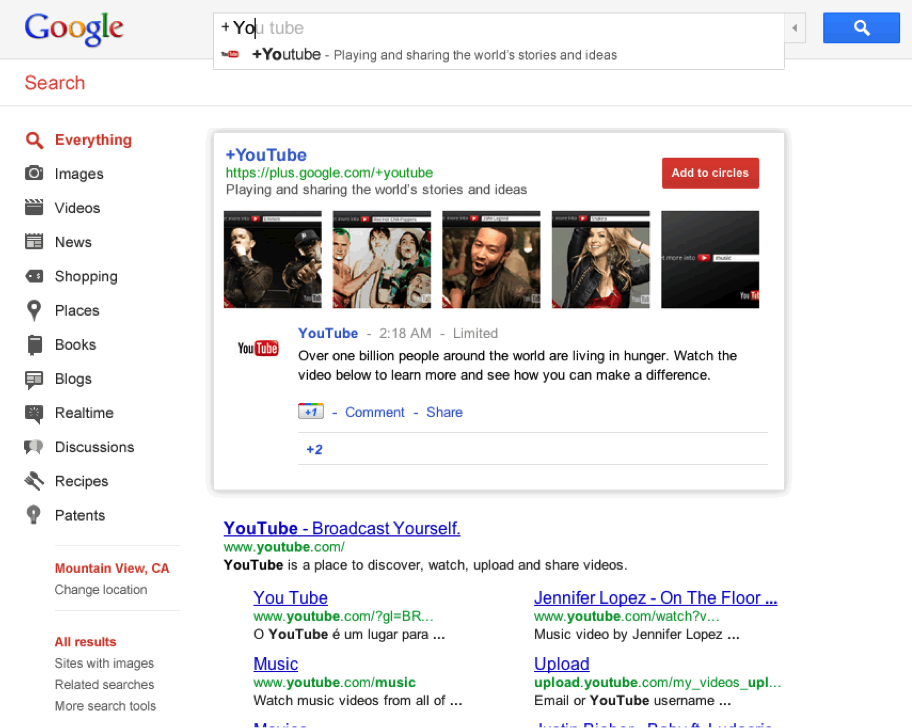
Our ultimate vision for Google+ is to transform the overall Google experience — weaving identity and sharing into all of our products. Beginning today, we’re rolling out a new experimental feature to a small group of eligible publishers,Google+ Direct Connect — an easy way for your audience to find your Google+ Page on Google search.  If you’ve linked your Page to your site and you qualify, when someone searches for your website’s name with the ‘+’ sign before it Direct Connect will send them directly to your Page. For example, try searching for ‘+YouTube’ on Google. Users will also be prompted to automatically add Pages they find through Direct Connect to their circles.


Direct Connect suggestions start populating as you type on Google.com


Just the beginning

We want to help you get your site on Google+ as soon as possible, so we’re opening the field trial for Google+ Pages to everyone today. Creating a Google+ Page only takes a few minutes. To get started, you’ll need a personal Google+ profile. If you don’t have a Google account, it’s very quick and easy to join. And if you’re looking for inspiration, check out some of the sites that are already starting to set up their Pages:

To learn more about how Google+ works for your site, check out the Google+ Your Business site. We’re just getting started, and have many more features planned for the coming weeks and months. To keep up to date on the latest news and tips, add the Google+ Your Business page to your circles. If you have ideas on how we can improve Google+ for your site, we’d love to hear them.


Cross posted from the Inside AdSense blog

The Time Protocols

Have you ever had a watch that ran slow or fast, and that you’d correct every morning off your bedside clock? Computers have that same problem. Many computers, including some desktop and laptop computers, use a service called the “Network Time Protocol” (NTP), which does something very similar—it periodically checks the computers’ time against a more accurate server, which may be connected to an external source of time, such as an atomic clock. NTP also takes into account variable factors like how long the NTP server takes to reply, or the speed of the network between you and the server when setting a to-the-second or better time on the computer you’re using.

Soon after the advent of ticking clocks, scientists observed that the time told by them (and now, much more accurate clocks), and the time told by the Earth’s position were rarely exactly the same. It turns out that being on a revolving imperfect sphere floating in space, being reshaped by earthquakes and volcanic eruptions, and being dragged around by gravitational forces makes your rotation somewhat irregular. Who knew?

These fluctuations in Earth’s rotational speed mean that even very accurate clocks, like the atomic clocks used by global timekeeping services, occasionally have to be adjusted slightly to bring them in line with “solar time.” There have been 24 such adjustments, called “leap seconds,” since they were introduced in 1972. Their effect on technology has become more and more profound as people come to rely on fast, accurate and reliable technology.

Why time matters at Google

Having accurate time is critical to everything we do at Google. Keeping replicas of data up to date, correctly reporting the order of searches and clicks, and determining which data-affecting operation came last are all examples of why accurate time is crucial to our products and to our ability to keep your data safe.

Very large-scale distributed systems, like ours, demand that time be well-synchronized and expect that time always moves forwards. Computers traditionally accommodate leap seconds by setting their clock backwards by one second at the very end of the day. But this “repeated” second can be a problem. For example, what happens to write operations that happen during that second? Does email that comes in during that second get stored correctly? What about all the unforeseen problems that may come up with the massive number of systems and servers that we run? Our systems are engineered for data integrity, and some will refuse to work if their time is sufficiently “wrong.” We saw some of our clustered systems stop accepting work on a small scale during the leap second in 2005, and while it didn’t affect the site or any of our data, we wanted to fix such issues once and for all.

This was the problem that a group of our engineers identified during 2008, with a leap second scheduled for December 31. Given our observations in 2005, we wanted to be ready this time, and in the future. How could we make sure everything at Google stays running as if nothing happened, when all our server clocks suddenly see the same second happening twice? Also, how could we make this solution scale? Would we need to audit every line of code that cares about the time? (That’s a lot of code!)

The solution we came up with came to be known as the “leap smear.” We modified our internal NTP servers to gradually add a couple of milliseconds to every update, varying over a time window before the moment when the leap second actually happens. This meant that when it became time to add an extra second at midnight, our clocks had already taken this into account, by skewing the time over the course of the day. All of our servers were then able to continue as normal with the new year, blissfully unaware that a leap second had just occurred. We plan to use this “leap smear” technique again in the future, when new leap seconds are announced by the IERS.

Here’s the science bit

Usually when a leap second is almost due, the NTP protocol says a server must indicate this to its clients by setting the “Leap Indicator” (LI) field in its response. This indicates that the last minute of that day will have 61 seconds, or 59 seconds. (Leap seconds can, in theory, be used to shorten a day too, although that hasn’t happened to date.) Rather than doing this, we applied a patch to the NTP server software on our internal Stratum 2 NTP servers to not set LI, and tell a small “lie” about the time, modulating this “lie” over a time window w before midnight:

lie(t) = (1.0 – cos(pi * t / w)) / 2.0

What this did was make sure that the “lie” we were telling our servers about the time wouldn’t trigger any undesirable behavior in the NTP clients, such as causing them to suspect the time servers to be wrong and applying local corrections themselves. It also made sure the updates were sufficiently small so that any software running on the servers that were doing synchronization actions or had Chubby locks wouldn’t lose those locks or abandon any operations. It also meant this software didn’t necessarily have to be aware of or resilient to the leap second.

In an experiment, we performed two smears—one negative then one positive—and tested this setup using about 10,000 servers. We’d previously added monitoring to plot the skew between atomic time, our Stratum 2 servers and all those NTP clients, allowing us to constantly evaluate the performance of our time infrastructure. We were excited to see monitoring showing plots of those servers’ clocks tracking our model’s predictions, and that we were continuing to serve users’ requests without errors.

Following the successful test, we reconfigured all our production Stratum 2 NTP servers with details of the actual leap second, ready for New Year’s Eve, when they would automatically activate the smear for all production machines, without any further human intervention required. We had a “big red button” opt-out that allowed us to stop the smear in case anything went wrong.

What we learned

The leap smear is talked about internally in the Site Reliability Engineering group as one of our coolest workarounds, that took a lot of experimentation and verification, but paid off by ultimately saving us massive amounts of time and energy in inspecting and refactoring code. It meant that we didn’t have to sweep our entire (large) codebase, and Google engineers developing code don’t have to worry about leap seconds. The team involved in solving this issue was a handful of people, distributed around the world, who were able to work together without restriction in order to solve this problem.

The solution to this challenge drove a lot of thinking to develop better ways to implement locking and consistency, and synchronizing units of work between servers across the world. It also meant we thought more about the precision of our time systems, which have a knock-on effect on our ability to minimize resource wastage and run greener data centers by reducing the amount of time we must spend waiting for responses and rarely doing excess work.

By anticipating potential problems and developing solutions like these, the Site Reliability Engineering group informs and inspires the development of new technology for distributed systems—the systems that you use every day in Google’s products.