Google Earth: Learn about a place

People  are usually amazed how quick and easy it is to put a place in Google Earth. Here you can see 10 easy steps used to learn about a place I read about today at GoogleSightseeing. They were writing about the extensive canal system across Germany – something I was not really familiar with. I was fascinated by their fourth entry which described the Magdeburg Water Bridge, which they said is the longest aqueduct in Europe.  Watch the short video below to see 10 steps I took to learn more about this place in GE:

You can watch the steps I took in the video above.

  1. First I found something interesting through a blog post at GoogleSightseeing.com. Alex posted some details in his post, but I find it more interesting to discover with Google Earth.
  2. So, I followed the link to view the location in Google Earth.
  3. The first thing I do in Google Earth is turn on the “Places“, “Photos” and “More” layers in Google Earth.
  4. The blue icons represent photos taken by many people around the world found at Panoramio (millions of photos are mapped into Google Earth).
  5. I quickly found a ground level photo which showed the bridge (there were even aerial photos in this case).
  6. Found a nice photo from the bridge itself as well.
  7. The white icon from “More” layer represents a Wikipedia story. Here you get a good description of the Magdeburg Water Bridge and a link to the full article with even more details.
  8. You can use the Google Earth navigation gadget in the upper right to turn and tilt your view to get other perspectives of any site.
  9. Zoom out a bit and turn on the Roads layer to get a handy map of the area.
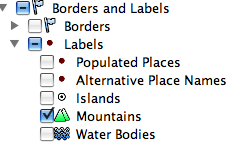
  10. Zoom out even more and turn on the Borders and Labels layer (you might want to turn off the other layers at this point). This gives you a broader perspective. (Tip: you can also turn on the “View->Overview Map” – or hit “CTRL-M” to get a fast broad perspective map).

These are just some really basic steps I often take when trying to learn about a place. Another useful layer is the Google Earth Community layer, found inside of the “Gallery” layer. Although, for some popular places you may find dozens of placemarks by people who have posted about their favorite places – almost too much information. There are many other collections and tools (written about on this blog) for learning all kinds of things like weather, conditions of the environment, real estate prices, history, etc.

The world is a big place, and these techniques won’t work for every single place on the planet. But, if you try them out, you will probably be surprised just how much you can learn (and how many hours you can spend learning about places you’ve always wanted to visit).

via googlearthblog

Panoramio- Join a photo community to match your interests

When I get home, I upload my photos to Panoramio and position them on the map. Pictures uploaded to Panoramio can be featured in the “Photos” layer of Google Earth and Google Maps, which means that I can share my travel experiences with others and, in return, explore places around the world through the eyes of other photographers.

Starting today, you can share your passions through photographs more collaboratively with Panoramio Groups. This new feature lets you create a sub-community within Panoramio around a topic you’re passionate about, so you can easily engage with like-minded photographers and hobbyists.


Panoramio is an online community of people that share and explore photos of the world.

For example, in my trips around the world, I always take the time to enjoy the local cuisine, like Costa Brava’s arròs negre. So I created a group called “Food,” to give others a “taste” of that region and get a glimpse of what fellow foodies are feasting on. My fellow group members—and by all means I hope you’ll become one of them!—can add their own photos, browse others’ and get culinary and travel inspiration.

Panoramio Groups allow members to share photos and start discussions on a given topic.

To share your own interests and passions through photos, hop over to Panoramio and create your own group or join an existing one from the Groups Directory. You can show off your photos of your favorite restaurant, the most beautiful sunset you’ve seen, the latest lighthouse you’ve visited, or the cutest dog from each continent. Whatever it is, try starting a discussion about your favorite topics and share what matters to you with others.

Enhancements to the mountains in Google Earth

While Google continues to add great new features and tons of new imagery to Google Earth, they want to be clear that they’re not forgetting about some of the basic layers such as the Mountains and Water bodies.

A few days ago they pushed out an update to the Mountains layer which includes some powerful new features, including a detailed information window, Panoramio photos, cross-section views of the mountain and tours that they’ve created for every mountain. For example, here is a video showing the tour of the Matterhorn:

For this feature to work, you need to enable the “Mountains” layer on the left-hand panel in Google Earth. Of course, an increasingly difficult challenge is finding the proper layers as Google continues to add more of them. For the Mountains, you’ll find it under “Borders and Labels” –> “Labels” –> “Mountains”, as shown here:

layers_panel.png

In addition to the mountain layer changes, they’ve added thousands of new labels to the “Water Bodies” layer, which can be found just below the “Mountains” layer in the image above.

Hopefully Google will continue to finesse the organization of the layers section and make it easier to find the hidden gems like this one.