Speed up Google Earth

Some of you out there are running brand new, amazingly fast machines that can handle anything you throw at it and Google Earth consistently runs well. For the rest of us, though, we need to balance features vs. speed in order to keep things running smoothly.

With that in mind, here are some tips to help Google Earth run more smoothly on your computer.

DirectX vs. OpenGL (Windows only)

On Windows computers, you have a choice to run Google Earth in “DirectX” or “OpenGL” mode. You can change the setting from inside of the [Tools] –> [Options] menu, or start them separately from your main Start menu. There may not be much of a difference, but play with them and see what happens.

Disable some layers/places

If you’re running with a whole bunch of Layers and Places open, try turning a few off. I enjoy keeping the Blue Marble overlay on quite often, along with a handful of other layers (roads, borders, 3D buildings, etc). However, things speed up considerably if I turn all of that off.

3D buildings are one of the biggest performance hogs, simply because they generate a lot of data to be displayed, so turning them off will help quite a bit. On the other hand, if you’re wanting to find ways to improve 3D building performance, then disabling as many other layers as possible is your best move.

Anisotropic Filtering

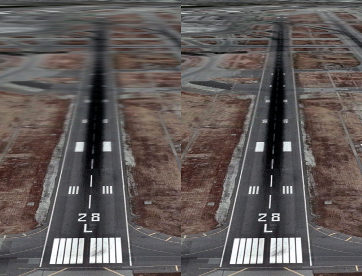
Anisotropic filtering is one of those cool features in Google Earth that most people don’t understand. In short, it helps keep things sharp when you’re viewing imagery from a low angle. Here is an image from the anisotropic filtering Wikipedia entry, comparing it turned off (on the left) and on (on the right):
Anisotropic_compare.png

You can see that it certainly helps make things look better, but it also costs a bit of performance. Turning it off can help speed things up.

Antialiasing

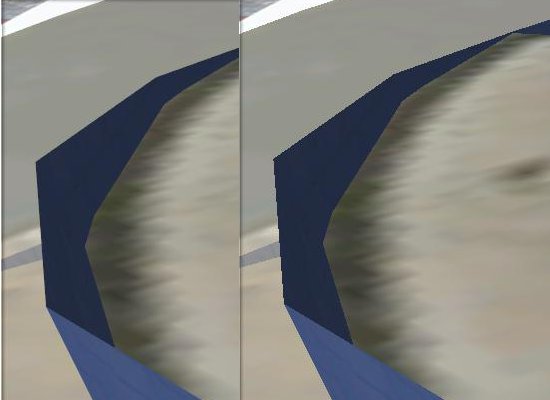
Anti-aliasing is a technique used to smooth the edges of features in an image. In Google Earth, this is particularly noticeable on 3D models. For example, here is part of the Georgia Aquarium with Google Earth’s Antialiasing set to “medium” on the left and “off” on the right. You can clearly see how much it improves the appearance of the building, though turning it off will help things to run a bit more smoothly. You can turn it off in the main [Tools] –> [Options] menu.
aquarium.jpg

Terrain Quality

The entire globe in Google Earth is covered with a 3D terrain mesh. But adjusting the quality of that mesh, you can improve performance. Simply go to [Tools] –> [Options] and move the Terrain Quality slider further to the left.

Atmosphere

When zoomed out, Google Earth has a cool blue/gray atmosphere surrounding the earth. You can disable it by clicking on [View] –> [Atmosphere].

Water Surface

When Google Earth 5 was released, one of the big new features was the 3D ocean. Part of that new feature includes a realistic looking surface on the ocean. To disable that surface, go to [View] –> [Water Surface].

Cache

Google Earth keeps imagery in two types of caches to help improve performance. The Memory Cache holds imagery in your RAM, and is cleared each time you boot up your computer. The Disk Cache holds imagery on your hard drive for easier access. Incresing those numbers can help your performance. However, if you have a low amount of RAM or are low on hard drive space, you may be better off to decrease them a bit to give your computer a little more to work with.

None of these tips will make a huge difference by themselves, aside from any massive “Place” that you may have enabled, but added up they can make quite a difference. Play with some of the settings and see what happens.
How to measure distances with the Google Earth


The “ruler” tool in Google Earth has always been useful, and it has seen a number of improvements over the years. To get started with it, simply go to [Tools] –> [Ruler] in Google Earth and it’ll open up for you in a small window.

Here are a few things you can do with it:

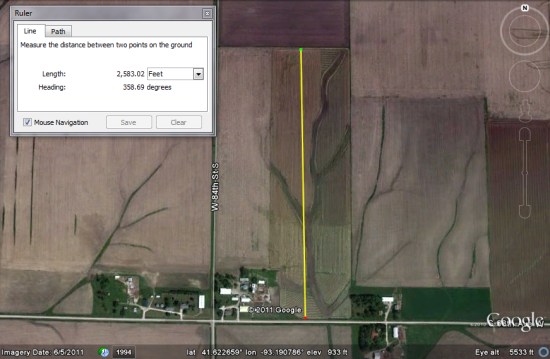
Measure the length of a field

To measure the length of a field (or driveway, or any other straight line), simply use the “line” feature in the ruler. Choose your unit of measure (inches, meters, miles, etc) and then click the two points on the ground you’d like to measure. That’s it — it’s very easy!

field.jpg 

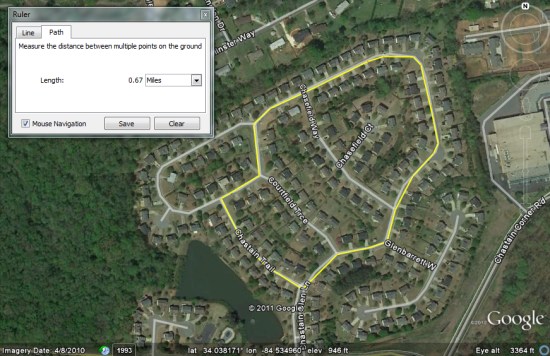
Measure a running/biking route

I have a GPS-enabled watch that can track how far I run, which is quite cool. However, I usually want to know how far my route is before I head out, and the Ruler’s “path” tool is great for that. By choosing the path, and then clicking various points along my route, I can see how far it’ll be. As long as you plot your points carefully, it will be remarkably accurate. I also change the setting to “miles” for this one, since that’s how I typically measure my runs. This would also work well for biking, hiking, or just walking. You could potentially use it to measure driving distance, though the standard “directions” feature would work better in most of those cases.

running.jpg 

Save and edit your path

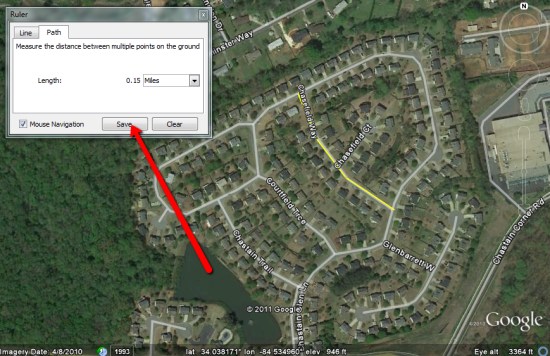
Once you’ve created your path, you might want to save it for future reference. Simply click the “save” button in the Ruler’s window and it will save the path to your “Temporary Places” folder. You can edit the path in the future by right-clicking on the item from within your “places” panel and choosing “properties”.

save-path.jpg 

Get an elevation profile

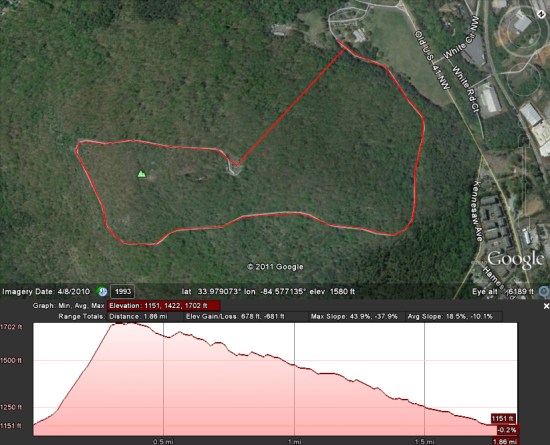
One of the great new features unveiled in Google Earth 5.2 last year was “Elevation Profiles”. This allows you to quickly see the elevation changes over a particular area. If you save your path in Google Earth, you can view the elevation profile for it very easily. Right-click on the item you saved in your “places” panel and choose “Show Elevation Profile”.

In this example, we’ll hike up Kennesaw mountain, and then follow the service road to get back down. You can see that the elevation profile shows the steep ascent, followed by the more gradual descent on the way back down.

kennesaw.jpg 

The Ruler tool in Google Earth can be quite useful, so head into [Tools] –> [Ruler] to try it for yourself!

Google Earth: Learn about a place

People  are usually amazed how quick and easy it is to put a place in Google Earth. Here you can see 10 easy steps used to learn about a place I read about today at GoogleSightseeing. They were writing about the extensive canal system across Germany – something I was not really familiar with. I was fascinated by their fourth entry which described the Magdeburg Water Bridge, which they said is the longest aqueduct in Europe.  Watch the short video below to see 10 steps I took to learn more about this place in GE:

You can watch the steps I took in the video above.

  1. First I found something interesting through a blog post at GoogleSightseeing.com. Alex posted some details in his post, but I find it more interesting to discover with Google Earth.
  2. So, I followed the link to view the location in Google Earth.
  3. The first thing I do in Google Earth is turn on the “Places“, “Photos” and “More” layers in Google Earth.
  4. The blue icons represent photos taken by many people around the world found at Panoramio (millions of photos are mapped into Google Earth).
  5. I quickly found a ground level photo which showed the bridge (there were even aerial photos in this case).
  6. Found a nice photo from the bridge itself as well.
  7. The white icon from “More” layer represents a Wikipedia story. Here you get a good description of the Magdeburg Water Bridge and a link to the full article with even more details.
  8. You can use the Google Earth navigation gadget in the upper right to turn and tilt your view to get other perspectives of any site.
  9. Zoom out a bit and turn on the Roads layer to get a handy map of the area.
  10. Zoom out even more and turn on the Borders and Labels layer (you might want to turn off the other layers at this point). This gives you a broader perspective. (Tip: you can also turn on the “View->Overview Map” – or hit “CTRL-M” to get a fast broad perspective map).

These are just some really basic steps I often take when trying to learn about a place. Another useful layer is the Google Earth Community layer, found inside of the “Gallery” layer. Although, for some popular places you may find dozens of placemarks by people who have posted about their favorite places – almost too much information. There are many other collections and tools (written about on this blog) for learning all kinds of things like weather, conditions of the environment, real estate prices, history, etc.

The world is a big place, and these techniques won’t work for every single place on the planet. But, if you try them out, you will probably be surprised just how much you can learn (and how many hours you can spend learning about places you’ve always wanted to visit).

via googlearthblog