Introducing the SketchUp Showcase


It’s our sincere pleasure to unveil The SketchUp Showcase, a home for the most impressive, interesting, and inspiring project stories that have been shared with us.

Why a new showcase? Often, when you find an amazing model in the 3D Warehouse, it doesn’t tell the full story behind a project. You can download it and see how it was built. But you probably wouldn’t get a sense of why it was built. Where did the inspiration come from? What were the design challenges the modeler faced? What happened after the model was finished? The story just isn’t complete.

The Showcase is a space where the stories, images, renders, animations, and 3D models of passionate SketchUppers can shine a bit brighter.


What was the inspiration behind this 3D model? | Image courtesy of Roberto Bergamo 


But that’s not all – the Showcase is also a first look at a new element of SketchUp technology: an online 3D model viewer. This 3D viewer lets you orbit, zoom, and pan 3D models right in your browser! To see it in action, find a project marked with a red flag or simply click here. Please note: you’ll need to use the latest version of Google Chrome to take advantage of the WebGL goodness that makes this viewer possible.

Go ahead and start exploring now; content is organized by category filters, so you can easily find projects based on your interests.

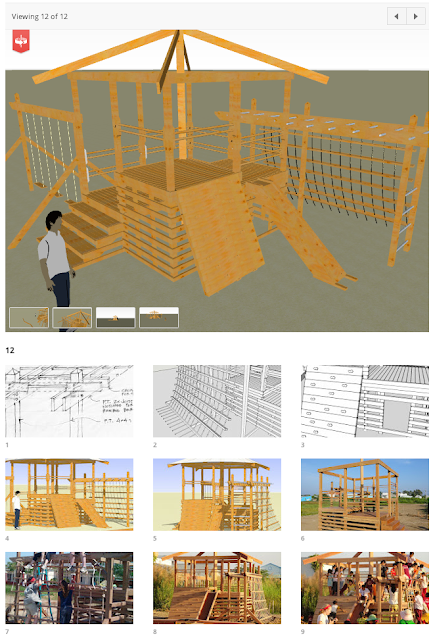
A project page featuring the new online 3D viewer | The Catalyst Playground in VietnamFinally, our team would like to dedicate the SketchUp Showcase to all the passionate SketchUppers who’ve supported us for over a decade. As we enter a new chapter with Trimble, we hope the Showcase and the online viewer are proof that SketchUp is only getting better. It’s clichéd to say we wouldn’t be much of anywhere without you, but that doesn’t make it any less true. Thank you for all of the love (sometimes tough) you’ve sent our way. Your passion for SketchUp is still what gets us out of bed in the morning.

It’s Time to Improve Your Web Map App


Google had several new feature announcements for the Google Maps API in the last few months, including high resolution static maps, the new Street View Image API, and the use of high DPI map tiles in the JS Maps API on mobile devices. I’m here to give you some tips for using these new features to improve your existing mobile JS map app.

1. Upgrade Your App to Use the v3 API
If you’re still using the v2 Google Maps API it’s time to change that. Period. This is one of the best improvements you can make to your map app. The v3 Google Maps API was designed for the mobile web and it is significantly faster than its predecessor. Not only is the v3 Google Maps API designed to load fast on mobile browsers, but your app will be upgraded immediately because your map will automatically access high DPI map tiles, which have better on screen fidelity.

2. Use the Static Maps API to Improve User Experience
Check your Google Analytics data (or server logs) to see if your app is being accessed by devices with browsers that can’t or don’t fully support JavaScript. You can add logic to your app (e.g, server-side user agent checking) to determine whether you should serve your JS Maps API-based app or a static map image that shows the same or similar information. Although your users won’t be able to interact with the map, they’ll appreciate the ability to view the map. You can even add markers and other features to the static map. You’ll also be able to take advantage of the high resolution Static Maps API.


3. Use StreetView Images to Provide More Context
Chances are your map app gives users access to all kinds of information, whether it’s your own data and images or our very own Places API. Give your users some additional context by using the Street View Image API to provide a general idea of what a location looks like at street level. When you provide a location in your URL request, the API will snap to the panorama photographed closest to that particular location.

4. Use the JS Maps API Only When It Makes Sense
If all you need is a small map for context, you should be using the Static Maps API. This may seem obvious, but we’ve come across a few mobile apps that seem to use the JS Maps API to provide nothing more than a thumbnail. Use the Static Maps API to load a small image and, if needed, link that thumbnail to open up a larger map (whether your own page that uses the JS Maps API or maps.google.com).

And again, if you’re still using the deprecated v2 Google Maps API in any of your apps (mobile or otherwise), it’s time to migrate your app to the v3 Google Maps API, as Google are more than halfway through the three year deprecation period.


Matt Fox’s Topographic USGS maps

A few months ago we showed you Matt Fox’s excellent topographic maps of New Zealand, which were quite impressive. Over the years he’s had many requests to create similar maps with seamless USGS topographic data, and now he’s starting to roll them out on his site.

flat-ridge.jpg

As you can see from the image above, the maps are remarkably sharp. The are distributed through a rather unique system; rather than just downloading a KMZ file, you download an installation program that adds the maps to your PC as Super Overlays. To try it for yourself, Matt is offering a free download of the San Francisco area, available here.

The new maps are significantly higher quality.

comparison.jpg

For more, be sure to visit Google Earth Library and read Matt’s full blog entry.

Now you can test your Mobile Web Apps with WebDriver

Mobile testing has come a long way since the days when testing mobile web applications was mostly manual and took days to complete. Selenium WebDriver is a browser automation tool that provides an elegant way of testing web applications. WebDriver makes it easy to write automated tests that ensure your site works correctly when viewed from an Android or iOS browser.

For those of you new to WebDriver, here are a few basics about how it helps you test your web application. WebDriver tests are end-to-end tests that exercise a web application just like a real user would. There is a comprehensive user guide on the Selenium site that covers the core APIs.

Now let’s talk about mobile! WebDriver provides a touch API that allows the test to interact with the web page through finger taps, flicks, finger scrolls, and long presses. It can rotate the display and provides a friendly API to interact with HTML5 features such as local storage, session storage and application cache. Mobile WebDrivers use the remote WebDriver server, following a client/server architecture. The client piece consists of the test code, while the server piece is the application that is installed on the device.

Get Started


WebDriver for Android and iPhone can be installed following these instructions. Once you’ve done that, you will be ready to write tests. Let’s start with a basic example using www.google.com to give you a taste of what’s possible.

The test below opens www.google.com on Android and issues a query for “weather in san francisco”. The test will verify that Google returns search results and that the first result returned is giving the weather in San Francisco.

public void testGoogleCanGiveWeatherResults() {
// Create a WebDriver instance with the activity in which we want the test to run.
WebDriver driver = new AndroidDriver(getActivity());
// Let’s open a web page
driver.get(“http://www.google.com”);

// Lookup for the search box by its name
WebElement searchBox = driver.findElement(By.name(“q”));

// Enter a search query and submit
searchBox.sendKeys(“weather in san francisco”);
searchBox.submit();

// Making sure that Google shows 11 results
WebElement resultSection = driver.findElement(By.id(“ires”));
List searchResults = resultSection.findElements(By.tagName(“li”));
assertEquals(11, searchResults.size());

// Let’s ensure that the first result shown is the weather widget
WebElement weatherWidget = searchResults.get(0);
assertTrue(weatherWidget.getText().contains(“Weather for San Francisco, CA”));
}

Now let’s see our test in action! When you launch your test through your favorite IDE or using the command line, WebDriver will bring up a WebView in the foreground allowing you to see your web application as the test code is executing. You will see www.google.com loading, and the search query being typed in the search box.


We mentioned above that the WebDriver supports creating advanced gestures to interact with the device. Let’s use WebDriver to throw an image across the screen by flicking horizontally, and ensure that the next image in the gallery is displayed.

WebElement toFlick = driver.findElement(By.id(“image”));
// 400 pixels left at normal speed
Action flick = getBuilder(driver).flick(toFlick, 0, -400, FlickAction.SPEED_NORMAL)
.build();
flick.perform();
WebElement secondImage = driver.findElement(“secondImage”);
assertTrue(secondImage.isDisplayed());

Next, let’s rotate the screen and ensure that the image displayed on screen is resized.


assertEquals(landscapeSize, secondImage.getSize())
((Rotatable) driver).rotate(ScreenOrientation.PORTRAIT);
assertEquals(portraitSize, secondImage.getSize());

Let’s take a look at the local storage on the device, and ensure that the web application has set some key/value pairs.


// Get a handle on the local storage object
LocalStorage local = ((WebStorage) driver).getLocalStorage();
// Ensure that the key “name” is mapped
assertEquals(“testUser”, local.getItem(“name”));

What if your test reveals a bug? You can easily take a screenshot for help in future debugging:


File tempFile = ((TakesScreenshot) driver).getScreenshotAs(OutputType.FILE);

High Level Architecture

WebDriver has two main components: the server and the tests themselves. The server is an application that runs on the phone, tablet, emulator, or simulator and listens for incoming requests. It runs the tests against a WebView (the rendering component of mobile Android and iOS) configured like the browsers. Your tests run on the client side, and can be written in any languages supported by WebDriver, including Java and Python. The WebDriver tests communicate with the server by sending RESTful JSON requests over HTTP. The tests and server pieces don’t have to be on the same physical machine, although they can be. For Android you can also run the tests using the Android test framework instead of the remote WebDriver server.

Infrastructure Setup

At Google, we have wired WebDriver tests to our cloud infrastructure allowing those tests to run at scale and making it possible to have them run in our continuous integration system. External developers can run their mobile tests either on emulators/simulators or real devices for Android and iOS phones and tablets.
Android emulators can run on most OSes because they are virtualized, so we run them on our generic cloud setup. Though there are many advantages to using Android emulators because they emulate a complete virtual device (including the virtual CPU, MMU, and hardware devices), it makes the test environment slower. You can speed up the tests by disabling animations, audio, skins, or even by running in the emulator headless mode. To do so, start the emulator with the options –no-boot-anim, –no-audio, –noskin, and –no-window. If you would like your tests to run even faster, start the emulator from a previously created snapshot image. That reduces the emulator startup time from 2 minutes to less than 2 seconds!
iOS simulators can’t be virtualized and hence need to run on Mac machines. However, because iOS simulators don’t try to emulate the virtual device or CPU at all, they can run as applications at “full speed,” this allows the test to run much faster.
Stay tuned for more mobile feature in Selenium WebDriver, and updates on the Selenium blog.