Bing Maps: How to Overlay Weather and Traffic Conditions

How to overlay traffic and weather information on Bing Maps.

Weather

You can get weather information from the U.S. National Oceanic and Atmospheric Administration (NOAA). The NOAA expose a number of WMS layers showing, for example, cloud coverage, real-time radar data, wind speed and sea levels across the U.S. and territories. (Sadly, I’m not aware of an equivalent data source for the rest of the world). You can find information on the various layers available from http://nowcoast.noaa.gov/help/mapservices.shtml?name=mapservices

The data is exposed as WMS layers, so start by following my previous posts explaining how to access and overlay WMS layers on the AJAX v7 or Silverlight control. Replace the URLTemplate in these examples with the URL of the NOAA WMS service, as follows:

[php]
string urlTemplate = “http://nowcoast.noaa.gov/wms/com.esri.wms.Esrimap/obs?service=wms&
version=1.1.1&request=GetMap&format=png&BBOX={0}&SRS=EPSG:4326&width=256&
height=256&transparent=true&Layers=RAS_RIDGE_NEXRAD”;
[/php]

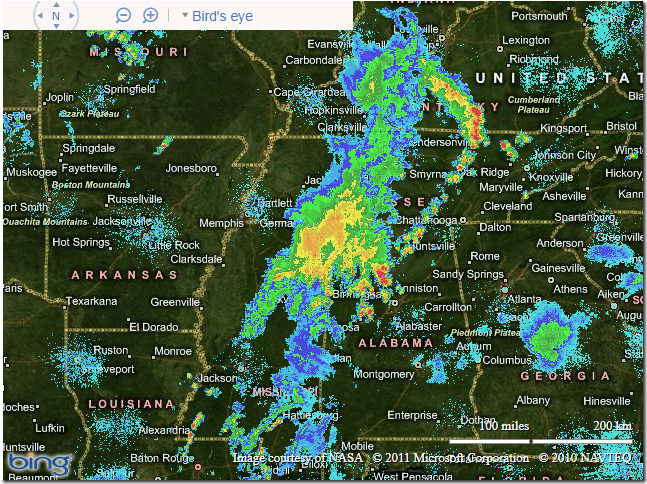
This example retrieves the RAS_RIDGE_NEXRAD layer, which is a RADAR mosaic for CONUS, Puerto Rico, Hawaii, Alaska, and Guam. When overlaid on Bing Maps, it looks like this (illustrating the weather currently affecting the Mississippi river area):

image

If you want to add several different weather layers from the NOAA and control them separately you can make several separate requests to the WMS service, changing the URL template each time to request the appropriate layer. Otherwise, you can make a single request that merges several types of information in one layer, by passing a comma-separated list in the LAYERS parameter. E.g. to retrieve a single layer that displays both the land surface temperature (OBS_MET_TEMP) and the sea surface temperature point observations (OBS_MAR_SSTF) in a single layer, you can use the following URL template:

string urlTemplate = “http://nowcoast.noaa.gov/wms/com.esri.wms.Esrimap/obs?service=wms&version=1.1.1&request=GetMap&format=png&BBOX={0}&SRS=EPSG:4326&width=256&height=256&transparent=true&Layers=OBS_MET_TEMP,OBS_MAR_SSTF”;

Traffic

Bing Maps v6.x contained an inbuilt option to display traffic using the VEMap.LoadTraffic method. This method does not exist in v7 or in the Silverlight control, but you can still access the same tileset as used by the v6.x control. The URL at which these tiles are located is:

http://t0.tiles.virtualearth.net/tiles/t{quadkey}.png

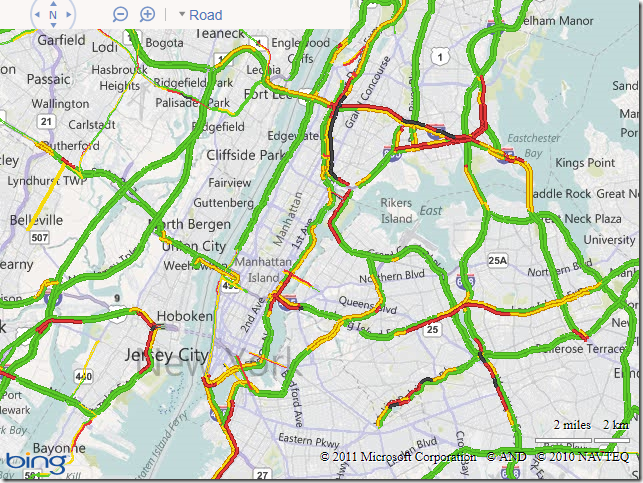
Note that, this time, these are tiles that have already been cut into the Bing Maps quadkey system, so you don’t need to add the intermediate WMS handler step as with the weather example above. Instead, you can directly add a tilesource pointing to the traffic tile data as follows:

[php]
<!DOCTYPE html PUBLIC "-//W3C//DTD XHTML 1.0 Transitional//EN" "http://www.w3.org/TR/xhtml1/DTD/xhtml1-transitional.dtd">
<html>
<head>
<title></title>
<meta http-equiv="Content-Type" content="text/html; charset=utf-8">
<script type="text/javascript" src="http://ecn.dev.virtualearth.net/mapcontrol/mapcontrol.ashx?v=7.0"></script>
<script type="text/javascript">
var map = null;
var tilelayer = null;
function GetMap()
{
// Initialize the map
map = new Microsoft.Maps.Map(document.getElementById("mapDiv"),{credentials:"Your Bing Maps Key",
center:new Microsoft.Maps.Location(47.9,-122), zoom:9, mapTypeId:"r"});

// Create the tile layer source
var tileSource = new Microsoft.Maps.TileSource({ uriConstructor: ‘http://t0.tiles.virtualearth.net/tiles/t{quadkey}.png’ });

// Construct the layer using the tile source
tilelayer= new Microsoft.Maps.TileLayer({ mercator: tileSource, opacity: 1.0 });

// Push the tile layer to the map
map.entities.push(tilelayer);
}
</script>
</head>
<body onload="GetMap();">
<div id=’mapDiv’ style="position:relative; width:640px; height:480px;"></div>
</body>
</html>

[/php]

image

Sadly, once again, this data is for the US only. Also note that there are a few clauses in the Bing Maps Terms of Use specifically governing the use of traffic data.
PHP and UTF-8 BOM

I recently wrote some PHP for the first time in ages, and noticed some of my pages were appearing on one development machine, in some browsers, preceded by the characters . These characters didn’t show up when editing the pages, and they didn’t show up at all when served from a different server or when viewed in some other browsers.

Initially, I thought that it was something to do with not having configured the correct character set in the response header (which is generally the main cause of garbled characters appearing in webpages), but, checking the response header it seemed ok – I was outputting UTF-8 as desired:

[php]header(‘Content-type: text/html; charset=UTF-8’) ;[/php]

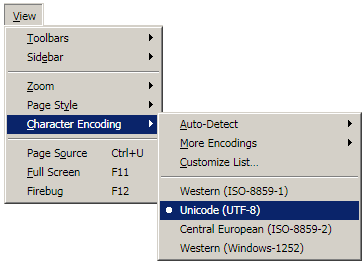
And browsers viewing the page were correctly auto-detecting the character encoding as UTF-8:


image

Then I checked the configuration of the server, which was also set up with Unicode support correctly. And then I checked the encoding of the PHP scripts themselves, which were all encoded using Unicode UTF-8 – (Windows Codepage 65001). So far, everything seemed consistent, so where were those garbled characters coming from?

UTF-8 with or without signature – your choice. (Or not).

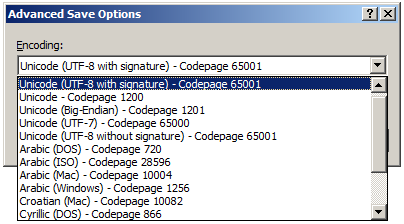
The reason, as I found out, was that one of my development environments (Visual Studio – from which I’d made the most recent edits to the affected pages) was configured to save UTF-8 encoded files with signature. Here’s the options for Unicode character encoding in Visual Studio, showing UTF-8 both with and without signature (notice that they’re both the same codepage – 65001):

image

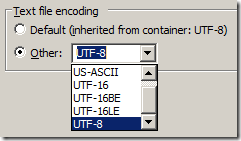
There seems to be very little convention or standardisation as to the use of this “signature”. I hadn’t really come across this problem before because I generally use Eclipse for PHP development. The encoding options there are shown below:

image

Notice that, although there are several flavours of UTF-16 available in Eclipse, there is only version of UTF-8, which is equivalent to Visual Studio’s without signature.

Then again, here are the options in Windows Notepad (yes, I use that sometimes as well). As in Eclipse, there is only one choice of UTF-8, but this time the sole option available  provides the opposite behaviour – always saving UTF-8 with signature:

BOM BOM!

The optional “signature” in question is the Byte-Order Marker, or BOM. A byte-order marker is required for multibyte encoded data, including UTF-16, to indicate big-endianness or little-endianness – the order in which bytes are arranged. All of the save dialogs above give you the choice for specifying the byte order for Unicode UTF-16, since in a multibyte format the byte order matters. However, for UTF-8, which uses only a single byte for each character (that’s what the “8” stands for – 8 bits = 1 byte) a BOM is not required and doesn’t really make sense.

Even though UTF-8 always uses the same byte-order, a UTF-8 encoded file can begin with the bytes EF BB BF, which merely signifies that it is in UTF-8 format. It’s not really a BOM, hence why Visual Studio calls it a “signature”. The problem is that some clients don’t expect UTF-8 to have a BOM and, as it turns out, the PHP engine is one of them. At least,some builds of the PHP engine. One of my PHP servers, running on a linux machine, interpreted the UTF-8 file with signature fine, whereas another, running under Windows, tried to display the leading bytes as content on the page, which is how you end up with .

The combination of different default encoding behaviours across different editors combined with different server/browser behaviours when interpreting UTF-8 files with BOM means that this problem can be a little tricky to diagnose.

This is reported as a PHP bug at http://bugs.php.net/bug.php?id=22108, but the workarounds are actually quite straightforward (once you know what the problem is!):

  • If you’re using Visual Studio, make sure you save your PHP files as UTF-8 withoutsignature. If you’re using Eclipse, this is the default anyway.
  • Compile your PHP with the –enable-zend-multibyte option, which will correctly parse the BOM at the start of the file
  • If you don’t need unicode at all, you could use ISO-8566-1, or another non-UTF-8  encoding

How To Customize Mailing Labels

Adding a Custom Field to a Mailing Label

The first task was to modify the default fields displayed on the mailing label (name, address, postcode etc.) to include a custom field. This organisation delivers a lot of its local mail by hand rather than through the royal mail, so the custom field was used to assign addresses into a delivery walk, and this was to be printed on the label so it could be given to the appropriate deliverer.

Fortunately, CiviCRM uses a token replacement system, and every user-created custom field is assigned a unique token. The only problem in including the deliverer custom field on the mailing label  was finding out what the token corresponding to the appropriate field was.


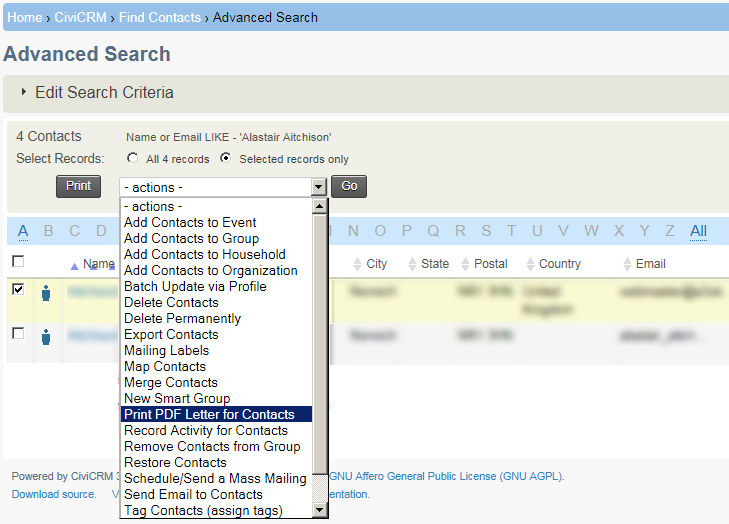
I’m sure there must be a better way, but the quick solution that worked for me was to bring up the “Print PDF Letter for Contacts” action from a search result

On the next screen, click the “Insert Tokens” link at the top right to be presented with a modal dialog box listing all the names of all the available tokens in your system. Clicking on the name of a token will insert it into the PDF letter, allowing you to see the token behind it. In the screenshot below, for example, the Geo Code 1 field associated with each individual contact can be inserted into any mailing (or mailing label) using the {contact.geo_code_1} token.

Having identified the appropriate token for a custom field (in my case, it was{contact.custom_4} ), you can then add this to the mailing label template by going toAdminister >> Configure >> Global Settings >> Address Settings and editing the Mailing Label Format to include the relevant token, as below:

{contact.addressee}
{contact.street_address}
{contact.supplemental_address_1}
{contact.supplemental_address_2}
{contact.city}{, }{contact.state_province}{ }{contact.postal_code}
{contact.country}
{contact.custom_4}

Sorting the Mailing List

Having ensured that the custom field was printed onto each label, the next step was to sort the list of labels based on the value of that field. As explained before, the mailings were to be hand-delivered, and it would save a lot of time sorting through the envelopes if they could be printed ready-sorted into batches for the appropriate deliverer, as specified by the custom field. A quick search of the internet reveals that sorted mailings are also required in other circumstances as well, such as sorting by ZIP code when submitting batch mailings to the U.S. Postal Service. However, although reported as a major bug in CiviCRM, the ability to sort mailing lists in anything other than alphabetical surname order of addressee is currently not possible. So I had to hack something together.

A snoop around revealed that the bulk of the work in preparing the mailing labels occurred in the script located at \sites\all\modules\civicrm\CRM\Contact\Form\Task\Label.php. Within the CRM_Contact_Form_Task_Label class in this file, I created a new comparison function which would sort an array of the items to be included in the mailing list based on the custom_4 field, as follows:

[php]
function cmpCustomField($a, $b) {
if ($a[‘custom_4’] == $b[‘custom_4’]) {
return 0;
}
return ($a[‘custom_4’] < $b[‘custom_4’]) ? -1 : 1;
}

[/php]

Through a bit of experimentation, I determined the best place to sort the records was after they had been run through the “Merge same address”/“Merge same household” scripts, but before being formatted for display. So I inserted a call to the PHP uasort function (sorts an associative array while keeping indexes) that used my comparison function at around line 330, as follows:

[php]

if ( isset( $fv[‘merge_same_household’] ) ) {
$rows = $this->mergeSameHousehold( $rows );
$individualFormat = true;
}

// INSERT CUSTOM SORT HERE
uasort ( $rows , array($this, ‘cmpCustomField’));

// format the addresses according to CIVICRM_ADDRESS_FORMAT (CRM-1327)
require_once ‘CRM/Utils/Address.php’;
foreach ($rows as $id => $row) {

[/php]

The mailing list labels were now produced in nicely ascending order based on the custom field.

Changing the Mailing Label Paper Template

CiviCRM supports a handful of common avery label formats out-of-the-box, but this organisation had recently purchased a bulk load of non-standard labels (A4, 24 labels per page, 8×3) which did not fit any of the supplied templates. They therefore couldn’t be used.

To create a new paper template, changes to two files must be made (both called “Label.php”, but in different directories).

Firstly, in the \sites\all\modules\civicrm\CRM\Utils\PDF\Label.php look for the $averyLabels array and add a new element to the array with the margins and other dimensions of your label sheet. Here’s the settings I used for my new paper (NX and NY are the number of columns and rows of labels on the sheet, width and height determined by dividing the overall dimensions of the page by the number of labels, and the margins determined mostly by guesswork):

[php]

$averyLabels = array (

‘Custom_3x8’ => array(
‘name’ => ‘NGP_3x8’,
‘paper-size’ => ‘A4’,
‘metric’ => ‘mm’,
‘lMargin’ => 5,
‘tMargin’ => 10,
‘NX’ => 3,
‘NY’ => 8,
‘SpaceX’ => 0,
‘SpaceY’ => 0,
‘width’ => 70,
‘height’ => 37.125,
‘font-size’ => 9
)
);

[/php]

Having defined the settings for the Custom paper template, to actually get these settings to be selectable when producing mailing labels, you also need to edit the file at\sites\all\modules\civicrm\CRM\Contact\Form\Task\Label.php

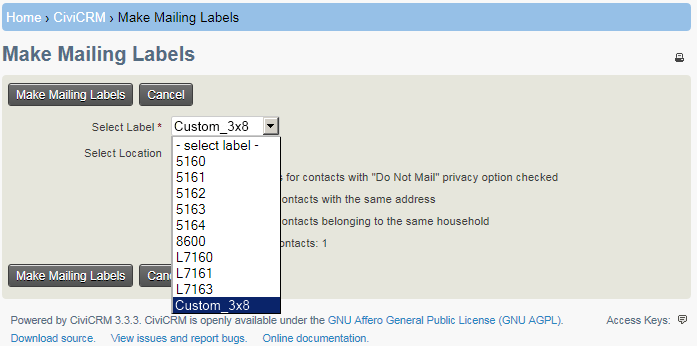
Near the top is a buildQuickForm() function that contains an array of templates to populate a select list. Add the name of your new paper template to the end of the array, exactly as you defined it in the $averyLabels array above:

[php]
$label = array(
"5160" => "5160",
"5161" => "5161",
"5162" => "5162",
…,
"Custom_3x8" => "Custom_3x8"
);

[/php]

Save the file, and your new template will magically become available for use:

A few tweaks…

Finally, there were just a few tweaks to be made. The new paper template should be always be selected by default for mailing labels (they’d bought reams of the stuff, so it was going to be used for all labels for quite a while yet), and also the “merge contacts with the same address” should always be selected. Adding these defaults was a simple matter of amending the $defaults array declared in the setDefaultValues() function near the top of the \sites\all\modules\civicrm\CRM\Contact\Form\Task\Label.php file.

[php]
function setDefaultValues()
{
$defaults = array();
$defaults[‘do_not_mail’] = 1;

// Modified by AA
$defaults[‘merge_same_address’] = 1;
$defaults[‘label_id’] = "Custom_3x8";

return $defaults;
}

[/php]

I’m no CiviCRM expert, and I’ve certainly no idea if the approach I took to solving any of these problems represents “best practice” in any way, but it seems to have got the job done and met the immediate needs of my client, so hopefully it might be helpful to somebody else too!