Garmin nuvu 3790T.
The magic of gzip compression
All developers agree that saving bandwidth is a critical factor for the success of a mobile application. Less data usage means faster response times and also lower costs for the users as the vast majority of mobile data plans are limited or billed on a per-usage basis.
When using any of the Google Data APIs in your application, you can reduce the amount of data to be transferred by requesting gzip-encoded responses. On average, the size of a page of users returned by the Provisioning API (100 accounts) is about 100 Kb, while the same data, gzip-encoded, is about 5 Kb — 20 times smaller! When you can reduce data sizes at this dramatic scale, the benefits of compression will often outweigh any costs in client-side processing for decompression.
Enabling gzip-encoding in your application requires two steps. You have to edit the User-Agent
string to contain the value gzip
and you must also include an Accept-Encoding
header with the same value. For example:
User-Agent: my application - gzip
Accept-Encoding: gzip
Client libraries for the various supported programming languages make enabling gzip-encoded responses even easier. For instance, in the .NET client library it is as easy as setting the boolean UseGZip flag of the RequestFactory object:
service.RequestFactory.UseGZip = true;
For any questions, please get in touch with us in the respective forum for the API you’re using.
Now you can test your Mobile Web Apps with WebDriver
Mobile testing has come a long way since the days when testing mobile web applications was mostly manual and took days to complete. Selenium WebDriver is a browser automation tool that provides an elegant way of testing web applications. WebDriver makes it easy to write automated tests that ensure your site works correctly when viewed from an Android or iOS browser.
For those of you new to WebDriver, here are a few basics about how it helps you test your web application. WebDriver tests are end-to-end tests that exercise a web application just like a real user would. There is a comprehensive user guide on the Selenium site that covers the core APIs.
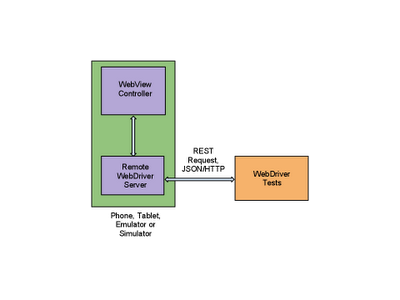
Now let’s talk about mobile! WebDriver provides a touch API that allows the test to interact with the web page through finger taps, flicks, finger scrolls, and long presses. It can rotate the display and provides a friendly API to interact with HTML5 features such as local storage, session storage and application cache. Mobile WebDrivers use the remote WebDriver server, following a client/server architecture. The client piece consists of the test code, while the server piece is the application that is installed on the device.
WebDriver for Android and iPhone can be installed following these instructions. Once you’ve done that, you will be ready to write tests. Let’s start with a basic example using www.google.com to give you a taste of what’s possible.
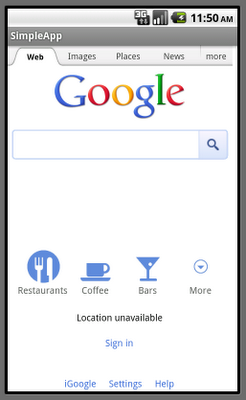
The test below opens www.google.com on Android and issues a query for “weather in san francisco”. The test will verify that Google returns search results and that the first result returned is giving the weather in San Francisco.
// Create a WebDriver instance with the activity in which we want the test to run.
WebDriver driver = new AndroidDriver(getActivity());
// Let’s open a web page
driver.get(“http://www.google.com”);
// Lookup for the search box by its name
WebElement searchBox = driver.findElement(By.name(“q”));
// Enter a search query and submit
searchBox.sendKeys(“weather in san francisco”);
searchBox.submit();
// Making sure that Google shows 11 results
WebElement resultSection = driver.findElement(By.id(“ires”));
List searchResults = resultSection.findElements(By.tagName(“li”));
assertEquals(11, searchResults.size());
// Let’s ensure that the first result shown is the weather widget
WebElement weatherWidget = searchResults.get(0);
assertTrue(weatherWidget.getText().contains(“Weather for San Francisco, CA”));
Now let’s see our test in action! When you launch your test through your favorite IDE or using the command line, WebDriver will bring up a WebView in the foreground allowing you to see your web application as the test code is executing. You will see www.google.com loading, and the search query being typed in the search box.
// 400 pixels left at normal speed
Action flick = getBuilder(driver).flick(toFlick, 0, -400, FlickAction.SPEED_NORMAL)
.build();
flick.perform();
WebElement secondImage = driver.findElement(“secondImage”);
assertTrue(secondImage.isDisplayed());
Next, let’s rotate the screen and ensure that the image displayed on screen is resized.
((Rotatable) driver).rotate(ScreenOrientation.PORTRAIT);
assertEquals(portraitSize, secondImage.getSize());
Let’s take a look at the local storage on the device, and ensure that the web application has set some key/value pairs.
LocalStorage local = ((WebStorage) driver).getLocalStorage();
// Ensure that the key “name” is mapped
assertEquals(“testUser”, local.getItem(“name”));
What if your test reveals a bug? You can easily take a screenshot for help in future debugging:
WebDriver has two main components: the server and the tests themselves. The server is an application that runs on the phone, tablet, emulator, or simulator and listens for incoming requests. It runs the tests against a WebView (the rendering component of mobile Android and iOS) configured like the browsers. Your tests run on the client side, and can be written in any languages supported by WebDriver, including Java and Python. The WebDriver tests communicate with the server by sending RESTful JSON requests over HTTP. The tests and server pieces don’t have to be on the same physical machine, although they can be. For Android you can also run the tests using the Android test framework instead of the remote WebDriver server.


