Trip to the Super Bowl with Google Earth


We’re two days away from one of my favorite events of the year, the Super Bowl (and I’m sure I’m not alone!). I’m one of those fans who starts watching football during pre-season and can have entire weekends ruined if my team loses. For me, the Super Bowl is the culmination of hours spent glued to the television and more hours doing post-game analysis (read: arguments) with fellow football enthusiasts.

However, what I love most about the Super Bowl is the tradition around it. It’s a time when friends and family get together and stuff their faces with nachos and beer, argue about who they wish were performing at halftime and watch the two best teams in the league slug it out for the storied Lombardi trophy. Even the commercials are good!

Unfortunately, not all of us can have the luxury of being at Cowboys Stadium – site of Super Bowl XLV – for the game, so we thought we’d offer users the next best thing: the Cowboys Stadium in 3D for Google Earth. Watch the video below to fly to Arlington, Texas and see the stadium in 3D.

You can also visit the stadium in Google Earth by searching for “Cowboys Stadium, Arlington TX” (make sure the 3D layer is turned on). Or, click here to see the area in your browser with Earth view in Google Maps.

We hope you enjoy the game as much as we will. Oh, and go Packers!

Posted by Gopal Shah, Google SketchUp team

Mappoint 2011 NA is released!

As of  March 1st, 2011

MapPoint 2011

is now officially released!

The MapPoint Product Home page has been updated and a trial download for MapPoint 2011 North America is now available. I hear the team is now working hard to get MapPoint 2011 Europe out the door.

After two releases with significant changes (MapPoint 2009 and MapPoint 2010) this release focused primarily on the #1 customer request which is data updates. As such there are 88,000 additional miles of roads. Updates are in the US, Canada, Mexico and Puerto Rico.

Larry Peterson on the MapPoint team at Microsoft writes —

This year we focused on updating our mapping data which is the #1 requested feature. With the 2011 version, you get 1.9 million points of interest (not only updated from 2010 but it was only 1.7million so many more have been added). There are also 88,000 additional miles of navigable roads in 2011 over 2010. That is pretty huge – equivalent to over 15 coast to coast round trips driving San Francisco between New York City.

Product development takes time and release cycles change for a variety of reasons. We’re ultimately committed to delivering top quality to our customers and this is what drives all efforts behind the product.

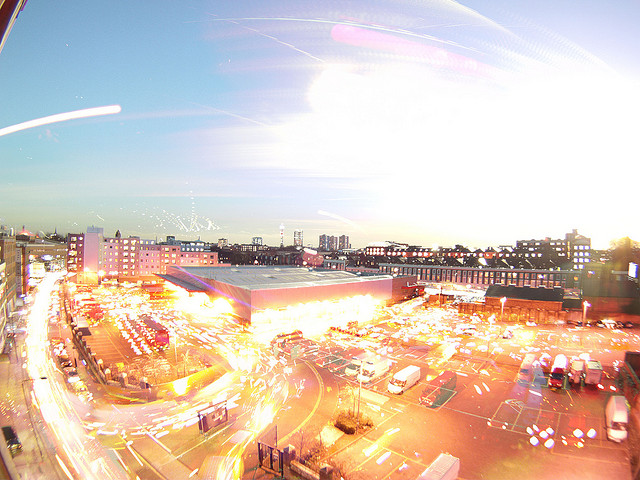
City Skyline Day and Night – Single Timelapsed Photography

Mixing day and night images with the technique in astrophotography known as ‘star trails’ it is possible to capture a single image detailing both day and night activity. In the photograph below to the left is the moon streaking across the scene and the lights of aircraft at night, to the right is the sun with traffic captured below. Depending on your location the technique can create some interesting timelapse single views photographs, below we detail how to create your own.

You will need:

1 x Timelapse System, you can use a simple webcam as per our previous Tutorial: Torch + Webcam = HD Timelapse System a DSLR such as the Canon G9 with CHDK , a iPhone with the free Gorrilacam app or any camera that can take photos at regular intervals. We used a Go Pro HD camera in timelapse mode, taking a picture every 5 seconds.

1 x Copy of Photoshop, you can download a 30 day trial.
1 x Photoshop Stacking Action (thanks to Deep Space Astrophotography

Time Taken, 4 to 12 hours to capture, 2 to 6 hours to process.

The concept is simple, set up your camera, webcam or iphone at a suitable location, and capture an image at regular intervals, for our example we captured an image every 5 seconds pointing at the skyline of London. Capturing an image at least every 5 seconds is vital for star/aircraft trails as it allows for closer spacing between the lights in the final image.

We left the camera running for approximately 12 hours capturing 8000+ images, saved into a folder on our computer. Ours captured covered both day and night time, resulting in the following timelapse:

The next step is to open up photoshop, chose the images you want to use, and start stacking.

Image Stacking in Photoshop


The images will be stacked onto of an intially blank image via a simple automated action:

1) Create a new blank black image the same size are your captured photographs.
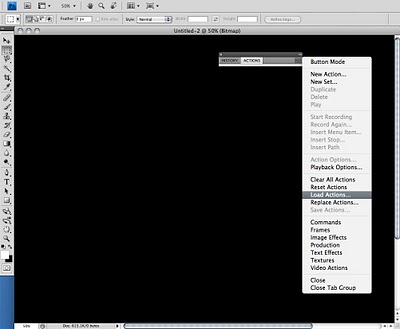
2) Load the action into the action windows in Photoshop and load the action Startrails.atn.


3) In Photoshop click ‘File’, ‘Automate’ and ‘Batch’. Select the action you have just loaded and choose your directory with the images as source and make sure you select ‘None’ for the output directory.
Click ‘Ok’ and leave it running, our Mac laptop took around an 2 hours to stack the images – resulting in the Star/Aircraft Trail’ below:
The line across the centre is a star and the bright line on the left is the moon coming into shot. The rest of the lights are aircraft in the sky above London. If you use a complete day/night sequence then you can create images of stars/activity in a blue sky, as in our first photograph.
You can view higher resolution versions via our Flickr Photostream.