Symbols and Heatmaps in the Google Maps API

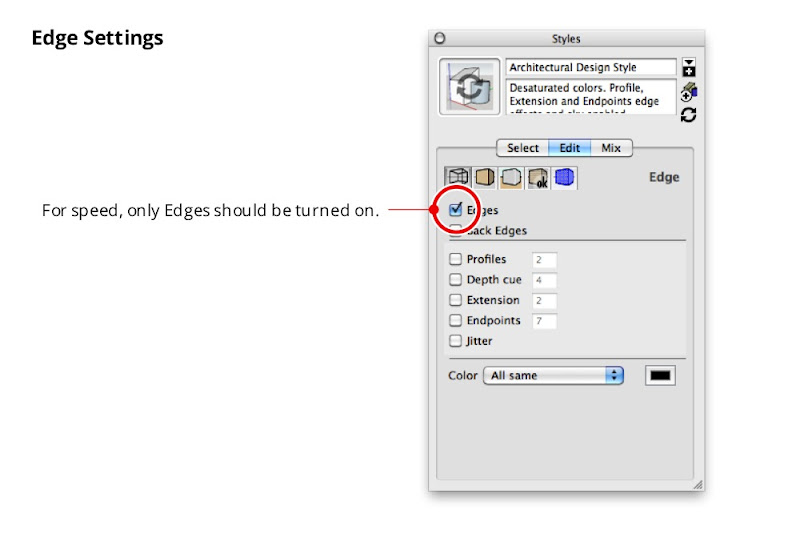
The Google Maps API provides a robust platform in which you can add geographical context to your data in a variety of ways. Data visualization is therefore one of the elements at the heart of the Maps API, and today we’re introducing two new techniques for visualizing your data in flexible and dynamic ways.

Symbols

At SXSW Interactive in 2011, I attended a session on geotemporal data visualization that made me keen to make it easier for Maps API developers to build visualizations similar to those discussed. For this reason I’m particularly excited to introduce a simple, yet powerful, new concept to the Maps API v3 that we call Symbols.

Unlike the image icons currently used for marking locations on a map, a Symbol is defined as a vector shape. The size, stroke width, color, and opacity of the shape, are all set by the Maps API application and can be dynamically modified. A small number of shapes, such as a circle, are provided by the Maps API, and custom shapes can be expressed as an SVG path.

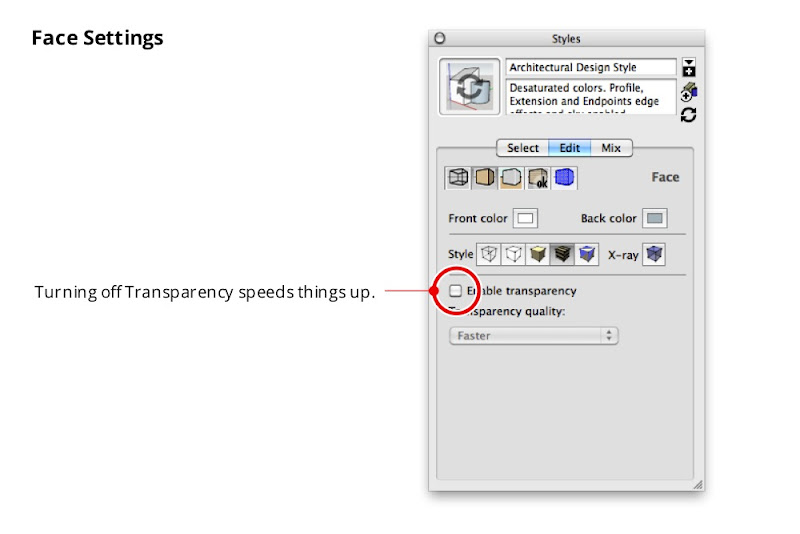
Symbols open up a wide range of compelling new possibilities for data visualization and visual effects. For example, the below map illustrates the expansion of the Walmart chain of stores between 1962 and 2006:

In addition to using symbols to represent point features you can also decorate polylines with Symbols. One or more symbols, such as an arrowhead, can be placed at fixed positions on the polyline or repeated along the polyline. Because the polyline that has been decorated does not need to be visible, this feature can also be used to created dotted or dashed polylines, and just as the style of the symbols can be dynamically modified, so too can their location on the polyline:
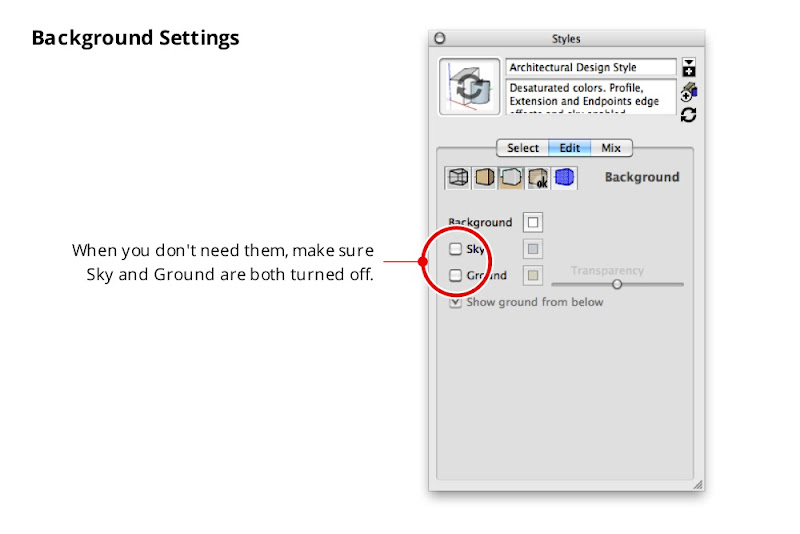
Heatmaps

Developers often ask how they can represent large amounts of data on a map. Improvements in web browser technology have increased the number of markers that can be rendered by a Maps API application, but above a certain threshold the density of markers can overwhelm the user.

An alternative approach is to use a heatmap, and to enable this approach we’re launching support for browser rendering of heatmaps by the Maps API using the new Heatmap Layer. Your Maps API application can define the colour spectrum, intensity range, and behaviour of the heatmap when the map is zoomed. Here’s the Walmart example from above, but this time visualized as a heatmap:

If you have any technical questions about these new features, we recommend engaging with our developer community online, or joining our regular Google Maps API Office Hours. If you’re at I/O come see us in person at Office Hours in the Google Maps developer sandbox.


SketchUp: Speed Up Using Fast Styles

You might not realize that the display settings you choose to apply to your models can affect SketchUp’s speed and general responsiveness. Turning on fancy edge effects and other doodads will slow you down when your model gets big.

When you’re working on a big model, you want to make sure that you’re using a style whose Edge Settings panel looks like the one in the image below. Everything but “Edges” should be turned off.

The Face Settings panel is where you can choose not to display Transparency. When Transparency is turned on, SketchUp has to redraw your model on the screen several times—each time you change your viewpoint. If you don’t need to see through your windows just now, opt to temporarily view these faces without transparency.

The Background Settings panel is handy for turning off Sky and Ground, both of which cause your computer to do extra thinking while you’re working.

Unless you absolutely need them, you should use the checkbox in the Watermark Settings panel to turn off Watermarks.

The only toggles in the Modeling Settings panel you really need to worry about are the ones for Hidden Geometry and Section Planes. Obviously, you shouldn’t have wither of these displayed if speed is what you’re aiming for.


Once you’ve configured your own fast style, you should save it. Just give it a new name (I suggest “Fast Style”), hit Enter, and click the Create New Style button in the Styles Browser. You new style is saved in the “In Model” collection of styles, which is only associated with the model you’re currently working on.

Incidentally, almost all of the choices in SketchUp’s Default Styles collection are so-called “Fast styles” — their Edge Display settings are already configured for speed. Choosing any one of these styles will switch off extraneous effects.

Make a Fast Scene

True SketchUp whizzes invariably go one step further and add a special “Fast” scene that they can activate whenever they need to. Rather than having to mess with the Styles Browser every time they want to activate their Fast Style, they just click a scene tab at the top of the modeling window. This Fast scene is usually set up to do three things: Switch to a Fast style, turn off Shadows, and turn off Fog.

Follow these steps to add a Fast scene to your model:

  1. Apply a Fast style to your model by choosing it from the Style Browser’s Select tab.
  2. Make sure Shadows and Fog are both turned off. These toggles are in the View menu.
  3. Choose Window > Scenes to open the Scenes Manager.
  4. Expand the Scenes Manager by clicking the Show Details button in the upper right corner.
  5. Click the Add Scene button to add a new scene to your model.
  6. Rename your new scene “Fast” (or something similarly descriptive) and hit Enter on your keyboard.
  7. Make sure that only the “Style and Fog” and “Shadow Settings” checkboxes are selected in the Properties to Save section of the Scenes Manager.

600 Free Google Map Markers

Map Icons Collection


I rarely make a Google Map without using map markers from the Map Icons Collection. The collection has more than 600 free icons which you can use as map markers with the Google Maps API, which means you can nearly always find a marker that fits the purpose and design of your map.

The collection has previously been hosted on Google Projects but now has its very own website. With the new website comes two cool new features, styles and custom colors.

The custom colors feature allows you to change the color of any map marker to fit the style of your map and website. The style feature lets you choose from seven different style of marker, including iPhone, gradient and classic.

If you are a Google Maps API developer then bookmark this collection now!