The Dalvik runtime may be garbage-collected, but that doesn’t mean you can ignore memory management. You should be especially mindful of memory usage on mobile devices, where memory is more constrained. In this article, we’re going to take a look at some of the memory profiling tools in the Android SDK that can help you trim your application’s memory usage.
Some memory usage problems are obvious. For example, if your app leaks memory every time the user touches the screen, it will probably trigger an OutOfMemoryError eventually and crash your app. Other problems are more subtle, and may just degrade the performance of both your app (as garbage collections are more frequent and take longer) and the entire system.
Tools of the trade
The Android SDK provides two main ways of profiling the memory usage of an app: the Allocation Tracker tab in DDMS, and heap dumps. The Allocation Tracker is useful when you want to get a sense of what kinds of allocation are happening over a given time period, but it doesn’t give you any information about the overall state of your application’s heap. For more information about the Allocation Tracker, see the article on Tracking Memory Allocations. The rest of this article will focus on heap dumps, which are a more powerful memory analysis tool.
A heap dump is a snapshot of an application’s heap, which is stored in a binary format called HPROF. Dalvik uses a format that is similar, but not identical, to the HPROF tool in Java. There are a few ways to generate a heap dump of a running Android app. One way is to use the Dump HPROF file button in DDMS. If you need to be more precise about when the dump is created, you can also create a heap dump programmatically by using theandroid.os.Debug.dumpHprofData() function.
To analyze a heap dump, you can use a standard tool like jhat or the Eclipse Memory Analyzer (MAT). However, first you’ll need to convert the .hprof file from the Dalvik format to the J2SE HPROF format. You can do this using the hprof-conv tool provided in the Android SDK. For example:
[php]hprof-conv dump.hprof converted-dump.hprof[/php]
Example: Debugging a memory leak
In the Dalvik runtime, the programmer doesn’t explicitly allocate and free memory, so you can’t really leak memory like you can in languages like C and C++. A “memory leak” in your code is when you keep a reference to an object that is no longer needed. Sometimes a single reference can prevent a large set of objects from being garbage collected.
Let’s walk through an example using the Honeycomb Gallery sample app from the Android SDK. It’s a simple photo gallery application that demonstrates how to use some of the new Honeycomb APIs. (To build and download the sample code, see the instructions.) We’re going to deliberately add a memory leak to this app in order to demonstrate how it could be debugged.

Imagine that we want to modify this app to pull images from the network. In order to make it more responsive, we might decide to implement a cache which holds recently-viewed images. We can do that by making a few small changes to ContentFragment.java. At the top of the class, let’s add a new static variable:
[php]private static HashMap<String,Bitmap> sBitmapCache = new HashMap<String,Bitmap>();[/php]
This is where we’ll cache the Bitmaps that we load. Now we can change the updateContentAndRecycleBitmap() method to check the cache before loading, and to add Bitmaps to the cache after they’re loaded.
[php]void updateContentAndRecycleBitmap(int category, int position) {
if (mCurrentActionMode != null) {
mCurrentActionMode.finish();
}
// Get the bitmap that needs to be drawn and update the ImageView.
// Check if the Bitmap is already in the cache
String bitmapId = "" + category + "." + position;
mBitmap = sBitmapCache.get(bitmapId);
if (mBitmap == null) {
// It’s not in the cache, so load the Bitmap and add it to the cache.
// DANGER! We add items to this cache without ever removing any.
mBitmap = Directory.getCategory(category).getEntry(position)
.getBitmap(getResources());
sBitmapCache.put(bitmapId, mBitmap);
}
((ImageView) getView().findViewById(R.id.image)).setImageBitmap(mBitmap);
}[/php]
I’ve deliberately introduced a memory leak here: we add Bitmaps to the cache without ever removing them. In a real app, we’d probably want to limit the size of the cache in some way.
Examining heap usage in DDMS
The Dalvik Debug Monitor Server (DDMS) is one of the primary Android debugging tools. DDMS is part of the ADT Eclipse plug-in, and a standalone version can also be found in the tools/ directory of the Android SDK. For more information on DDMS, see Using DDMS.
Let’s use DDMS to examine the heap usage of this app. You can start up DDMS in one of two ways:
- from Eclipse: click Window > Open Perspective > Other… > DDMS
- or from the command line: run
ddms(or./ddmson Mac/Linux) in thetools/directory

Select the process com.example.android.hcgallery in the left pane, and then click the Show heap updates button in the toolbar. Then, switch to theVM Heap tab in DDMS. It shows some basic stats about our heap memory usage, updated after every GC. To see the first update, click the Cause GCbutton.

We can see that our live set (the Allocated column) is a little over 8MB. Now flip through the photos, and watch that number go up. Since there are only 13 photos in this app, the amount of memory we leak is bounded. In some ways, this is the worst kind of leak to have, because we never get anOutOfMemoryError indicating that we are leaking.
Creating a heap dump
Let’s use a heap dump to track down the problem. Click the Dump HPROF file button in the DDMS toolbar, choose where you want to save the file, and then run hprof-conv on it. In this example, I’ll be using the standalone version of MAT (version 1.0.1), available from the MAT download site.
If you’re running ADT (which includes a plug-in version of DDMS) and have MAT installed in Eclipse as well, clicking the “dump HPROF” button will automatically do the conversion (using hprof-conv) and open the converted hprof file into Eclipse (which will be opened by MAT).
Analyzing heap dumps using MAT
Start up MAT and load the converted HPROF file we just created. MAT is a powerful tool, and it’s beyond the scope of this article to explain all it’s features, so I’m just going to show you one way you can use it to detect a leak: the Histogram view. The Histogram view shows a list of classes sortable by the number of instances, the shallow heap (total amount of memory used by all instances), or the retained heap (total amount of memory kept alive by all instances, including other objects that they have references to).

If we sort by shallow heap, we can see that instances of byte[] are at the top. As of Android 3.0 (Honeycomb), the pixel data for Bitmap objects is stored in byte arrays (previously it was not stored in the Dalvik heap), and based on the size of these objects, it’s a safe bet that they are the backing memory for our leaked bitmaps.
Right-click on the byte[] class and select List Objects > with incoming references. This produces a list of all byte arrays in the heap, which we can sort based on Shallow Heap usage.
Pick one of the big objects, and drill down on it. This will show you the path from the root set to the object — the chain of references that keeps this object alive. Lo and behold, there’s our bitmap cache!

MAT can’t tell us for sure that this is a leak, because it doesn’t know whether these objects are needed or not — only the programmer can do that. In this case, the cache is using a large amount of memory relative to the rest of the application, so we might consider limiting the size of the cache.
Comparing heap dumps with MAT
When debugging memory leaks, sometimes it’s useful to compare the heap state at two different points in time. To do this, you’ll need to create two separate HPROF files (don’t forget to convert them using hprof-conv).
Here’s how you can compare two heap dumps in MAT (it’s a little complicated):
- Open the first HPROF file (using File > Open Heap Dump).
- Open the Histogram view.
- In the Navigation History view (use Window > Navigation History if it’s not visible), right click on histogram and select Add to Compare Basket.
- Open the second HPROF file and repeat steps 2 and 3.
- Switch to the Compare Basket view, and click Compare the Results (the red “!” icon in the top right corner of the view).
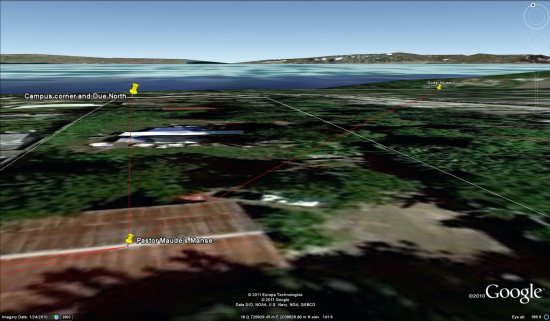
 . Buildings are marked with yellow push pins. Radio links are marked with red paths.