Disasters and maps

7 February 2011 marked the second anniversary of the worst bushfire tragedy in Australian history – 173 people died and 414 were injured as the result of infernos raging around the State of Victoria. The Black Saturday Bushfire was a very traumatic event for many Australians, those directly affected by the fires but also those thousands who got emotionally and personally involved in post event forensic studies, clean up, counselling, rebuilding, Royal Commission and general assistance through voluntary work or collection of donations. The whole nation felt the pain and helplessness in the wake of such an enormous tragedy.

After a period of a relative calm over the last two years Australia has been struck again by several major natural disasters, such as flush floods in Queensland and Victoria, tropical cyclone Yasi, or bushfires in Western Australia. Events like these bring online crowds of people: those caught inadvertently in the incidents, or those concerned about safety of their family members and friends, but above all, “curious onlookers” from around the world who just would like to know what is happening. All those people are looking for basic information, such as maps of places to identify where “these things” reported in commercial and social media are happening, as well as anything that relates to progress of the event, likely scenarios it may evolve into and the impact on people, infrastructure and the surrounding environment.

In the first instance they turn to official sites run by State authorities – those that issue the alerts and warnings – and of course the Australian Bureau of Meteorology. When they can’t find what they are looking for, or the information is not in the format that is meaningful, they turn to online search engines seeking more details about the event. It is therefore not a coincidence that during the times of natural disasters the traffic to sites providing information on maps goes through the roof. A question comes to mind if there really is enough tools in the public domain to keep general public fully informed. Has anything changed since Victorian bushfires of 2009?

In an ideal world, all the relevant information would be provided by the authorities, along with alerts, warnings, evacuation orders, road closures and detour routes, situation briefs etc. And through all possible channels: online, stationary and mobile phones, radio and TV, and in all formats: text, audio and video broadcasts and online streaming, printed as well as static and interactive maps, and above all, web services for republishing the information through media and social channels. But that is still only a distant dream. The reality is that information is very fragmented, differs in formats and content from State to State and ultimately in reliability, accuracy and timeliness.

So, what information is actually available, in spatial format, to an average person interested in a particular event? Let’s start with bushfire related information as there is quite a few resources available…

Part 1: Mapping Bushfires

Detection of fire hotspots from satellites has been around for quite a while and Australia has two systems delivering such information that pre-dates Victorian bushfires of 2009: Geoscience Australia’s Sentinel and Landgate’s FireWatch. Both are using data obtained from the NASA Earth Observation Satellites Terra and Aqua which pass over Australia up to three times a day (although a revisit of the same area is only two times a day). Although data has some limitations, like timeliness due 
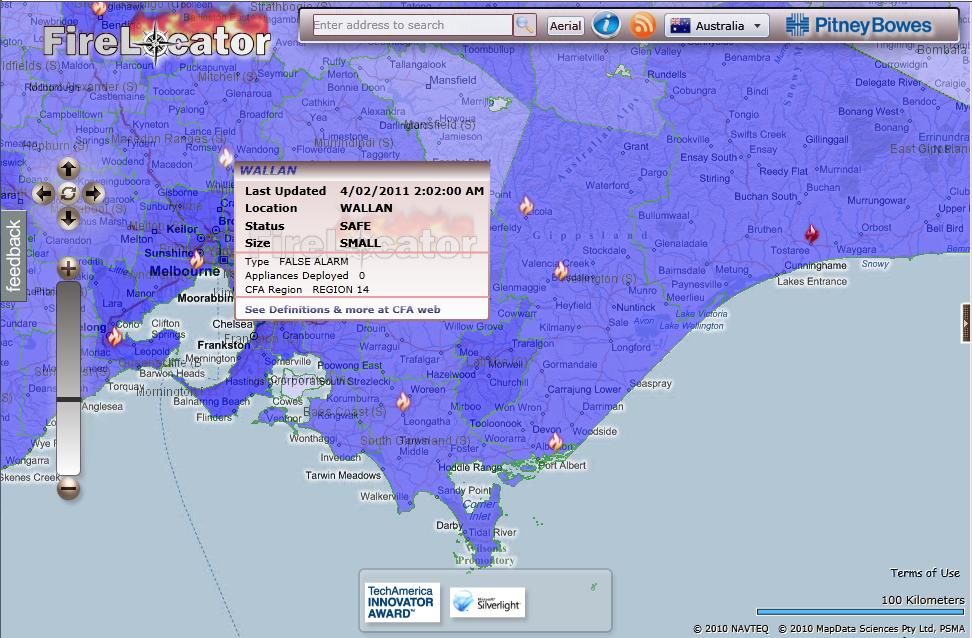
to infrequent revisit cycle or inability to detect hotspots through thick smoke and clouds, these applications provide excellent location reference for larger fire outbreaks throughout Australia. Geoscience Australia publishes the data in KML, WFS and WMS formats. I use those in my Hazard Monitor Bushfire Incidents map to publish an alternative view of the information. FireLocator from PitneyBowes provides yet another version of the same data in Silverlight format and with Bing Map in the background.

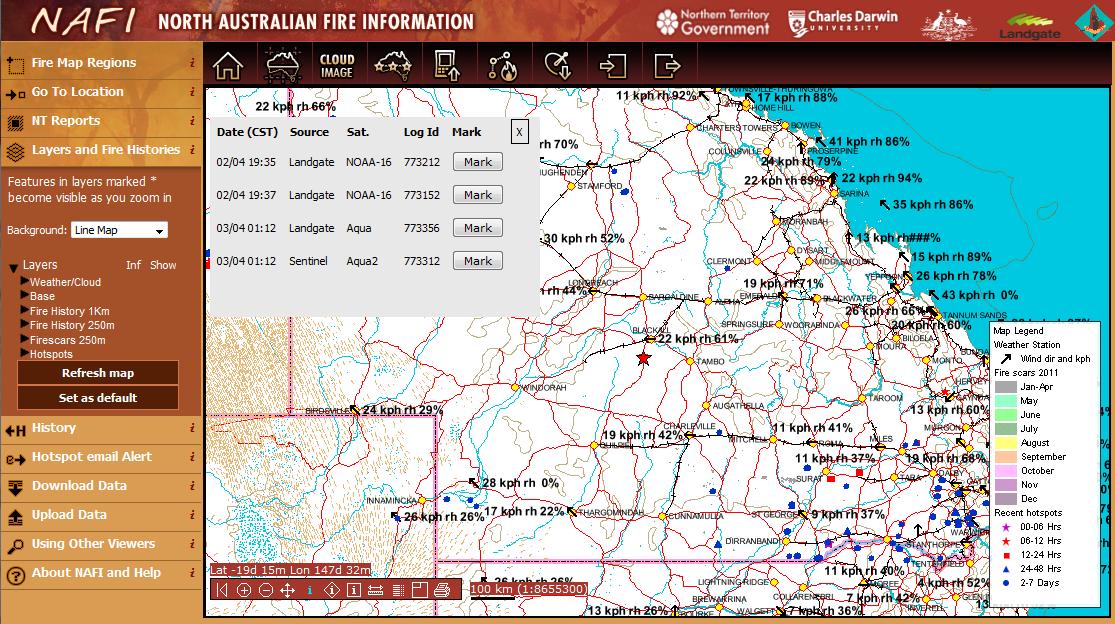
North Australia Fire Information is an application dedicated to monitoring fires in the northern part of Australia. In addition to satellite detected fire hotspots it also includes information on fire scars from past bushfires. Some of the information available on this site can be accessed in KML and WMS formats.

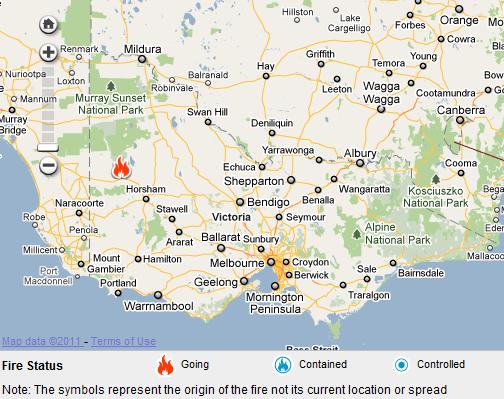
State authorities responsible for emergency alerts and response to natural disasters are publishing on their respective websites summaries of information on the latest incidents. Victorian Country Fire Authority (CFA) publishes a summary of incidents in a tabular format and on a Google Map. The information is also available as RSS feeds (locations are not georeferenced, hence cannot be directly imported into maps).

In NSW Rural Fire Service (RFS) publishes its version of summary of incidents – as a list and a map. Georeferenced RSS feed is also provided.

Both Bushfire Incidents map and FireLocator (developed in late 2009) are using the above feeds to display information about the latest incidents on the maps. During the peak of Victorian bushfires Google released its own application that mapped these feeds and showed satellite imagery of smoke and cloud cover.

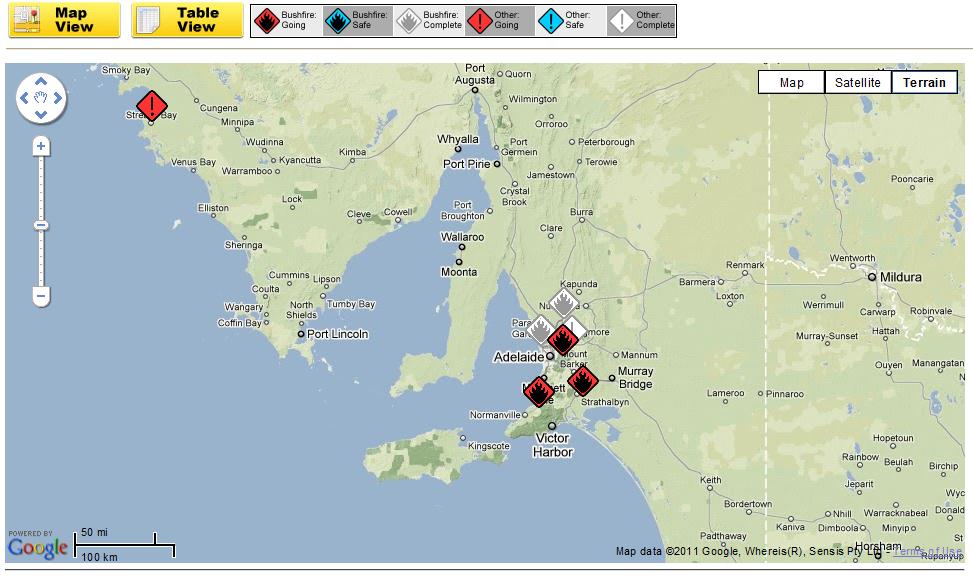
Tasmania Fire Service (TFS) is another agency that publishes fire incidents information and a map as well as distributes the information via RSS (non-georeferenced) and KML. And South Australian Country Fire Service (CFS) publishes map and incidents in a similar fashion to already mentioned States (their RSS feed is also not georeferenced).


There are no interactive maps with the latest incidents for Queensland and Western Australia and those states do not publish RSS feeds in the format that could be easily reused for displaying the information in third party mapping applications.

The most recent additions to the list of online bushfire related information sources are BushfireConnect and everymap.com.au. Built with Ushahidi, these online mapping applications aim to publish information supplied by the public located in the affected areas, either by lodging reports online, or via SMS or Twitter (ie. crowd sourcing). They also republish RSS alerts from State authorities. Not the easiest and the most intuitive tools to use but these initiatives are attempting to engage a wider community in reporting of incidents so, deserving all the support.

At the time of major disasters media and private individuals create maps and various applications to share the information about a particular event. Examples include a Black Saturday feature created by ABC that allows users to explore timeline of events on an interactive map, or Google’s MyMap version created by a private individual as a static record of events (presented here on aus-emaps.com shareable map).


Android: Moving accessibility forward

For the last 8 years we at Code Factory have been making software that helps the blind and the visually impaired access their mobile phones. We’ve created this software for several different platforms. Last year we decided it was time to start doing something for the Android platform, due to its growing popularity and variety of devices.

From our past experience, developing a screen reader for a new platform required a lot of work, hacks, and investigation. Almost none of the previous platforms we supported implemented any sort of Accessibility API that we could use. Android, we thought, would be no exception to this rule. We were very wrong.

Starting at version 1.6, the Android operating system comes with a built-in Accessibility API that makes our application a lot easier to develop. All you do is create a service, which implements the AccessibilityService interface, declare it in your manifest and voilà! The system will start sending events, such as button presses, list navigation, focus changes, etc. to your service. You then convert this information to voice using a Text-to-Speech engine, and you have a screen reader.

The Accessibility API is not yet as complete as what you can find on a desktop PC, but it’s good enough to provide the users with basic user interface navigation, and we have no doubt that, as the Android platform evolves, so will the built-in Accessibility API.

We also wanted our application to go beyond a screen reader and provide an intuitive, easy-to-use UI that allowed the blind and visually impaired access to most of the phone’s functionality, such as messaging, web browsing, contact management, and so on.

We were pleased to see that we could do this Android. The existing set of UI controls, such as buttons and lists, can be overridden in order to provide custom functionality, such as speaking the text of the control. This made it possible for us to keep the user interface of our application consistent with Android, while at the same time providing the speech feedback that our users require.

By intercepting touch events within our application and using the gesture detectors that Android provides to developers, we were also able to make the touch screen accessible to our users, so they can use gestures like swipes to move through items of lists, or double-taps to activate items.

We really like how much we can accomplish with Android with so little code. Want to let a blind person create an SMS or email using voice? Simply use the SpeechRecognizer class. Want blind users who are walking on the street to know their exact location? Just use the LocationManager and Geocoder classes to give their exact street name and number.

Android lets us do a lot in a very efficient way. It wraps a whole bunch of cool technology into well-defined classes and interfaces. And if at any given time you need to know how something works behind the scenes, you just take a look at the source code, which is freely available to everyone.

The DO’s and DON’Ts of Google Summer of Code: Student Edition

As Google Summer of Code mentoring organization administrators, we are the people who ensure Google Summer of Code runs smoothly within our organizations. Over the past 6 years, contributors to our four open-source projects (Gentoo, KDE, XMPP, and X.Org) have read more than 1,000 student applications and mentored hundreds of successful, and unsuccessful, students.

Based on our experience with Google Summer of Code, we’ve built cultural and community practices that strongly favor successful student projects, integration of code, and conversion of students to long-term contributors. We’ve also seen a lot of things go wrong—repeatedly. We’d like to share these tips and antipatterns with you to raise awareness and help students avoid the same mistakes when taking part in the program. For even more advice, check out the student guide.

DO DON’T
Be on your best behavior. Clear, respectful communication is just as important to success today as it was 100 years ago. When you write email or chat on IRC, use complete sentences without any SMS abbreviations (but acronyms are allowed, especially on IRC). If you are unsure about your English skills, there are tools available to help you, such as spell checkers and grammar checkers. On a related note, people want to work with others whose company they enjoy. Be friendly and polite; it’s hard to be too much of either. Make a bad first impression: SMS speech, extremely poor English, rudeness/hostility, etc. These fall into two major categories: failure to communicate and inability to get along with other people. Poor first impressions can seriously damage your chances because both of these problems derail collaboration, which is vital to a successful project. Entirely adequate programmers fail Google Summer of Code because of failures to communicate.
Read all the documentation, so you submit a useful application. Your application should provide all the detail necessary to convince people that you can accomplish your project, and you’re the best person to do it. That means showing you have experience, proving you’ve done research, and providing a concrete plan. Submit a useless application. Many varieties of entirely unhelpful applications exist: the one-sentence wonder, the proposal pasted directly from the ideas page, the free-form text that ignores an application template, and the application submitted to the wrong organization.
Be transparent about other commitments. When organizations know about your commitments in advance, you can work with them to develop a plan that deals with your schedule. For example, you could begin your work at a slower pace during the community-bonding period. If another commitment comes as a surprise to your mentor during the summer, you might not be able to compensate for it. Disappear. If your mentor thinks you have disappeared during the summer, this tends to quickly result in failure. The most common problem is failing to mention long family vacations or class schedules in the summer. Disappearing includes taking the initial payment and running with it; if you’re tempted to do this, you might want to consider the damage to your reputation, or the excited students missing out on a slot so you can waste yours.
Make Google Summer of Code your top priority. During the 12 weeks of coding time, nothing should take precedence over your project, and you should have no major distractions. If you have another job, decide whether you prefer it or Google Summer of Code and pick one. Make your choice early enough to leave your slot open for another student. Hold another major commitment. For example, if you have a second job without telling anyone until the start of coding, it’s a major problem. Anything outside of the program that takes more than 5–6 hours a week causes problems; this includes classes that extend through the coding period. Two simultaneous full-time jobs is unrealistic.
Be realistic about your skills. Think through your past experience. If you have trouble fairly assessing your abilities, just write about your coding experience instead and your org can make its own judgment. Additionally, some orgs will gladly provide small sample tasks that you can perform to judge how easy you’ll find the summer-long projects. Over- or under-rate your abilities. As long as you have some programming skill and are able to communicate well (see above), you should be suitable for some projects. This doesn’t mean that every student is equal if they meet these requirements. Overselling yourself leads to disappointment; underselling yourself the same.
Commit and publicize your code frequently. Discussing your code early and often, with your mentor and the broader community, is vital to the success of your project. Make small, easily recoverable mistakes early rather than huge ones when it’s too late to do anything about them. Make last-minute (or later) code drops. Showing your code in public can be scary. Some students wait until the very last minute to show their code to their mentor and other contributors to the project. Do this only if you have a burning desire to fail, because it’s too late for any review to fix holes in your code.
Submit code that’s ready to integrate. The best thing about an open source project is seeing your own code shipped in a release and used by thousands or even millions of people. This requires some effort on your part, however. You should closely track how other developers change related code so yours can be easily added to the latest development branch as soon as—or even before—the summer ends. During the last few weeks, make sure your code is polished enough so it’s ready to add to the project’s main repository; this may require documentation or test suites. Don’t let your summer’s work go to waste. Finish the summer with code that’s “almost ready” but will take forever to ship. Many students leave their project in a state that is very close to being shippable but isn’t quite there yet. Since the mentor tends to be too busy to finish it, these projects ship very slowly, if ever. It’s your project—you need to make it see the light of the day. This can require you to keep driving the project, and not trust that the mentor will keep on top of it once the summer is over.
Complete your project design before writing a line of code. Work with your mentor to define the architecture of your project before you begin coding. You don’t need to go as far as prototyping every function, but you should have a vision of how it will all eventually work at a reasonable level of detail, such as important data structures and algorithms. Determine the libraries and tools you’ll use, and be able to justify your choices. Start coding before finalizing design. You can hit major dead-ends when you haven’t yet finished working with your mentor to design the project, but you choose to begin coding anyway. For example, if you start coding for a NoSQL backend but your mentor and the rest of the community determine that a standard SQL database should be used, this can necessitate rewriting a lot of code for no reason. Changes on the architectural level can be even more disruptive to any code you’ve written prematurely.
Use your resources wisely. Help is just an email away. Don’t be afraid to ask questions when you get stuck; we don’t expect you to be an expert, and we’re happy to answer your questions. On the other hand, remember to do some basic research on your own before asking, such as searching the project documentation, the source code, and Google. Refuse to ask for help. Throughout the whole program, you will encounter problems that need to be solved—some of them small and some of them large. You can waste days stuck on a problem that can be solved in an hour by talking to other team members.
Remember that you’re part of a community. Very little in Google Summer of Code is 100% independent work. You may propose your project design, but you’ll develop it with the help of your mentor and community. You’ll write the code, but others will review it, and you’ll often build upon their previous work. Unlike school, where a grade could be your first feedback, in Google Summer of Code your grade (pass/fail) is your last feedback. By designing and developing your project in collaboration with your entire open-source community, you’ll get people excited about using your work and ready to integrate it. You’ll also give yourself the best chance of passing the program by receiving thorough reviews from your community and responding to them. Many students choose to continue contributing after the summer ends because of their interactions with the community. Consider it a solo project, like it often is in college. It’s not; you write the code, but your mentor is there to help with plans, designs etc. Your mentor is not like a lecturer or course leader at a college or university. There’s a whole community of people working on the project together, and you should interact with them as a whole. Don’t feel like you’re working for your mentor, you’re working for the community and your mentor is helping guide you, they are not your only point of contact. This has other implications too—other people will be working on the code base while you are, and you will see improvements happening around you as you code. You may need to keep your development branch up to date to take advantage of these.

Making Google Summer of Code the best possible program requires a commitment to excellence from participants at every level. In addition to committing to the program, you must also be thoroughly prepared.

In this post we’ve provided suggestions for students, and in later posts in this series we’ll cover mentors and admins. Whatever role you would like to play in Google Summer of Code or a similar program, read everything you can find so you know what you’re getting into. Good luck, and have fun in your endeavors.