The Pictarine: Building a mashup in the cloud with Google App Engine


Pictarine is a photo management web application, launched in 2010, that allows people to easily manage and share all of their photos from Flickr, Picasa, Facebook, Twitter and other sites. Pictarine developers Guillaume Martin and Maxime Rafalimanana have contributed the following post discussing their experiences using Google App Engine and Google Web Toolkit.

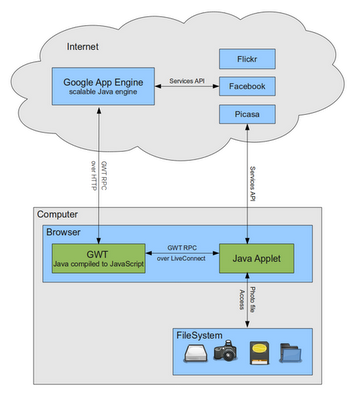
From the start, we used Google technologies in developing Pictarine and we wanted to share our experience with them so far. In this post, we will shed some light on the weaknesses and strengths we found in Google Web Toolkit (GWT) and Google App Engine. We will also discuss how we leveraged GWT to build a new technology that allows Pictarine to seamlessly display photos from the computer directly into the browser. The following diagram is an overview of how our application works.

Building a mashup in the cloud with Google App Engine

The Pictarine team is made of a web designer and two developers who previously worked mainly with Java based enterprise technologies and had a little experience with web technologies. When we started the project in early 2009, we were quite open on learning new languages like Python or Ruby, but when App Engine announced that Java would be supported, we were really excited to give Google App Engine a try.

The first few months, learning about the App Engine environment was quite easy and dare I say fun. Testing our code on Google’s servers from Eclipse IDE was only one click away. So we built our first prototype fast and we quickly decided to adopt App Engine. Then we started to build the core of our application: the engine that uses the API from Flickr, Picasa, Facebook to fetch the users’ photos. This is where we hit the first limitations of App Engine. Most users have a lot of photos on these services and retrieving them can take some time. But App Engine has strict limits on how long a request should last: an outgoing HTTP request cannot last more than 10 seconds and cannot process a request for more than 30 seconds. So while building our architecture we found ourselves writing approximately one third of our code dealing with these limitations: paginating our requests, creating background tasks to store data in small batches, etc.

In early 2010, when we launched our alpha version, everything went smoothly. We had some good press coverage and App Engine met our expectations in handling our first users. During 2010, we worked on implementing new features requested by our users, and during this period of time we were really impressed by the way App Engine evolved. Many of the limitations were lifted and great new features were added. We are now able to use Task Queues for requests that last up to 10 minutes, which we fully use to sync our users’ photos and albums. One of the features we like the most is the Channel API, a push notification system that allows us to instantly show a photo in every connected browser as soon as it is uploaded.
App Engine is still not perfect but has greatly improved and when we see its roadmap, we are quite confident it will continue to improve.
The Email Settings and the Profiles APIs

Updating all signatures to make them adopt the same visually appealing style sounds like a perfect task to automate, however we’d still need to collect various pieces of information for each user, such as phone number or job title, and the Email Settings API has no knowledge of them.

The Google Apps Profiles API provides exactly what we are looking for and in the rest of this article we’ll see how to have the two APIs interact to reach our goal.

Let’s assume we want our signatures to look like the one in the screenshot below, with a bold name, italic job title and clickable link for the email address. Of course you can edit the style as you like with a bit of HTML skills:

Python is the programming language of our choice for this small script and we use the Google Data APIs Python Client Library to send requests to the Email Settings and Profiles APIs.

The first few lines of the script import the required libraries and set the values of the credentials that will be used to authorize our requests. You can find the consumer key and secret for your domain in your Control Panel, under Advanced Tools – Manage OAuth domain key. Remember to replace the dummy values in the script below with yours before running it:

import gdata.apps.emailsettings.client

import gdata.contacts.client

# replace these values with yours

CONSUMER_KEY = 'mydomain.com'

CONSUMER_SECRET = 'my_consumer_secret'

company_name = 'ACME Inc.'

admin_username = 'admin'

We’ll use 2-legged OAuth as the authorization mechanism and set the administrator’s email address as the value of the xoauth_requestor_id parameter, identifying the user we are sending the requests on behalf of.

The consumer key and secret plus the requestor id are the only parameters needed to create an OAuth token that we can pass to the Email Settings and Profiles clients:

# request a 2-legged OAuth token

requestor_id = admin_username + '@' + CONSUMER_KEY

two_legged_oauth_token = gdata.gauth.TwoLeggedOAuthHmacToken(

  CONSUMER_KEY, CONSUMER_SECRET, requestor_id)

# Email Settings API client

email_settings_client = gdata.apps.emailsettings.client.EmailSettingsClient(

  domain=CONSUMER_KEY)

email_settings_client.auth_token = two_legged_oauth_token

# User Profiles API client

profiles_client = gdata.contacts.client.ContactsClient(

  domain=CONSUMER_KEY)

profiles_client.auth_token = two_legged_oauth_token

Let’s define a class that generates the signatures for our users on the basis of a set of optional attributes (occupation, phone number, email, etc). This is the class you need to edit or extend if you want to change the style of the signatures for your domain. In the example below, the HtmlSignature() method simply concatenates some strings with hard-coded styling, but you may want to use a more elaborate templating system instead:

# helper class used to build signatures

class SignatureBuilder(object):

def HtmlSignature(self):

  signature = '%s' % self.name

  if self.occupation:

    signature += '%s' % self.occupation

  if self.company:

    signature += '%s' % self.company

  signature += 'Email: %s - Phone: %s' % (

      self.email, self.email, self.phone_number)

  return signature

def __init__(

    self, name, company='', occupation='', email='', phone_number=''):

  self.name = name

  self.company = company

  self.occupation = occupation

  self.email = email

  self.phone_number = phone_number

Let’s use profiles_client to retrieve a feed containing all profiles for the domain. Each call to GetProfilesFeed() only returns a page of users, so we need to follow the next links until we get all users:

# get all user profiles for the domain

profiles = []

feed_uri = profiles_client.GetFeedUri('profiles')

while feed_uri:

  feed = profiles_client.GetProfilesFeed(uri=feed_uri)

  profiles.extend(feed.entry)

  feed_uri = feed.FindNextLink()

At this point profiles will contain the list of users we want to process. For each of them, we instantiate a SignatureBuilder object and set its properties name, company, occupation, email and phone_number with the data for that user.

A call to the HtmlSignature() method of the SignatureBuilder instance will provide us with a properly formatted HTML-encoded signature.

# extract relevant pieces of data for each profile

for entry in profiles:

builder = SignatureBuilder(entry.name.full_name.text)

builder.company = company_name

if entry.occupation:

  builder.occupation = entry.occupation.text

for email in entry.email:

  if email.primary and email.primary == 'true':

    builder.email = email.address

for number in entry.phone_number:

  if number.primary and number.primary == 'true':

    builder.phone_number = number.text

# build the signature

signature = builder.HtmlSignature()

The Email Settings API client exposes a method called UpdateSignature to set the signature for a target user. This methods accepts two parameters, the username of the user to be affected and a string containing the signature. We just built the latter, so we only need the retrieve the unique username that identifies each user and that can be easily inferred from the entry identifier returned by the Profiles API, as described in the code and the comment below.

It is worth mentioning that you can also retrieve usernames with the Provisioning API, but for the sake of simplicity we’ll rely on this small hack:

# entry.id has the following structure:

# http://www.google.com/m8/feeds/profiles/domain/DOMAIN_NAME/full/USERNAME

# the username is the string that follows the last /

username = entry.id.text[entry.id.text.rfind('/')+1:]

It’s time to send the requests to the Email Settings API and update the signature:

# set the user's signature using the Email Settings API

email_settings_client.UpdateSignature(username=username, signature=signature)

For further details on what can be accomplished with the Google Apps APIs, please check our documentation .

Custom Fonts in Open Street Map

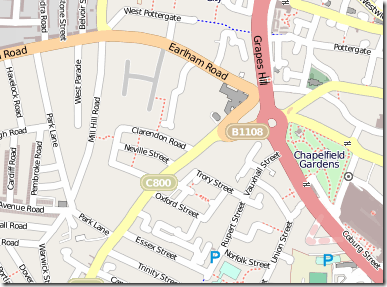
The default font family used for rendering text labels on maps created by Mapnik (and the one shipped with it) is Deja Vu. Deja Vu Sans Book is a pretty nice font, and can be seen, for example, in all the labels used on Open Street Map:

image

So what if you want to render text onto a custom tile overlay using a different font?

  • Perhaps you’d like to create a custom tile layer using image labels to match Google Maps?
  • Or how about going for a Bing Maps feel with image labels?

To do so, first you need to register the location of the directory containing the fonts you want to use. For example, to make all the installed Windows fonts available to Mapnik, add the following to the top of your python render script:

mapnik.register_fonts('c:/windows/fonts/')

Mapnik needs to reference these fonts by their font name (not by filename, for example); To find out the correct name to use for each font, once you’ve registered your custom fonts directory you can call the following:

for face in mapnik.FontEngine.face_names(): print face

On a fairly vanilla installation of Window 7, this gave me a list of available fonts as follows:

  • Aharoni Bold
  • Andalus Regular
  • Andy Bold
  • Angsana New Bold
  • Angsana New Bold Italic
  • Angsana New Italic
  • Angsana New Regular
  • AngsanaUPC Bold
  • AngsanaUPC Bold Italic
  • AngsanaUPC Italic
  • AngsanaUPC Regular
  • Aparajita Bold
  • Aparajita Bold Italic
  • Aparajita Italic
  • Aparajita Regular
  • Arabic Typesetting Regular
  • Arial Black
  • Arial Bold
  • Arial Bold Italic
  • Arial Italic
  • Arial Regular
  • Browallia New Bold
  • Browallia New Bold Italic
  • Browallia New Italic
  • Browallia New Regular
  • BrowalliaUPC Bold
  • BrowalliaUPC Bold Italic
  • BrowalliaUPC Italic
  • BrowalliaUPC Regular
  • Buxton Sketch Regular
  • Calibri Bold
  • Calibri Bold Italic
  • Calibri Italic
  • Calibri Regular
  • Candara Bold
  • Candara Bold Italic
  • Candara Italic
  • Candara Regular
  • Comic Sans MS Bold
  • Comic Sans MS Regular
  • Consolas Bold
  • Consolas Bold Italic
  • Consolas Italic
  • Consolas Regular
  • Constantia Bold
  • Constantia Bold Italic
  • Constantia Italic
  • Constantia Regular
  • Corbel Bold
  • Corbel Bold Italic
  • Corbel Italic
  • Corbel Regular
  • Cordia New Bold
  • Cordia New Bold Italic
  • Cordia New Italic
  • Cordia New Regular
  • CordiaUPC Bold
  • CordiaUPC Bold Italic
  • CordiaUPC Italic
  • CordiaUPC Regular
  • Courier New Bold
  • Courier New Bold Italic
  • Courier New Italic
  • Courier New Regular
  • DFKai-SB Regular
  • DRMS T1 Regular
  • DaunPenh Regular
  • David Bold
  • David Regular
  • DengXian Bold
  • DengXian Regular
  • DilleniaUPC Bold
  • DilleniaUPC Bold Italic
  • DilleniaUPC Italic
  • DilleniaUPC Regular
  • DokChampa Regular
  • Ebrima Bold
  • Ebrima Regular
  • Estrangelo Edessa Regular
  • EucrosiaUPC Bold
  • EucrosiaUPC Bold Italic
  • EucrosiaUPC Italic
  • EucrosiaUPC Regular
  • Euphemia Regular
  • FangSong Regular
  • FrankRuehl Regular
  • Franklin Gothic Medium Italic
  • Franklin Gothic Medium Regular
  • FreesiaUPC Bold
  • FreesiaUPC Bold Italic
  • FreesiaUPC Italic
  • FreesiaUPC Regular
  • Gabriola Regular
  • Gautami Bold
  • Gautami Regular
  • Georgia Bold
  • Georgia Bold Italic
  • Georgia Italic
  • Georgia Regular
  • Gisha Bold
  • Gisha Regular
  • Impact Regular
  • IrisUPC Bold
  • IrisUPC Bold Italic
  • IrisUPC Italic
  • IrisUPC Regular
  • Iskoola Pota Bold
  • Iskoola Pota Regular
  • JasmineUPC Bold
  • JasmineUPC Bold Italic
  • JasmineUPC Italic
  • JasmineUPC Regular
  • Jing Jing Regular
  • KaiTi Regular
  • Kalinga Bold
  • Kalinga Regular
  • Kartika Bold
  • Kartika Regular
  • Khmer UI Bold
  • Khmer UI Regular
  • KodchiangUPC Bold
  • KodchiangUPC Bold Italic
  • KodchiangUPC Italic
  • KodchiangUPC Regular
  • Kokila Bold
  • Kokila Bold Italic
  • Kokila Italic
  • Kokila Regular
  • Kootenay Regular
  • Lao UI Bold
  • Lao UI Regular
  • Latha Bold
  • Latha Regular
  • Leelawadee Bold
  • Leelawadee Regular
  • Levenim MT Bold
  • Levenim MT Regular
  • LilyUPC Bold
  • LilyUPC Bold Italic
  • LilyUPC Italic
  • LilyUPC Regular
  • Lindsey Regular
  • Lucida Console Regular
  • Lucida Sans Unicode Regular
  • MV Boli Regular
  • Malgun Gothic Bold
  • Malgun Gothic Regular
  • Mangal Bold
  • Mangal Regular
  • Marlett Regular
  • Microsoft Himalaya Regular
  • Microsoft JhengHei Bold
  • Microsoft JhengHei Regular
  • Microsoft MHei Bold
  • Microsoft MHei Regular
  • Microsoft NeoGothic Bold
  • Microsoft NeoGothic Regular
  • Microsoft New Tai Lue Bold
  • Microsoft New Tai Lue Regular
  • Microsoft PhagsPa Bold
  • Microsoft PhagsPa Regular
  • Microsoft Sans Serif Regular
  • Microsoft Tai Le Bold
  • Microsoft Tai Le Regular
  • Microsoft Uighur Regular
  • Microsoft YaHei Bold
  • Microsoft YaHei Regular
  • Microsoft Yi Baiti Regular
  • Miramonte Bold
  • Miramonte Regular
  • Miriam Fixed Regular
  • Miriam Regular
  • Moire Bold
  • Moire ExtraBold
  • Moire Light
  • Moire Regular
  • Mongolian Baiti Regular
  • MoolBoran Regular
  • Motorwerk Regular
  • Narkisim Regular
  • Nina Bold
  • Nina Regular
  • Nyala Regular
  • Palatino Linotype Bold
  • Palatino Linotype Bold Italic
  • Palatino Linotype Italic
  • Palatino Linotype Regular
  • Pericles Light
  • Pericles Regular
  • Pescadero Bold
  • Pescadero Regular
  • Plantagenet Cherokee Regular
  • Raavi Bold
  • Raavi Regular
  • Rod Regular
  • Sakkal Majalla Bold
  • Sakkal Majalla Regular
  • Segoe Condensed Bold
  • Segoe Condensed Regular
  • Segoe Marker Regular
  • Segoe Print Bold
  • Segoe Print Regular
  • Segoe Script Bold
  • Segoe Script Regular
  • Segoe UI Bold
  • Segoe UI Bold Italic
  • Segoe UI Italic
  • Segoe UI Light
  • Segoe UI Regular
  • Segoe UI Semibold
  • Segoe UI Symbol Regular
  • Segoe WP Black
  • Segoe WP Bold
  • Segoe WP Light
  • Segoe WP Regular
  • Segoe WP SemiLight
  • Segoe WP Semibold
  • Shonar Bangla Bold
  • Shonar Bangla Regular
  • Shruti Bold
  • Shruti Regular
  • SimHei Regular
  • SimSun-ExtB Regular
  • Simplified Arabic Bold
  • Simplified Arabic Fixed Regular
  • Simplified Arabic Regular
  • SketchFlow Print Regular
  • Sylfaen Regular
  • Symbol Regular
  • Tahoma Bold
  • Tahoma Regular
  • Times New Roman Bold
  • Times New Roman Bold Italic
  • Times New Roman Italic
  • Times New Roman Regular
  • Traditional Arabic Bold
  • Traditional Arabic Regular
  • Transport Medium
  • Trebuchet MS Bold
  • Trebuchet MS Bold Italic
  • Trebuchet MS Italic
  • Trebuchet MS Regular
  • Tunga Bold
  • Tunga Regular
  • Utsaah Bold
  • Utsaah Bold Italic
  • Utsaah Italic
  • Utsaah Regular
  • Vani Bold
  • Vani Regular
  • Verdana Bold
  • Verdana Bold Italic
  • Verdana Italic
  • Verdana Regular
  • Vijaya Bold
  • Vijaya Regular
  • Vrinda Bold
  • Vrinda Regular
  • Webdings Regular
  • Wingdings Regular
  • Yu Gothic Bold
  • Yu Gothic Regular

To use one of these fonts, set the TextSymbolizer face_name attribute in the style applied to your layer to the name of whatever font you want.

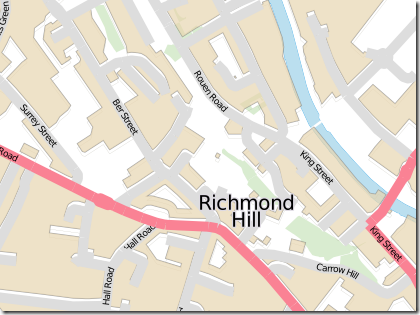
For example, here’s a style with default Deja Vu Sans Book text labels:


and this is the map it creates:

image

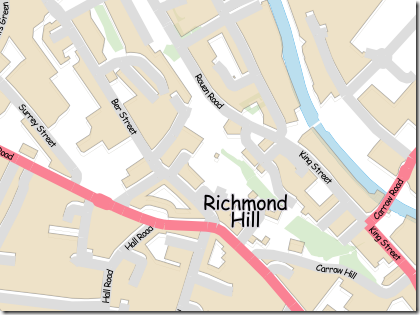
And here’s the same map rendered with, oh I don’t know, say Comic Sans MS Regular style (don’t ever, ever do this! Maybe unless you’re creating a map of how to get to a children’s party…)

which leads to this:

image