Using ESRI Base Map Tile Layers in Bing Maps

I received an email this morning from the ESRI announcements mailing list stating that “ArcGIS Online basemaps published and hosted by Esri are now freely available to all users regardless of commercial, noncommercial, internal, or external use.”.

This is a nice surprise – it’s always useful to have a greater choice of tile styles on which to build your map, and ESRI have a nice selection of alternative map types. So, I decided to test them out by creating some ESRI tile layers in the Bing Maps Silverlight control.

The basic method of creating a new tilelayer using the Bing Maps Silverlight control is to define a new custom class in your .xaml.cs code file that inherits from the Microsoft.Maps.MapControl.TileSource class. You set the base of this class to represent the URL template of the tiles that will be used to build this layer. Then, by overriding the GetUri() method of this class, you insert the parameters corresponding to the x, y, and zoomlevel of each requested tile image from this tilelayer. For example, the following code demonstrates how to construct a class based on the ESRI topo world map tiles:

public class ESRITileSource : Microsoft.Maps.MapControl.TileSource
{
 public ESRITileSource() : base("http://services.arcgisonline.com/ArcGIS/rest/services/World_Topo_Map/MapServer/tile/{0}/{1}/{2}")
 { }

public override Uri GetUri(int x, int y, int zoomLevel)
 {
 return new Uri(String.Format(this.UriFormat, zoomLevel, y, x));
 }
}

Then, in your .xaml file, hide the default Bing Maps base tiles by specifying the MercatorMode of the map, and create a new tilelayer based on the custom tilelayer class instead:

<m:Map x:Name=”Map1″ Grid.Row=”1″ Grid.Column=”1″ Center=”55,-2″ ZoomLevel=”6″ CredentialsProvider=”{StaticResource MyCredentials}” HorizontalAlignment=”Stretch” VerticalAlignment=”Stretch”>
<!– Do Not Display Bing Maps base layer –>
<m:Map.Mode>
<mcore:MercatorMode></mcore:MercatorMode>
</m:Map.Mode>
<!– Add ESRI Tile Layer –>
<m:Map.Children>
<m:MapTileLayer>
<m:MapTileLayer.TileSources>
<local:ESRITileSource></local:ESRITileSource>
</m:MapTileLayer.TileSources>
</m:MapTileLayer>
</m:Map.Children>
</m:Map>

<m:Map x:Name=”Map1″ Grid.Row=”1″ Grid.Column=”1″ Center=”55,-2″ ZoomLevel=”6″ CredentialsProvider=”{StaticResource MyCredentials}” HorizontalAlignment=”Stretch” VerticalAlignment=”Stretch”> <!– Do Not Display Bing Maps base layer –> <m:Map.Mode> <mcore:MercatorMode></mcore:MercatorMode> </m:Map.Mode> <!– Add ESRI Tile Layer –> <m:Map.Children> <m:MapTileLayer> <m:MapTileLayer.TileSources> <local:ESRITileSource></local:ESRITileSource>

 </m:MapTileLayer.TileSources> </m:MapTileLayer> </m:Map.Children></m:Map>

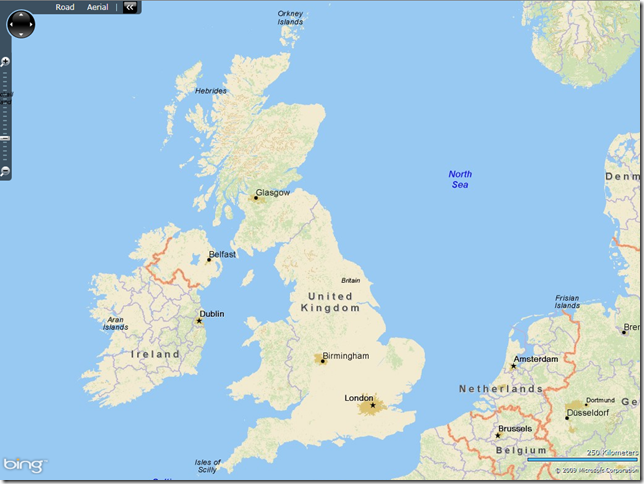
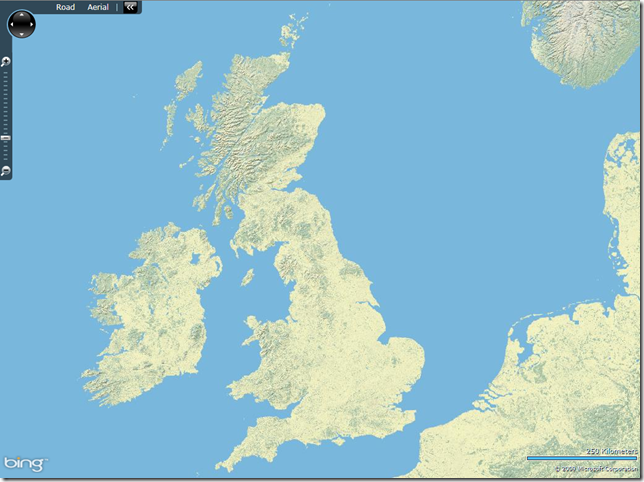
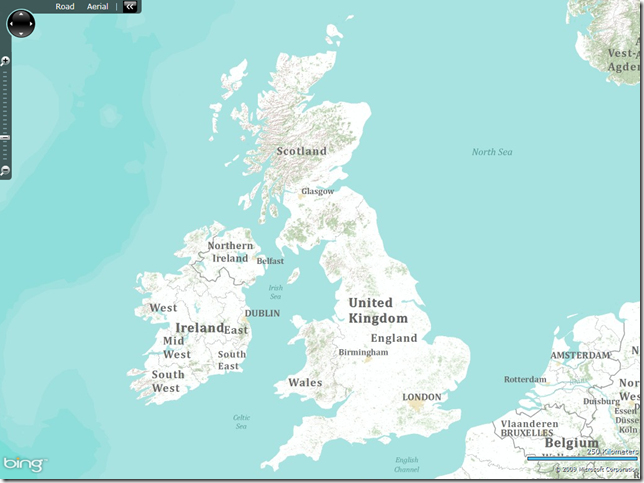
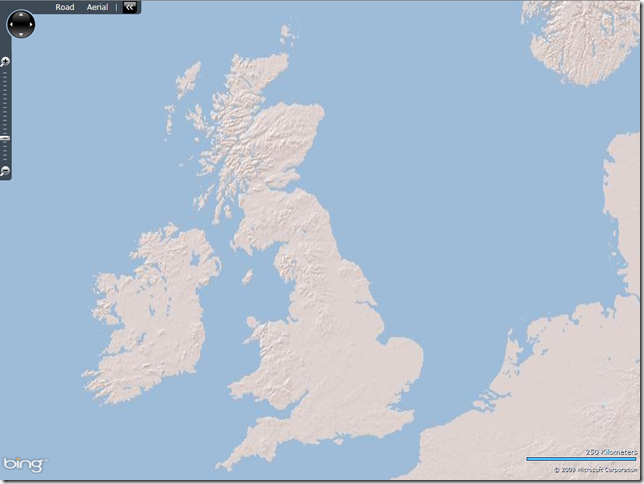
Using this method, I tried out a few of the different ESRI styles, as shown below:

World Topography

URL Template: http://services.arcgisonline.com/ArcGIS/rest/services/World_Topo_Map/MapServer/tile/{0}/{1}/{2}

image

World Shaded Relief

URL Template: http://services.arcgisonline.com/ArcGIS/rest/services/World_Shaded_Relief/MapServer/tile/{0}/{1}/{2}

image

DeLorme World Basemap

URL Template: http://server.arcgisonline.com/ArcGIS/rest/services/Specialty/DeLorme_World_Base_Map/MapServer/tile/{0}/{1}/{2}

image

World Physical Map

URL Template: http://services.arcgisonline.com/ArcGIS/rest/services/World_Physical_Map/MapServer/tile/{0}/{1}/{2}

image

There’s plenty more map styles, including demographic maps (US only), specialist maritime maps etc. – see http://www.esri.com/software/arcgis/arcgisonline/standard-maps.html for more details.
Google Earth: Four new cities added to Building Maker: Rome, New Orleans, Long Beach, Malibu

Last month Google added some new features to Building Maker and this month they’ve added some new cities. The new cities added are:

• Rome, Italy

• New Orleans, Louisiana

• Long Beach, California

• Malibu, California

NewOrleans.jpg

To try them for yourself, simply head over to the Building Maker site and get started!

If you’re not yet familiar with Building Maker, you can read this post on getting started with it, or watch the short video below.

Google Places Dashboard: QR Code MIA, Good riddance!

The printable QR Code that directed folks to your Places Page that Google offered up in the Places Dashboard went missing last week. A number of posters have turned up in the forums asking where it went, wondering how to print out the QR Code for their Places Page and lamenting its absence.  Google has not yet made a public announcement whether the feature has been pulled or is just missing as a result of another bug.

My response to the posters: GOOD RIDDANCE!

While the availability of the QR Code in the Places Page raised the visibility of the idea of the QR Code for millions of SMBs that otherwise would not have thought about them, Google’s self serving implementation was never one that was in the best interest of the business owner.

It is incredibly easy to create and print your own QR Code that can be used in a range of environments that better meet the needs of business. For example this site CreateQRcode.appspot.com uses Google’s QR code API to allow a user to embed any URL in the code and print at a range of different sizes. It’s as simple as deciding which web page should be referenced in which campaign and pasting the URL in. The QR Code graphic is then generated in a choice of different sizes.

QR Codes could be added to newspaper ads, yellow page ads, billboards, business cards, TV commercials and signage. They are a useful way to encourage online engagement from the offline world. One suggestion that I have been making of late to clients with heavy foot traffic is to use the code to drive mobile shoppers directly to the Google mobile rating/review entry screen so as to facilitate the process….. here is the “recipe:

Take Google’s incredibly onerous URL for your Places Page:

http://maps.google.com/maps/placeclient=safari&oe=UTF8&ie=UTF8&

q=blumenthals.com+olean+ny&fb=1&gl=us&hq=blumenthals.com+olean+ny

&hnear=blumenthals.com+olean+ny&cid=8612728639224254627&z=14

Shorten it to its minimum content:

http://google.com/maps/place?cid=8612728639224254627

Add the following snippet to the end of the URL to send the user directly to the review window:

&dtab=2&action=openratings&ct=write-review

This creates the following URL:

http://google.com/maps/place?cid=8612728639224254627&dtab=2&action=openratings&ct=write-review

Enter the above URL in the QR Code Generator, print and post near your exit with a request for a review. When scanned with any of the QR Code readers available on Android or the iPhone it will direct the users to Google’s Hotpot style, simplified mobile review environment:

While the above review solution still takes a user to your Google Places Page, it does so in a way that is useful to you and makes the customer’s life easier. Not only does it greatly facilitate the process of leaving a review in an engaging way, it does so while the experience is fresh for the consumer.

I would love to hear how your clients have used QR Codes and how well they worked.

Related posts:

  1. Google Maps and the QR Code – Why Use Google’s?
  2. Google Places Upgrades Dashboard Analytics – Is Google Adding a Reservation System?
  3. Google Places Review Bugs on the Mend